Release Notes & Changelog
New features, improvements, and updates to the Loandisk loan management system, in reverse-chronological order.
- 25 May 2026
-
New Features and Improvements
Major Features
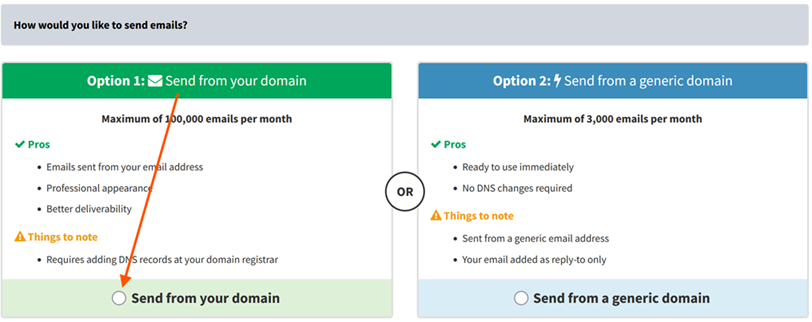
- Send Email from your Domain - NEW Option 1:
Previously, all system emails were sent using Option 2: Send from a generic domain - emails went out from a generic Loandisk address with your email set as the reply-to, capped at 3,000 emails per month. We have now added a new Option 1: Send from your domain, and we strongly recommend it for any organization that takes its customer communication seriously.
With Option 1, emails are sent directly from your own email address (e.g. info@yourcompany.com) with full SPF, DKIM, and DMARC authentication. Borrowers see your domain in their inbox - not a third-party one - so they are far more likely to open the email, less likely to mark it as spam, and replies route naturally back to you. The result is dramatically higher inbox-placement rates, which means repayment reminders are actually seen, receipts and statements are trusted as authentic, and collections improve. The monthly send limit jumps from 3,000 to 100,000 emails per month. The only requirement is a one-time setup of a few DNS records on your domain.
To enable, visit Admin → Email → Add Email Account (or edit an existing account) and select Option 1: Send from your domain. The system will then walk you through domain verification.
- Savings Accounts - Withholding Tax:
The system can now automatically charge withholding tax on every interest amount posted to a savings account - no more calculating tax line-by-line in a spreadsheet or trying to deduct it after the fact. The deducted tax flows straight into your accounting ledger as a separate withholding tax liability entry tied to the original interest posting, and shows up on the dedicated Savings Withholding Tax Report so you always know exactly how much tax has been withheld, by which product, in which period. When it is time to remit the withheld tax to the government, you use that report to file and pay.
You configure one or more withholding tax rules per savings product (for example, a 10% rate for resident individuals and 15% for non-residents), and the system applies the correct rate every time interest is credited: deducting at source, generating the withholding tax transaction, and posting both legs to the chart of accounts.
To configure, visit Admin → Savings → Savings Withholding Tax → Add Savings Withholding Tax.
- Investor Accounts - Withholding Tax:
The system can now automatically charge withholding tax on every interest amount posted to an investor account - exactly the same way it works for savings withholding tax, but for the investor side of the business. The deducted tax flows straight into your accounting ledger as a separate withholding tax liability entry tied to the original interest posting, and shows up on the dedicated Investor Withholding Tax Report so you always know exactly how much tax has been withheld, by which product, in which period. When it is time to remit the withheld tax to the government, you use that report to file and pay.
You configure one or more withholding tax rules per investor product (for example, a 10% rate for resident individuals and 15% for non-residents), and the system applies the correct rate every time interest is credited.
To configure, visit Admin → Investors → Investor Withholding Tax → Add Investor Withholding Tax.
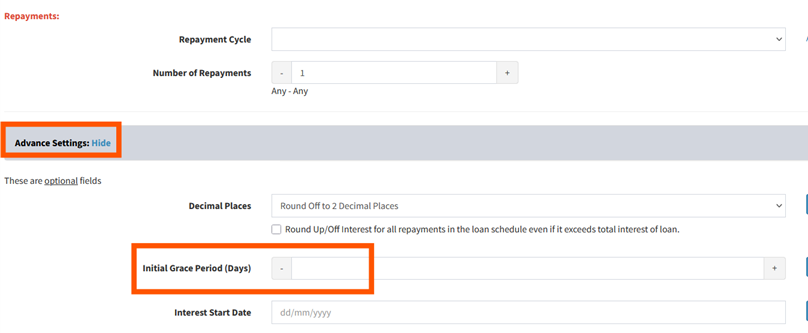
- Add Grace Period to Loans:
You can now configure a Grace Period on a loan, specifying a number of days at the start of the loan during which no late fees are charged and the loan is not flagged as in arrears. This is useful for accommodating borrowers who legitimately start repayments slightly later than the contractual schedule (e.g. waiting for their first salary after disbursement, completing a construction milestone, or recovering from a short-term setback), without penalizing them or distorting your arrears reports.
To set a grace period, visit Loans(top menu) → Add Loan (or edit an existing loan) and fill in the Initial Grace Period (Days) field.
- Construction Draws:
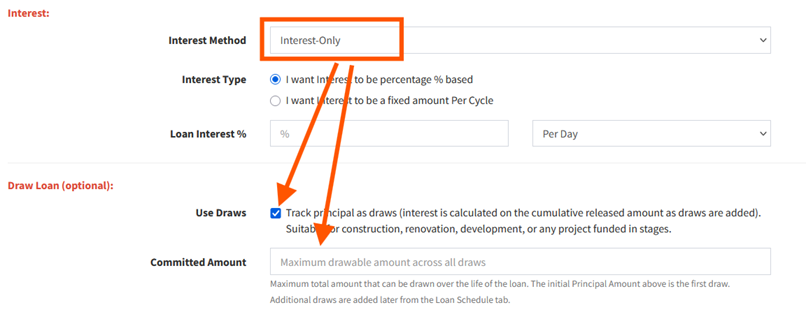
A new Construction Draw Loan type has been introduced for projects where funds need to be disbursed in stages as construction milestones are completed (e.g. foundation, framing, roofing, finishing). Instead of releasing the full loan amount upfront, you can schedule and approve individual draws against the loan, while interest accrues only on the funds actually released so far. This significantly reduces interest costs for borrowers and limits your exposure on incomplete projects, making it ideal for builders, property developers, and home renovation lending.
Important: Construction Draws are only available on Interest Only loans. This is by design - during the construction phase, the released principal balance changes every time a new draw is added, so a fixed amortization schedule is not appropriate. With Interest Only, the borrower pays only the interest accrued on the cumulative released amount each period, which keeps payments low and predictable while construction is in progress.
How it works:
- Create the parent Draw Loan - visit Loans(top menu) → Add Loan, set the Loan Interest Method to Interest Only, tick the Draw Loan checkbox, and enter a Committed Amount that is greater than or equal to the initial Principal Amount. The Principal Amount is what is released on disbursement; the Committed Amount is the maximum total that can be drawn across all future stages.
- Release further draws over time - once the parent loan is open, visit the loan via Loans(top menu) → View All Loans → Pencil button → Loan Schedule tab. Because the parent loan has the Draw Loan flag set, a new Add Draw button appears on the schedule. Each click creates a new draw entry tied to the parent loan with its own date and amount. Interest then accrues on the cumulative released balance after each draw.
The Add Draw button only appears on loans where the Draw Loan checkbox was ticked at creation time - on a regular loan, the Loan Schedule tab continues to behave as before.
- Bulk Upload Manual Journals via CSV:
Manual journal entries can now be uploaded in bulk via a CSV file, instead of being added one at a time through the UI.
To use, visit Accounting → Journals → Manual Journals and click the Bulk Upload Journals via CSV button.
- Term Deposit Accrual in Accounting:
Interest expense on Savings Term Deposits and Investor Term Deposits is now accrued automatically in the accounting ledger over the life of the deposit, rather than recognized only at maturity. This ensures your Profit & Loss statement reflects the true cost of funds in each period and your Balance Sheet shows accurate interest payable liabilities, which is essential for IFRS-compliant financial reporting and regulatory submissions.
To create a term deposit product (or edit an existing one to enable accrual), visit:
- Savings TD Products: Admin → Savings → Savings Term Deposit Products → Add Term Deposit Product.
- Investor TD Products: Admin → Investors → Investor Term Deposit Products → Add Term Deposit Product.
Workflow Improvements
- Show/Hide Top Menu Items:
Each staff member can now customize their own top navigation menu by hiding items they never use. This declutters the interface, speeds up daily navigation, and lets each staff member tailor the top menu to their specific role.
To customize your menu, look at the top menu bar on the right-hand side - you will see a + / - icon. Click it to open the Show / Hide Top Menu Items page, where you can show or hide menu items.

- Backdated Savings Withdrawal - Overdrawn Check:
When posting a backdated savings withdrawal, the system now validates that the resulting balance on the backdated date (and any date thereafter) does not go below zero if the savings product has Allow Overdrawn set to No. This prevents data-entry mistakes and fraudulent backdating from creating impossible negative balances retroactively, protecting the integrity of your savings ledger and downstream reports.
This check runs automatically - no setup required. To review or change the overdrawn rule, visit Admin → Savings → Savings Products → Edit and check the Allow Overdrawn field.
- Add Disbursement on Loans Extended After Maturity:
What is "Extend Loan After Maturity"? It is an option you can turn on when creating a loan that tells the system: if the borrower has not fully paid by the original maturity date, keep the loan open and continue charging interest (and optionally generating new installments) until the loan is fully paid, instead of treating the loan as overdue from a fixed end date.
What is new: previously, once a loan had been extended past its original maturity, the system blocked any further disbursement on that loan - you would have had to close the loan and create a brand new one to give the borrower additional funds. Now, you can simply add another disbursement to the same matured-and-extended loan, keeping the borrower's full history (principal, interest, fees, repayments) on one record instead of fragmenting it across multiple loan numbers.
How to add a disbursement after maturity: open the loan via Loans(top menu) → View All Loans → Pencil button → Loan Schedule tab → Add Disbursement button. The new disbursement will be added to the same loan and the schedule will recalculate from the disbursement date forward.
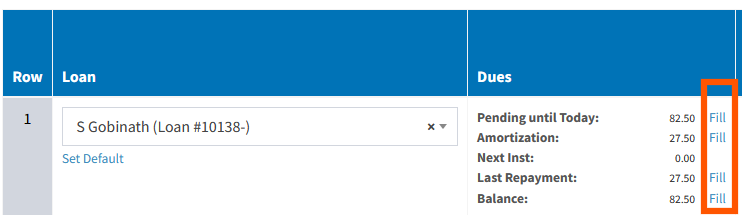
- Add Bulk Repayments - Fill with Dues:
The Add Bulk Repayments page now displays each loan's key due figures inline - Pending until Today, Amortization, Next Installment, and Last Repayment - each with a one-click Fill link that copies that value straight into the row's repayment amount. Loan officers no longer have to look up due amounts manually or switch between screens, the right figure is right there next to the input, and a single click drops it in.
To use it, visit Repayments(top menu) → Add Bulk Repayments. The due figures appear next to each loan row - click the Fill link beside whichever value you want to use.
- Add Branch: Select Staff with Access:
When adding or editing a branch, you can now directly select which staff members will have access to that branch - no need to open each staff record individually to grant branch access.
To use, visit Admin → Branches → Add Branch (or edit an existing branch) and select the staff in the Staff Access section.
- Investor Reports:
A dedicated suite of Investor Reports has been added, giving you the same depth of analysis for investor accounts that already exists for borrower portfolios.
The new reports are:
- Investor Report - overall view of investor balances, contributions, withdrawals, and interest activity per investor.
- Investor Products Report - performance and totals grouped by investor product, useful for evaluating which products are attracting the most capital.
- Investor Fee Report - fees charged to investors over a period, broken down by fee type and investor.
- Investor Staff Report - investor activity attributed to each staff member, useful for relationship-manager reviews and incentive calculations.
- Investor Withholding Tax Report - withholding tax deducted on investor interest payments, used as the source-of-truth when remitting withheld tax to the government.
To access, visit Reports(top menu) → Investors section.
- Comprehensive Loan Report:
A new Comprehensive Loan Report brings together principal outstanding, interest accrued, fees, penalties, repayments made, arrears aging, last/next installment, borrower details, loan officer, branch, and many more fields into a single configurable report.
To access, visit Reports(top menu) → Comprehensive Loan Report.
- Auto Load Reports - All Pages at Once:
Several reports now automatically load all pages of data in a single view, instead of forcing you to click through page 1, page 2, page 3 and so on to see the full dataset. Scroll once and you have the entire report in front of you, ready to review, filter, search within, or export.
This now applies to the Outstanding Report, Balance Due Report, Fees Report, Deferred Income, Deferred Income Monthly, and Pro-Rata Collections Monthly - open any of them and all pages will load automatically.
- Daily and Weekly Summary Emails - Now with Charts:
The Daily and Weekly Summary Emails that go out to subscribed staff now include visual charts on top of the existing tabular summary - collections trend, disbursements, arrears aging, portfolio composition, and other key metrics rendered as inline graphics in the email body.
To subscribe (or change which staff receive them), visit Staff Email Notifications.
- Sticky Loans, Savings Accounts, and Investor Accounts:
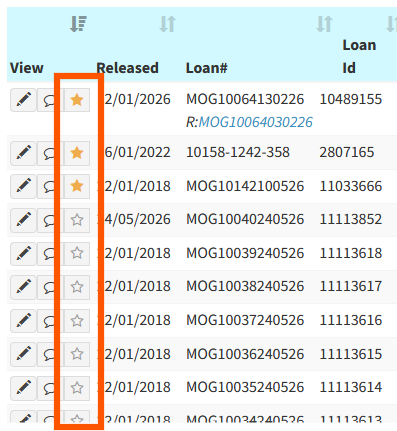
You can now pin frequently-accessed loans, savings accounts, and investor accounts so they stay at the top of your list view as a "sticky" group, no matter how the rest of the list is filtered or sorted. This eliminates the constant search-and-filter cycle when you are actively working a small set of priority collection cases, accounts under review, loans in restructuring, or anything else you keep coming back to. The pinned list is per-staff, so your pinned records do not appear in anyone else's view.
To pin a record, click the star icon (★) next to any loan, savings account, or investor account — a hollow star (☆) means “not pinned”, a filled gold star (★) means “pinned”. The record will then appear in the Sticky section at the top of the corresponding list view (Loans → View All Loans, Savings → View Savings Accounts, or Investors → View Investor Accounts). Click the star again to unpin.
- Investor Reports Watermark:
You can now add a watermark to all investor PDF reports such as Investor Statements, Term Deposit Certificates, and Transaction Statements. This protects sensitive investor documents from unauthorized use, photocopying, and reuse, and visually identifies the document as an official record from your institution.
To configure, visit Admin → Investors → Format Investor Reports and set the watermark field.
- Loans Arrears Aging Report - Branch ID Included:
The Loans Arrears Aging Report now includes the Branch ID (and Branch Name) on each loan row if multiple branches are selected.
To access, visit Reports(top menu) → Loans Arrears Aging.
- Include CC and BCC in Add Email Account:
When configuring an email account, you can now specify CC and BCC addresses that will be automatically copied on every email sent from that account. This is useful for compliance archiving, supervisor oversight on customer correspondence, and keeping a central inbox in the loop on all outbound communications without depending on staff to remember to copy them in.
To configure, visit Admin → Email → Add Email Account (or edit an existing account) and fill in the CC and BCC fields.
- Prevent Duplicate Other Income Entries:
You can now enable a duplicate-detection check on Other Income entries. When turned on, the system warns you (or blocks you) if you try to add an income entry that matches an existing one on key fields such as customer, income type, amount, and date.
To enable, visit Admin → Other Income → Other Income Settings and turn on the Prevent Duplicate Entries option.
- Prevent Duplicate Expense Entries:
The same duplicate-detection capability is now available for expenses. When enabled, the system flags any expense that matches an existing one on vendor, expense type, amount, and date - preventing the same invoice or receipt from being recorded twice.
To enable, visit Admin → Expenses → Expense Settings and turn on the Prevent Duplicate Entries option.
Convenience & Auto-Fill
- Portrait or Landscape Mode for Borrower Downloads:
Borrower PDF downloads (loan statements, schedules, repayment receipts, borrower statements, savings statements, term deposit certificates, and other documents) can now be generated in either Portrait or Landscape orientation. Landscape is ideal for wide tabular content such as detailed loan schedules with many columns, transaction histories, or fee breakdowns - where Portrait would cause columns to wrap or get truncated.
To configure, visit Admin → Borrowers → Format Borrower Reports and set the orientation for each document.
- Loan Repayment - Auto Fill with Today's Date:
A new per-Loan-Product option lets you configure the Add Repayment form to default the Collection Date to today. Once enabled on a product, every loan under that product opens the Add Repayment form with today's date pre-filled - loan officers no longer click the date picker for the most common case, shaving several seconds off every repayment posting and reducing errors from accidentally leaving the date blank or picking the wrong day.
To enable, visit Admin → Loans → Loan Products → Edit the relevant product, scroll to the Repayment Collection Date section, and set Set Repayment Collection Date to Today's date to Yes. It will then apply on Loans(top menu) → View All Loans → Pencil button → Loan Repayments tab → Add Repayment for every loan under that product.

- Expense Settings - Auto Fill with Today's Date:
A new option in Expense Settings lets you configure the Add Expense form to default the expense date to today. Once enabled, every time a staff member opens the form, the date is pre-filled with the current date - eliminating an unnecessary click for the most common scenario where expenses are recorded on the day they are paid.
To enable, visit Admin → Expenses → Expense Settings and turn on the Auto Fill Date with Today option. It will then apply on Expenses(top menu) → Add Expense.
- Other Income Settings - Auto Fill with Today's Date:
A new option in Other Income Settings lets you configure the Add Other Income form to default the transaction date to today. Once enabled, every time a staff member opens the form, the date is pre-filled with the current date.
To enable, visit Admin → Other Income → Other Income Settings and turn on the Auto Fill Date with Today option. It will then apply on Other Income(top menu) → Add Other Income.
- Print Collateral:
You can now print or download a formatted PDF of a loan's collateral details, including description, valuation, photos, and ownership information.
To print, visit Loans(top menu) → View All Loans → Pencil button → Collateral tab → Print button.
- Manual Journals - Export All Pages:
The Manual Journals listing now supports exporting all pages of journal entries in a single download, not just the current page. This makes month-end and year-end accounting reviews much faster, gives auditors a complete dataset in one file, and removes the need to manually stitch together multiple page exports.
To use, visit Accounting → Journals → Manual Journals and click the Export all pages button at the top right of the table.
- Loan Templates/Agreements - Excel:
Loan templates and agreements can now be authored and uploaded in Excel format, in addition to the existing Word (DOCX) format. This is especially helpful for agreements that include detailed amortization tables, fee breakdowns, or other tabular content that is much easier to format and maintain in Excel than in Word. The biggest advantage is that Excel supports formulas - you can build agreements that automatically compute totals, taxes, percentages, fee subtotals, grand totals, and even derived values from the loan placeholders (e.g. =PrincipalAmount*0.05 for a 5% fee, or =SUM(...) across an installments table).
To use, visit Admin → Loans → Loan Templates → Add Loan Template and upload your Excel template.
API Additions
- Loan Status History via API:
A new API endpoint exposes the full status history of a loan, including every transition between Pending, Approved, Open, Closed, Defaulted, and other statuses, along with the timestamp and the staff member who triggered each change.
For details, visit API Documentation - Loan Status History.
- Fully Paid Loans Report via API:
The Fully Paid Loans Report is now available via API.
For details, visit API Documentation - Fully Paid Loans Report.
- Defaulted Loans Report via API:
The Defaulted Loans Report is now available via API.
For details, visit API Documentation - Defaulted Loans Report.
- Draw Loan via API:
Construction Draw Loans are also fully supported via the API, so you can create draw loans (using the loan_is_draw_loan flag plus loan_committed_amount), add individual draws, and retrieve draw history programmatically from your own systems.
For details, visit API Documentation - Draw.
- Send Email from your Domain - NEW Option 1:
- 8 April 2026
-
New Features and Improvements
- Investor Term Deposit:
A new Investor Term Deposit product has been introduced, allowing investors to place fixed-term deposits with guaranteed interest rates. This is separate from the borrower Savings Term Deposit and is designed for investor account management.
To create an Investor Term Deposit Product, visit Admin → Investors → Investor Term Deposit Products → Add Term Deposit Product.
To add a new Investor Term Deposit, visit Investors(top menu) → Add Term Deposit.
- Loan Impairment Expense:
Automatically calculate and post loan impairment expenses based on configurable aging buckets and expected credit loss rates. This ensures compliance with IFRS 9 and provides accurate provisioning for non-performing loans. Visit Admin → Accounting → Loan Impairment Settings to configure impairment buckets and enable automatic calculations. - AI Insights on Loan:
Get AI-powered risk analysis and credit assessment directly on each loan. This is particularly useful for loans in processing, where AI analyzes the borrower's history and provides a recommendation to Approve, Reduce, or Deny the loan.
For open loans, AI provides default risk scores with detailed explanations and suggested interventions.
AI Insights cost only $0.01 per credit. To purchase credits, visit Admin → AI Insights → AI Insights Credits.
To configure your collections policy for AI analysis, visit Admin → AI Insights → AI Insights Collections Policy.
To view AI Insights on a loan, visit Loans(top menu) → View All Loans → Pencil button on the View Loan Details page.
- Add Loan - Down Payment:
A new down payment option has been added when creating loans. You can configure down payment requirements (percentage or fixed amount) at the loan product level, and the system will apply them when adding new loans. You can optionally configure down payment defaults at Admin → Loans → Loan Products → Edit. The down payment field is also available directly when adding a loan at Loans(top menu) → Add Loan, even without a loan product configured. - New Menu Design:
The navigation menu has been redesigned with a new horizontal layout for improved usability and faster access to features. This also frees up more horizontal space on the page, allowing you to view more columns on data tables such as View All Loans without needing to scroll sideways. - Force Two-Factor Authentication (2FA):
Administrators can now force staff members to set up two-factor authentication before they can access the system. If a staff member has not yet set up 2FA, a verification code will be sent to their email address upon login. This strengthens account security by ensuring all staff use 2FA. Visit Admin → Manage Staff → Staff → Edit and enable the Force Two-Factor Authentication option. - Loan Agreement - Restrict to Staff:
Loan agreements can now be restricted so that only authorized staff members can view and download them. This adds an extra layer of security for sensitive loan documents. Permissions are managed through Admin → Manage Staff → Staff Roles and Permissions → Set Permissions. - Loan Agreement - Do Not Allow DOCX Download:
For added document security, you can now disable downloading loan agreements in DOCX (editable) format, so agreements are available only as PDF. This prevents unauthorized modifications to loan documents. To configure this, visit Admin → Loans → Loan Templates → Edit and set the Allow DOCX Download field to No. - Loan Agreement - Watermark:
Loan agreement PDFs can now include a watermark for added security and to prevent unauthorized use or duplication of documents. To configure this, visit Admin → Loans → Loan Templates → Edit and set the Enable Watermark field to Yes, then enter your Watermark Text. - Multiple Branches Selection:
You can now select multiple branches when viewing records, allowing you to filter and view data across selected branches in a single view. This is available on several pages including Borrowers(top menu) → View Borrowers, Loans(top menu) → View All Loans, Repayments(top menu) → View Repayments, and Savings(top menu) → View Savings Accounts. Click the Advanced Search button (green button on the right) to access the multiple branch selection. - Export Data for All Pages - All Branches:
You can now export data across all branches on every datatable page in the system. Previously, exports were limited to the current branch. This allows head office staff to generate comprehensive reports covering the entire organization. On any datatable page, click the Export all pages button at the top right of the table and select All Branches. - Asset Management - Updated with Depreciation and New Reports:
The Asset Management module has been enhanced with full depreciation tracking (straight-line, reducing balance, and manual methods) and four new reports:- Asset Register Report - Complete listing of all assets with classification, cost, and status.
- Depreciation Schedule Report - Shows cost, accumulated depreciation, and net book value.
- Capitalised Assets Report - Assets grouped by capitalisation status for accounting.
- Disposed/Written-Off Assets Report - Sold or written-off assets with gain/loss calculations.
- Loan Statement - New Look:
The loan statement has been redesigned with a cleaner, more professional layout. Visit Loans(top menu) → View All Loans → Pencil button → Loan Schedule tab → Download Statement button. - Home Branch Charts Updates:
The Home Branch dashboard charts have been updated with improved visualizations, the ability to switch between chart types (line, bar, horizontal bar), combine multiple charts, and create custom charts. Visit the Home Branch page to see the updated charts. Use the chart settings icons to customize your view. - New Home Branch Charts:
New chart types have been added to the Home Branch dashboard, providing deeper insights into your portfolio performance, disbursements, collections, and other key metrics. Visit the Home Branch page to explore the new charts. - Collection Sheet - Show First and Last Collection:
The collection sheet now displays the first and last collection dates, giving loan officers a quick overview of the collection history for each borrower. Visit Collection Sheets(top menu) → Manage Daily Collection Sheet. - Include Borrower Details on Loan Calculator:
The loan calculator now includes borrower name/business name, phone number, mobile, and email fields. The PDF download and print output also include these borrower details, so you can use the loan calculator as a professional quote to give to a prospective client. Visit Loans(top menu) → Loan Calculator. - Loan Calculator Download Redesign:
The loan calculator download/PDF has been redesigned with a cleaner, more professional layout. Visit Loans(top menu) → Loan Calculator and click the Download button. - Show Deductible Fees in Loan Calculator:
The loan calculator now displays deductible fees and the net disbursed amount, giving borrowers a clear picture of the actual amount they will receive after fee deductions. Visit Loans(top menu) → Loan Calculator. - Loan Comments Template:
Save and reuse frequently used loan comments as templates. This saves time when adding common notes such as follow-up reminders, payment promises, or collection updates. Visit Loans(top menu) → View All Loans → Pencil button → Loan Comments tab. When adding a comment, click the Templates button to save or load comment templates. - Loan Terms Download - Modified:
The Loan Terms print and download functionality has been updated with improved formatting and layout. Visit Loans(top menu) → View All Loans → Pencil button → Loan Terms tab → Print button at the bottom of the page. - Footer Customizable to Each Document:
You can now set a different footer for each document type (repayment receipt, loan statement, borrower statement, loan schedule, loan calculator, savings statement, payslip, and more). Visit Admin → Borrowers → Format Borrower Reports - Footer. - Borrower Reports Watermark:
You can now add a watermark to all borrower PDF reports such as Repayment Receipts, Loan Statements, Client Statements, Loan Schedules, and Loan Comments. This helps protect your documents from unauthorized use. Visit Admin → Borrowers → Format Borrower Reports - Watermark. - Include Unique Token in Loan Application ID Generation:
The loan application ID generation now includes a unique token, ensuring that every loan number is unique across all branches. This is especially useful for organizations with multiple branches where loan numbers could otherwise overlap. Visit API Documentation for more details. - View Staff Roles and Permissions - Show Summary:
A summary view has been added to Staff Roles and Permissions, making it easier to see at a glance what permissions each role has. You can also download the permissions comparison as an Excel file. Visit Admin → Manage Staff → Staff Roles and Permissions - Summary. - View Staff - Show Comparison:
Compare staff members side by side to review their settings, roles, and permissions. You can compare up to 100 staff members at once and download the comparison as an Excel file. Visit Admin → Manage Staff → Staff → Staff Comparison. - View Account Ledger - Export Data for All Pages:
The Account Ledger now supports full data export across all pages, allowing you to download the complete ledger history for any account. Visit Accounting → Ledger → Account Ledger and click the Export all pages button. - Add Manual Journal - Search Select Box:
The Add Manual Journal page now includes a searchable select box for selecting chart of accounts, making it faster to find and select the correct accounts when creating journal entries. Visit Accounting → Journals → Add Manual Journal. - Export Data - Custom Fields for Borrowers in Loans:
When exporting loan data, borrower custom fields are now included in the export. This allows you to generate more comprehensive reports that include all custom borrower information alongside loan data. - Custom Fields Checkbox:
A new Checkbox field type has been added to custom fields. This allows you to create yes/no or multiple-choice checkboxes for borrowers, loans, and other records. Visit Admin → Custom Fields → View Custom Fields → Add Custom Field and select Checkbox as the field type. - Custom Fields - MM/YYYY Selection:
A new Date Field (MM/YYYY) type has been added to custom fields, allowing you to capture month and year values without requiring a specific day. This is useful for fields like employment start date, graduation date, or driver license expiry date. Visit Admin → Custom Fields → View Custom Fields → Add Custom Field and select Date Field (MM/YYYY). - API Bulk Repayments:
A new API endpoint allows you to submit up to 5,000 repayments in a single call. The system processes them in the background and notifies you when complete. This is ideal for integrations with mobile money providers or payment processors. Visit API Documentation - Bulk Repayments for details. - API Bulk Savings Transactions:
A new API endpoint allows you to submit up to 5,000 savings transactions in a single call. Similar to bulk repayments, transactions are processed in the background. Visit API Documentation - Bulk Savings Transactions for details.
- Investor Term Deposit:
- 26 January 2026
-
New Features and Improvements
- Savings Term Deposit:
We have introduced a comprehensive Savings Term Deposit product that allows your borrowers to invest their savings for a fixed period at guaranteed interest rates.
Key Features:
- Flexible Terms
- Set Interest Rates
- Automatic Interest Calculation
- Automatic renewal, transfer to savings account, or manual processing.
- Early Withdrawal
- Rollover to a new Term Deposit
- Funding from Savings
- Certificate Generation
- Transaction History
To create a Term Deposit Product, please visit Admin(top menu) → Savings → Savings Term Deposit Products → Add Term Deposit Product.
To add a new Term Deposit, please visit Savings(top menu) → Add Term Deposit.
- Add Vendor:
Add vendor records for expense tracking. Visit Expenses → Add Vendor. You can then select these vendors when adding expenses at Expenses → Add Expense. - Add Customer:
Add customer records for other income. Visit Other Income → Add Customer. You can then select these customers when adding other income at Other Income → Add Other Income. - Upload Vendors - CSV file:
Bulk import vendors via CSV file upload. Visit Expenses → Upload Vendors - CSV file. - Add Customer Bulk CSV:
Bulk import customers via CSV file upload. Visit Other Income → Upload Customers - CSV file. - Asset Management Depreciation:
Added support for different types of asset depreciation. Visit Asset Management → Add Asset Management → Depreciation Method select box. These include the following:- Manual Entry (Enter book values manually)
- Straight Line
- Declining Balance
- Double Declining Balance
- Sum of Years Digits
- No Depreciation
- Loan Agreement Categories:
Added category support for loan agreements and a new Loan Agreement tab on the View Loan Details page. Visit Loans → View All Loans → Pencil → Loan Agreement tab. - MFRS Ratio Report:
New Microfinance Ratio Standards reporting for regulatory compliance. Visit Reports → MFRS Ratio. - Fully Paid Loan Report:
View reports of all fully paid loans. Visit Reports → Fully Paid Loan Report. - Defaulted Loan Report:
View reports of all defaulted loans for tracking non-performing assets. Visit Reports → Defaulted Loan Report. - Portfolio at Risk Filters:
Enhanced PAR report with filtering by loan product and loan officer. Visit Reports → Portfolio at Risk. There, select the View By option on top of the page. - Remodeled Admin Dashboard:
Redesigned admin dashboard and included a search box for improved navigation and usability. Visit Admin on the top menu. - Home Branch Chart Settings:
Configure which charts are displayed on your branch dashboard. Visit Home Branch → Chart Settings. - Home Branch Date Picker:
Filter dashboard data up to a custom date using the new date picker controls on the Home Branch page. You can pick a date in the Custom End Date field. - Home Branch Download PDF:
Export your branch dashboard as a PDF document using the Download PDF button on the Home Branch page. - Copy Manual Journal:
Duplicate existing manual journal entries for faster data entry. Visit Accounting → Manual Journals and click the Copy button. - Cash Flow Statement Periods:
View cash flow data by weekly, monthly, quarterly, or yearly periods. Visit Reports → Cash Flow Accumulated. There, on top of the page, you can select the periods. - Profit and Loss Statement Periods:
Analyze income and expenses by weekly, monthly, quarterly, or yearly periods. Visit Reports → Profit and Loss. - Tax Support in Expense CSV:
Export expenses to CSV now includes tax information. Visit Expenses → Upload Expenses - CSV file. - Tax Support in Other Income CSV:
Export other income to CSV now includes tax information. Visit Other Income → Upload Other Income - CSV file. - Capitalized Fees:
Capitalized fees are now properly handled in accounting. - Accounting Ledgers:
Applied multiple optimizations to the accounting ledgers, resulting in approximately a 30x increase in generation speed.
- Savings Term Deposit:
- 22 October 2025
-
Platform Infrastructure Upgraded
We have recently upgraded our platform's infrastructure to provide a faster, more reliable, and resilient experience. The new system automatically balances workloads across resources, recovers quickly if any service encounters an issue, and scales up or down depending on demand. It also allows us to roll out updates and new features seamlessly. Overall, these improvements will result in a platform that can grow with your needs.
-
E-Signature Updated: Add Multiple Signatories and Boxes
We have updated the E-Signature feature to allow multiple signatories in a document and to let you specify where each signatory will sign. To see the new updates to the E-Signature feature, please watch the video below:
-
Loan Files: Create Folders
The Loan Files feature has been updated. Now, you can create folders and move files in those folders for better organization. Please visit Loans(top menu) → View All Loans → Pencil button. There on the View Loan Details page, please click on the Loan Files tab. Please watch the video below on how it works:
-
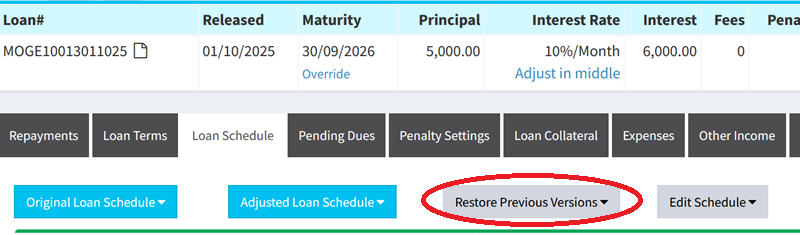
Loan Schedule: Versioning
We have added versioning for the loan schedule. Whenever you edit a schedule or perform an early settlement, the system now saves both the old and new versions. This allows you to restore previous versions if needed and makes it easier to review or audit any changes made by staff.
Please visit Loans(top menu) → View All Loans → Pencil button → Loan Schedule tab. There, please click on the Restore Previous Versions button.
-
SUSU Collector Savings Product
We have introduced a new savings product, commonly used in parts of Africa: the SUSU Collector Product. With this product, members make daily contributions according to a set cycle, and the system automatically deducts one day of fees at the start or end of the cycle..
Please visit Admin(top menu) → Savings → Savings Products → Add SUSU Collector Product.
-
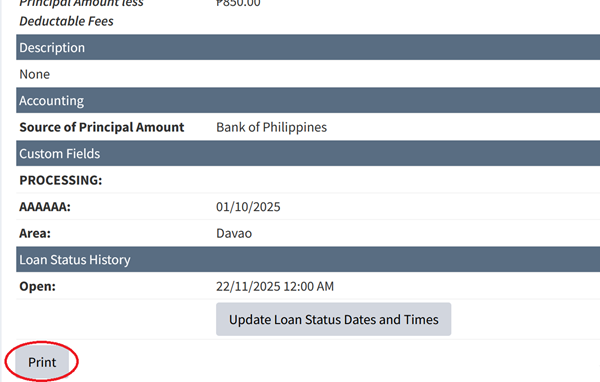
Print Loan Terms tab
To print the Loan Terms tab, please visit Loans(top menu) → View All Loans → Pencil button. There on the View Loan Details page, please click on the Loan Terms tab. At the bottom of the page, you will see the Print button.
-
View All Loans: New Columns Added
We have added the following new columns on the View All Loans page:
-
Previous Installment Amount
- This will show the last installment amount from the current date. -
Previous Installment Date
- This will show the last installment date from the current date. -
Next Installment Amount
- This will show the next installment amount from the current date. -
Next Installment Date
- This will show the next installment date from the current date. -
Last Payment Date
- This will show the last payment date of the borrower from the current date. -
Last Payment Amount
- This will show the last payment amount made by the borrower from the current date.
Please visit Loans(top menu) → View All Loans. On the top right of the table, please click on Show/Hide Columns button. There, you can move the above columns to the right box using the arrows in the middle.
-
Previous Installment Amount
-
Format Borrower and Loan Statement
You can now select which sections to display in the Borrower Statement and the Loan Statement. This helps simplify the statement for the borrower if needed.
Please visit Admin(top menu) → Borrowers → Format Borrower Reports. There, you will see the Borrower and Loan Statement section.

-
View Repayments: New Columns Added
We have added the following new columns on the View Repayments page:
- Borrower Gender
- Borrower Address
- Borrower Age
- Borrower City
- Borrower Country
- Borrower Credit Score
- Borrower Date 0f Birth
- Borrower Email
- Borrower Landline
- Borrower Mobile
- Borrower Province
- Borrower Zipcode
To select the above columns, please visit Repayments(top menu) → View Repayments and click on Show/Hide Columns(top right of table) button and move the columns to the right box.
-
Staff: Auto Logout After Inactivity
We have added an option to set how long a staff member can remain idle before being automatically logged out of the system.
Please visit Admin(top menu) → Manage Staff → Staff → Edit. There, you will see the Auto Logout After Inactivity field where you can select the duration.
-
Recalculate Loan Schedule from Start
A new feature has been added that allows you to recalculate the loan schedule based on the original terms at the time the loan was created. This is useful if the schedule has been modified multiple times or automatically adjusted due to payment changes. If you disagree with the current adjustments, you can use this option to restore the original loan schedule.
Please visit Loans(top menu) → View All Loans → Pencil button. There click on the Loan Terms tab → Edit Loan → Recalculate Loan from Start.
-
Make Loan Balance into Zero: Set Permissions
To restrict whether your staff can access the Make Loan Balance into Zero feature, please visit Admin(top menu) → Manage Staff → Staff → Staff Roles and Permissions → Set Permissions button. There, uncheck Make Loan Balance into Zero and click Submit button at the bottom of the page.
-
Advanced Search based on Gender
We have added the option to filter borrowers, loans, repayments, and savings based on gender.
Please visit Borrowers(top menu) → View Borrowers, Loans(top menu) → View All Loans, Repayments(top menu) → View Repayments, Savings(top menu) → View Savings Accounts, and Savings Transactions(top menu) → View Savings Transactions and click on the Advanced Search: Click here to Show link on top of the page. There, please select a value in the Gender field and then click Search.
-
Monthly Report: Increased to 12 Months
Please visit Reports(top menu) → Monthly Report. There, we have increased the reporting period from 6 months to 12 months.
-
New Placeholders
We have added a new placeholder {RestructureLoanNo} which you can include in Loan Templates: Applications/Agreements, SMS, and Email. This will be replaced with the Loan # of the Restructured Loan.
-
API: Show Loan Officers in GET Repayment
We have added the borrower_access_ids field in the GET Repayments call which will return the list of loan officers set for the borrower. Please read the API documentation for more information.
- 15 July 2025
-
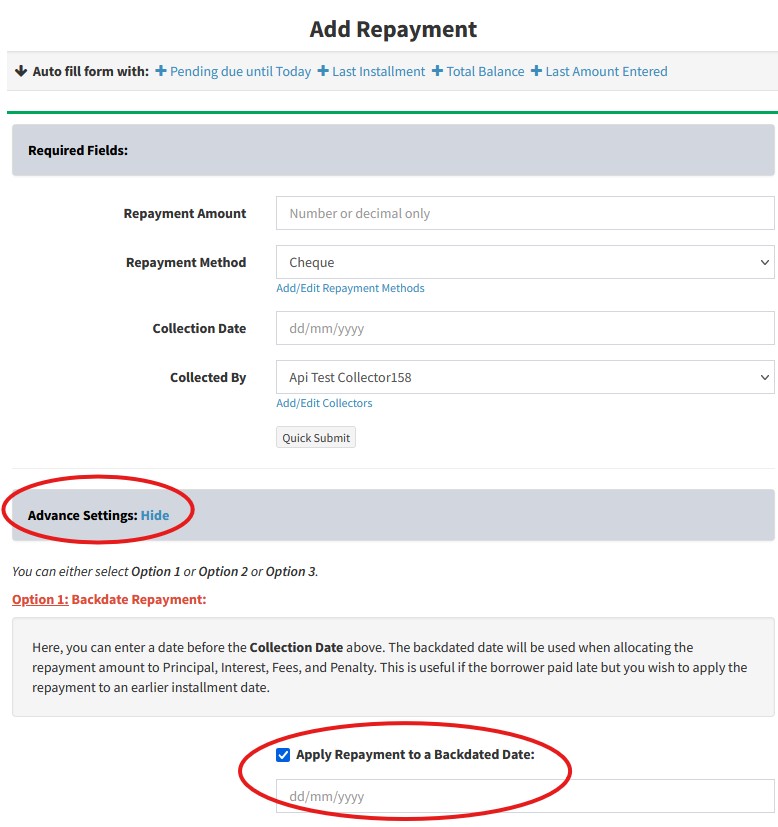
Add Repayment: Backdate Repayment to an earlier date
You can now add a repayment and backdate it to an earlier installment. This is useful if the repayment was paid late by the borrower and you would like to apply this to an earlier date. To do this, please visit the Add Repayment page and click on Advance Settings: Show. There check the Apply Repayment to a Backdated Date option and select a date.
The repayment composition will be calculated based on the date that you have selected.
-
Custom Fields: Tooltip
You can now add tooltips beside each custom field to provide users with helpful guidance.
To add custom fields, please visit Admin(top menu) → Settings → Custom Fields → Add Custom Field. There, at the bottom of the page, you will see the Tooltip option.


-
Increased Security: Geoblock
We have introduced new security features to better protect your data. If someone attempts to access your account from a different location, they will be prompted to enter a One-Time Pincode sent to your registered email address. This extra step helps prevent unauthorized access to your account.
-
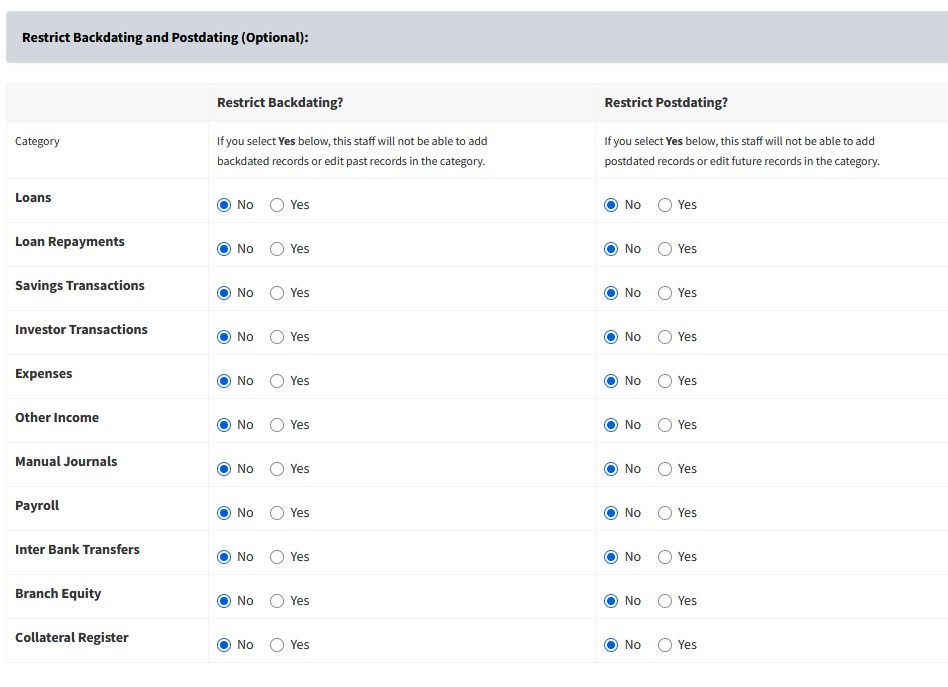
Staff Restrictions: Backdating and Postdating
We have added additional categories that allow you to restrict staff from backdating or postdating transactions. These include Investor Transactions, Expenses, Other Income, Manual Journals, Payroll, Branch equity, and Collateral Register.
Please visit Admin(top menu) → Manage Staff → Staff → Edit. There, you will see the Backdating or Postdating section.
-
Loan Templates: Applications/Agreements: Set Custom Date Format
In Loan Templates: Applications/Agreements, we have now added an option to replace the Date placeholders with a custom Date Format. Before, we would replace the placeholders based on the date format set in Account Settings. But in Applications/Agreements, you may want another date format such as Wed, June 25, 2025.
Please visit Admin(top menu) → Loans → Loan Templates: Applications/Agreements → Add Loan Template. There, you will see the Replace the Date placeholders with the following Date Format field.

-
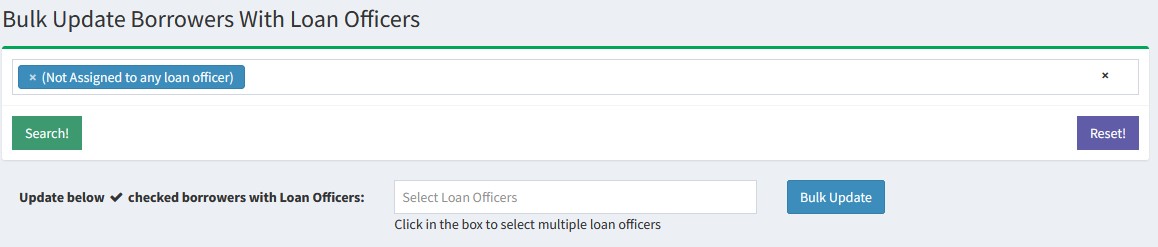
Bulk Update Borrowers with Loan Officers: Find borrowers who are not assigned to any loan officer
Before, you could not filter borrowers that did not have any loan officer. Now, you can search for those borrowers and then use the Bulk Update Borrowers With Loan Officers feature to assign loan officers to those borrowers.
To do this, please visit Admin(top menu) → Borrowers → Bulk Update Borrowers With Loan Officers. There, on top of the page, you will see the Filter Loan Officers section where you search for (Not Assigned to any loan officer).
-
Accounting: Increased Speed
We have increased the speed of the Accounting section by roughly 8 times. We will be making further changes to increase the speed.
-
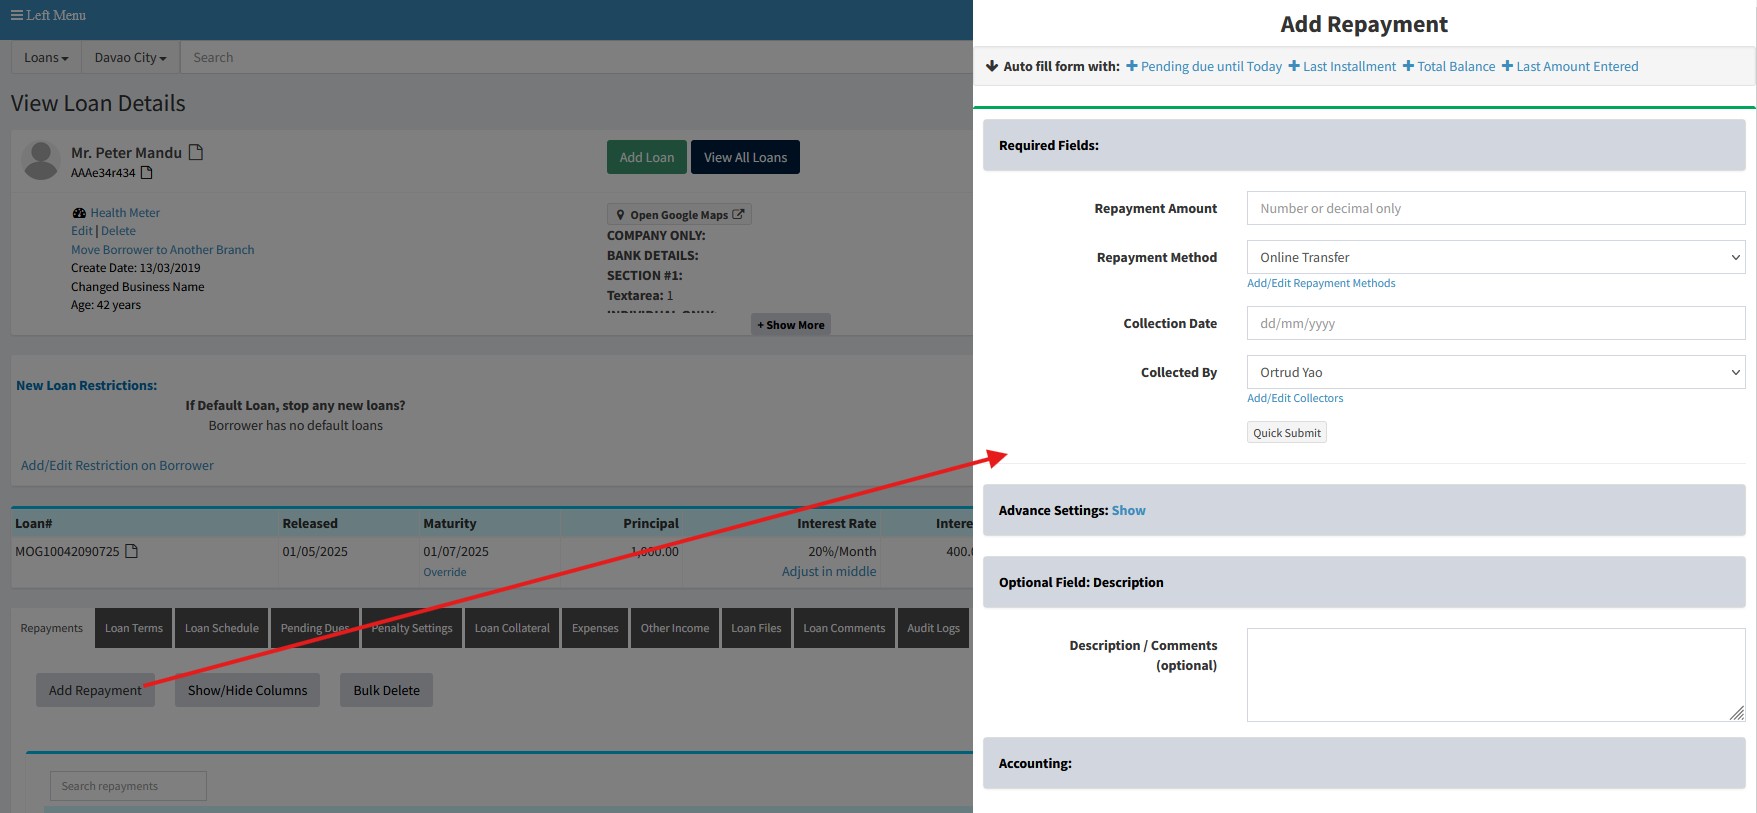
View Loan Details: New UI
We have changed the View Loan Details page so it is easier to add/edit repayments, download statements, add/edit expenses and other income, upload files, and add/edit loan comments.
Please visit Loans(top menu) → View All Loans → Pencil button. There please click on buttons like Add Repayment. When you click these buttons, the page will open in the current page allowing a better view of the loan when adding/editing details.
-
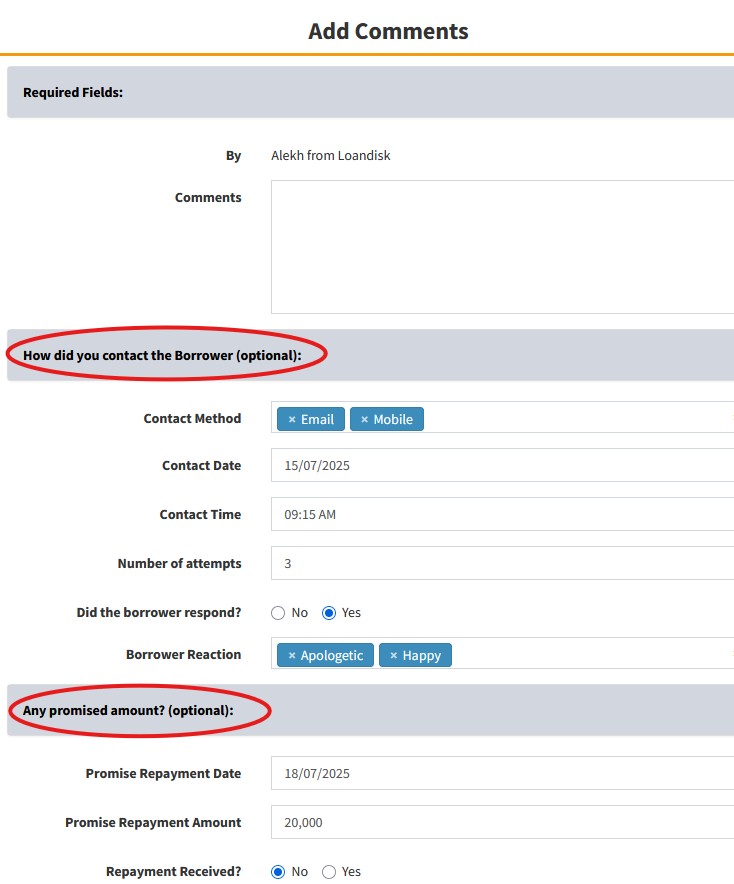
Loan Comments: New Fields
When adding a loan comment, we have added How did you contact the Borrower and Any promised amount? sections. This allows you to store more information on the interaction with the borrower.
These fields are:
- Contact Method
- Contact Date
- Contact Time
- Number of attempts
- Did the borrower respond?
- Borrower Reaction
- Promise Repayment Date
- Promise Repayment Amount
- Repayment Received?
-
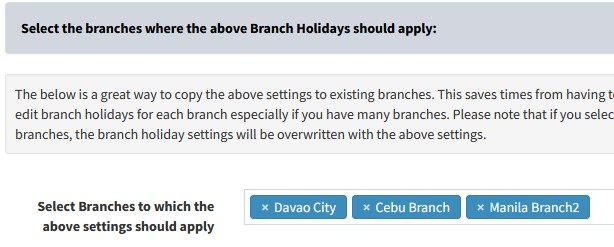
Branch Holidays: Apply to all branches
Previously, Branch Holidays could only be set individually for each branch, which was time-consuming if multiple branches shared the same holidays. You had to update each branch separately. We have now added a bulk update option, allowing you to apply holidays to multiple selected branches at once.
To add/edit holidays, please visit Admin(top menu) → Branches → Branch Holidays. There, at the bottom of the page, you will see the Select Branches to which the above settings should apply field where you can select multiple branches.
-
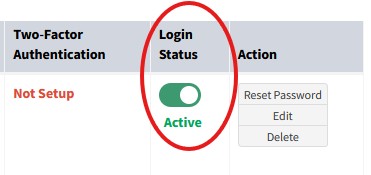
View Staff: Make Staff Inactive without deleting them
We have added a feature where you can deactivate staff members so they can not login. This is useful if the staff members are going on holidays and you would like to prevent access. Once they return to work, you can activate the staff members.
Please visit Admin(top menu) → Manage Staff → Staff. There you will see the Login Status column where you can toggle the staff from Active to Deactivated and vice versa.
-
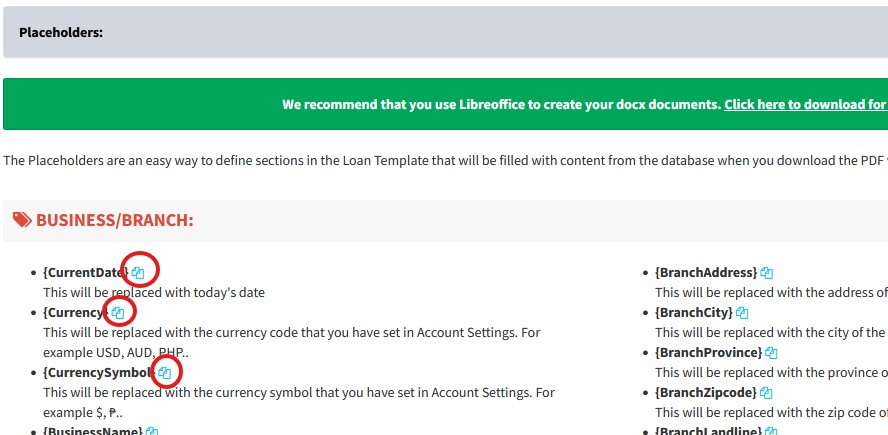
Loan Templates: Applications/Agreements: Easier to Read and Copy Placeholders
You can now copy placeholders in Loan Templates: Applications/Agreements easily by clicking the copy button. We have also modified the design of the placeholders so they are easier to read.
Please visit Admin(top menu) → Loans → Loan Templates: Applications/Agreements → Add Loan Template. There, below the Submit button, you can see the placeholders and the copy button.
-
API: Get Multiple Disbursements in Branch and Loan Id
We have added a feature to get the all the disbursements in a branch for a specific loan.
Please read the API documentation at Loan for more information. There you will see the Get multiple disbursements in Branch and Get multiple disbursements from loan_id field endpoints.
-
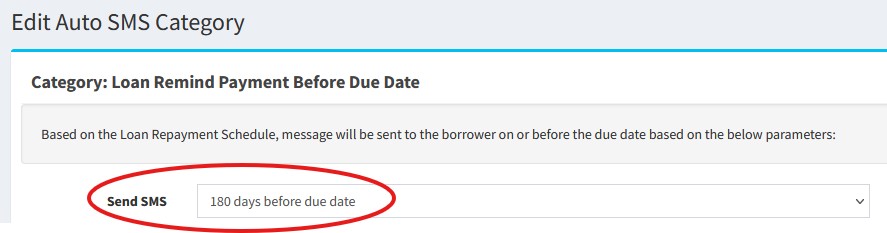
Auto Send SMS/Email: Increased Days from 30 to 180
In Auto Send SMS/Email, we have now increased the days from 30 days to 180 days. This means you can now send Automated SMS and Email up to 180 days before a payment for category like Loan Remind Payment Before Due Date.
To do this for SMS, visit Admin(top menu) → SMS Settings → Auto Send SMS. For email, visit Admin(top menu) → Email Settings → Auto Send Emails. There, click Edit button for one of the categories. In the Send SMS/Email field, you can select up to 180 days.
-
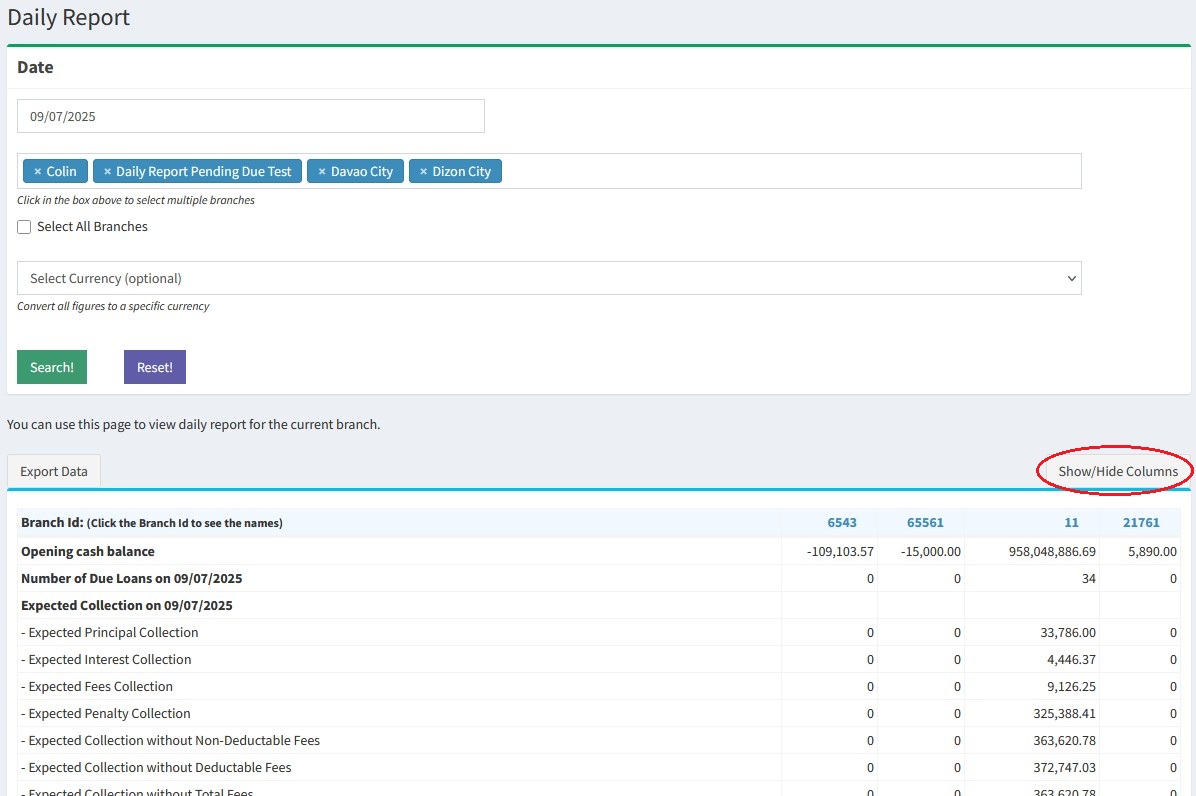
Daily Report: Multiple Branches and Show/Hide Columns
In Reports(top menu) → Daily Report, we have added a new option to select the columns to show in the report. Please click on Show/Hide Columns on top right of the table. Also if you select multiple branches, they will now show on the same table so it is easier to export the data.
- 30 April 2025
-
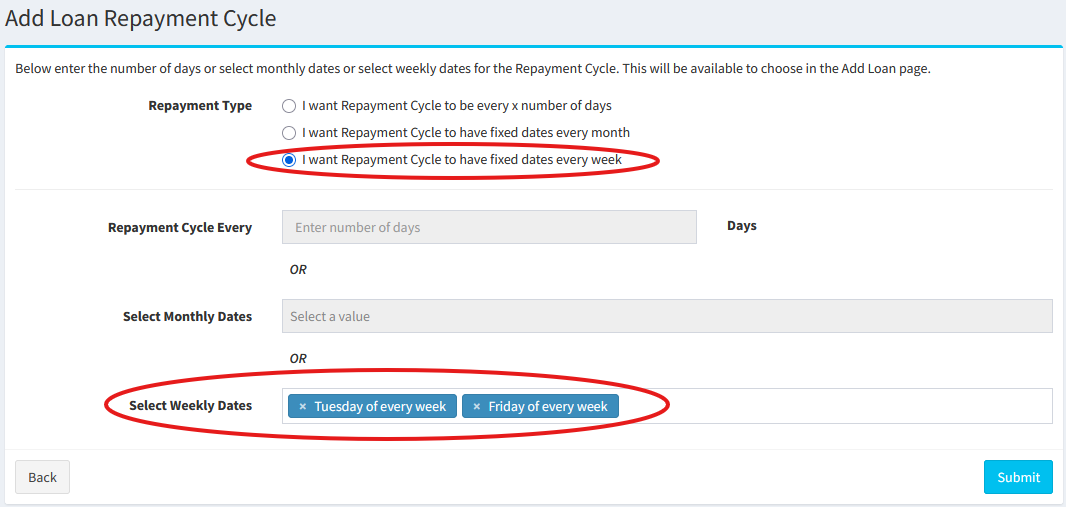
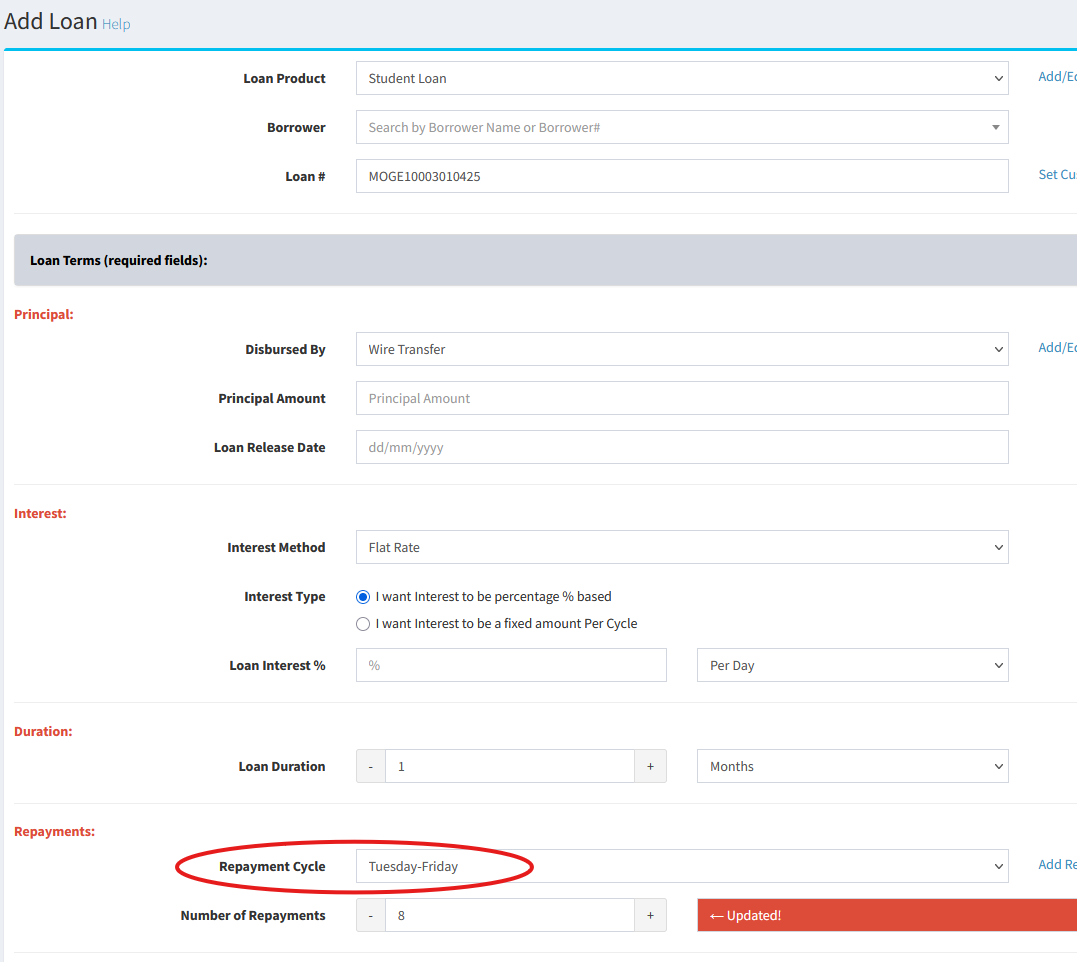
Add Loan: Weekday Repayment Cycle
You can now add a loan and set a weekly repayment cycle that falls on certain days in a week. For example, you can have loan installments on Tuesday and Friday of every week. To do this, please visit Admin(top menu) → Loans → Loan Repayment Cycles → Add Loan Repayment Cycle. There, please select Repayment Type as I want Repayment Cycle to have fixed dates every week. Then, select the weekdays in the Select Weekly Dates field.
After doing the above, please visit Loans(top menu) → Add Loan. There, in Repayment Cycle, please select the weekly dates.
-
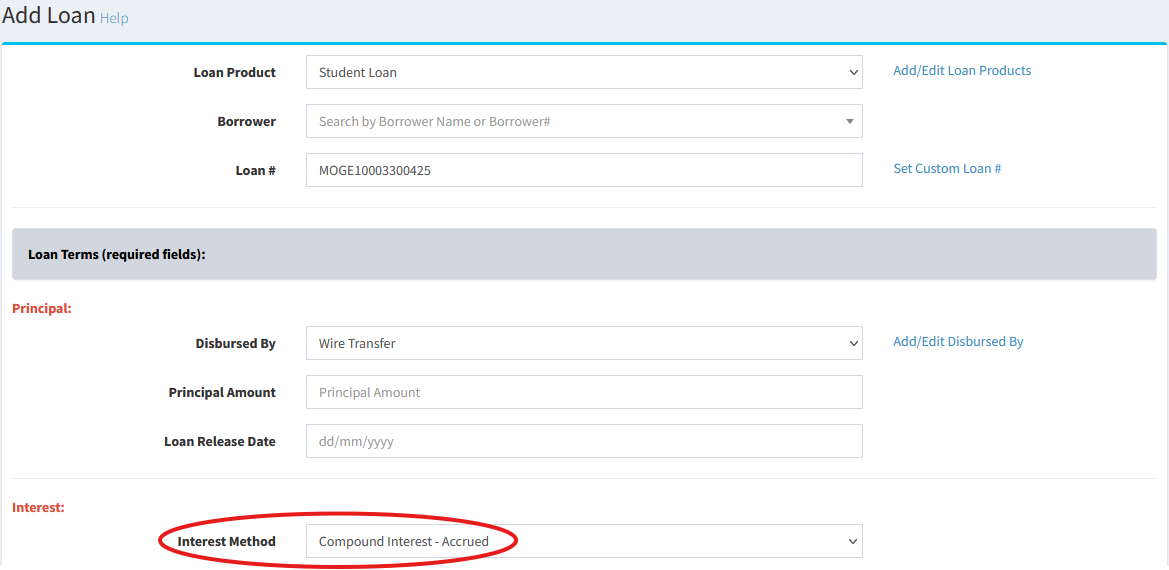
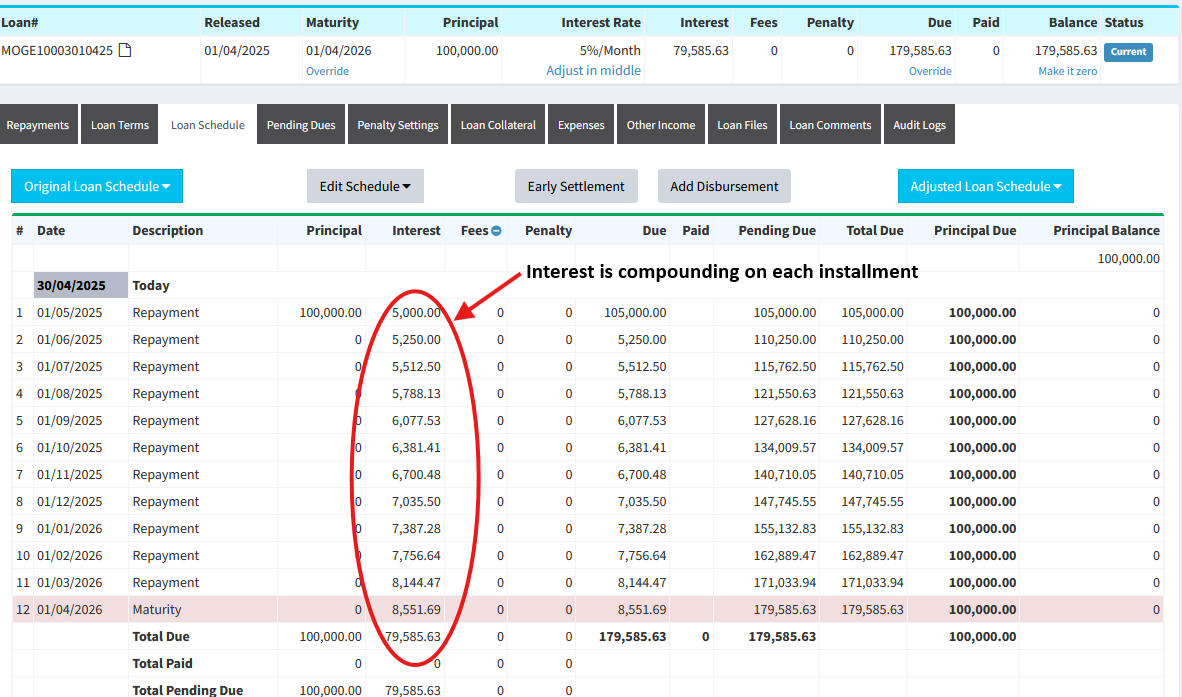
Add Loan: Compound Interest Accrued
In Loans(top menu) → Add Loan, we have added a new Interest Method to calculate Compound Interest - Accrued. This is a more traditional way of calculating compound interest where the principal is charged on the first installment and then interest is compounded on each installment.
-
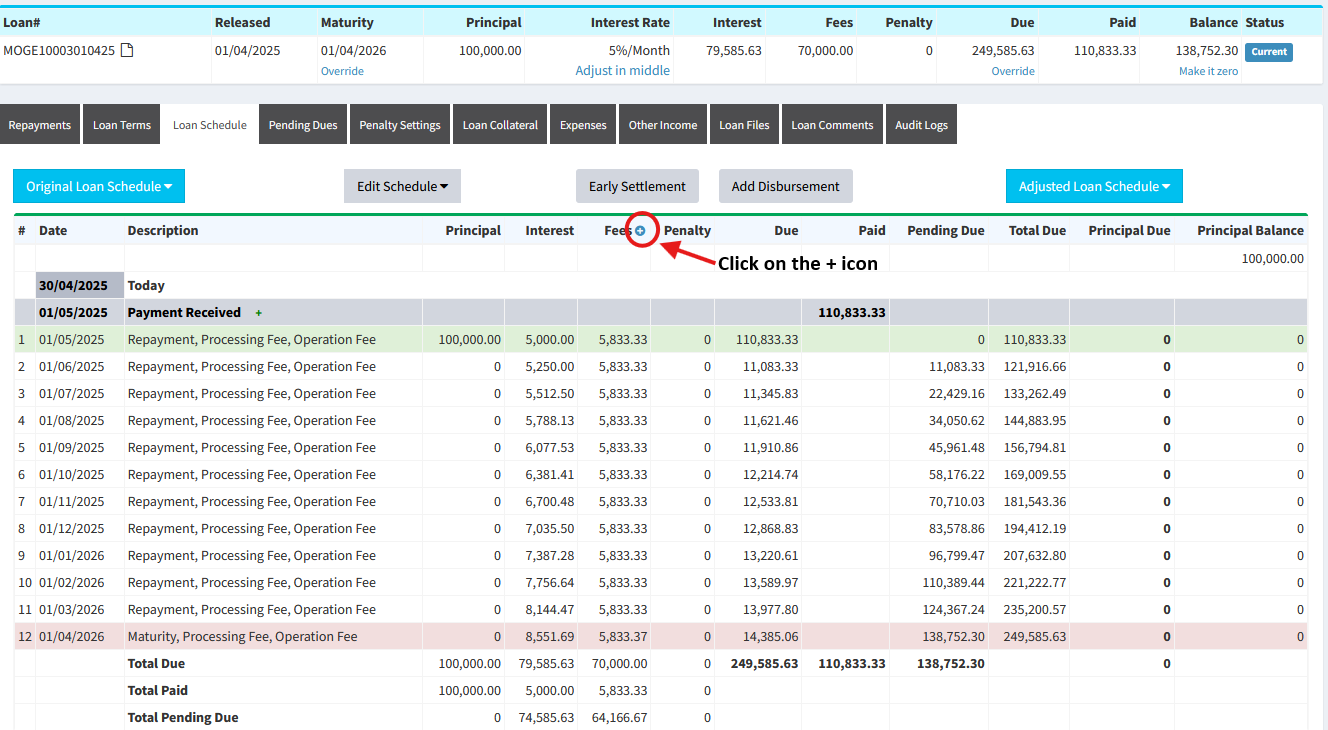
Loan Fees - Expand in Loan Schedule
When viewing a loan schedule, you can now expand the Fees column and show the fees dues and paid amounts. Please visit Loans(top menu) → View All Loans → Pencil button → Loan Schedule tab. There, please click on the icon next to Fees.
Before:
After:

-
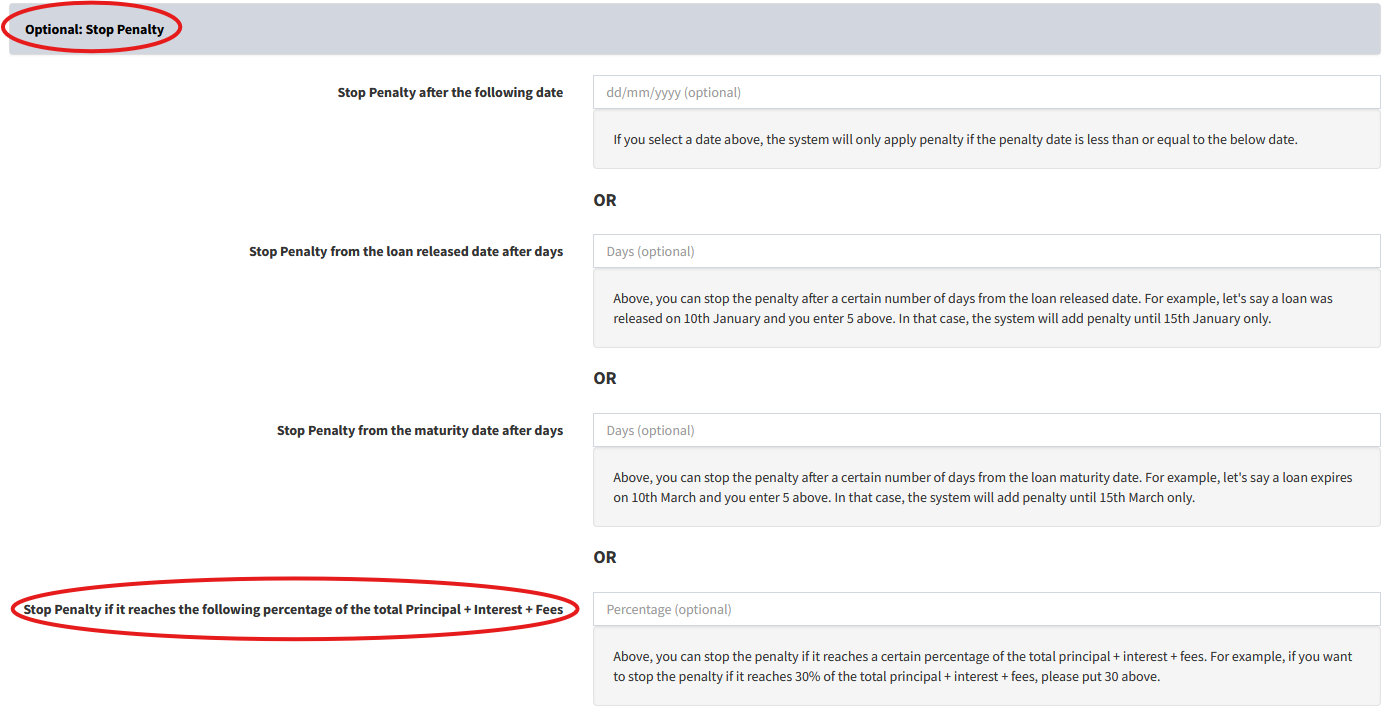
Loan Penalty: Stop Penalty if it reaches a percentage of the total Principal + Interest + Fees
You can now now stop penalty if it reaches a certain percentage of the total Principal + Interest + Fees. To see this option, please visit Admin(top menu) → Loans → Loan Penalty Settings → Set Penalty button. There, in the Optional: Stop Penalty section, please type a percentage value in the Stop Penalty if it reaches the following percentage of the total Principal + Interest + Fees field. For example, if you want to stop the penalty if it reaches 30% of the total principal + interest + fees, please put 30 there.
-
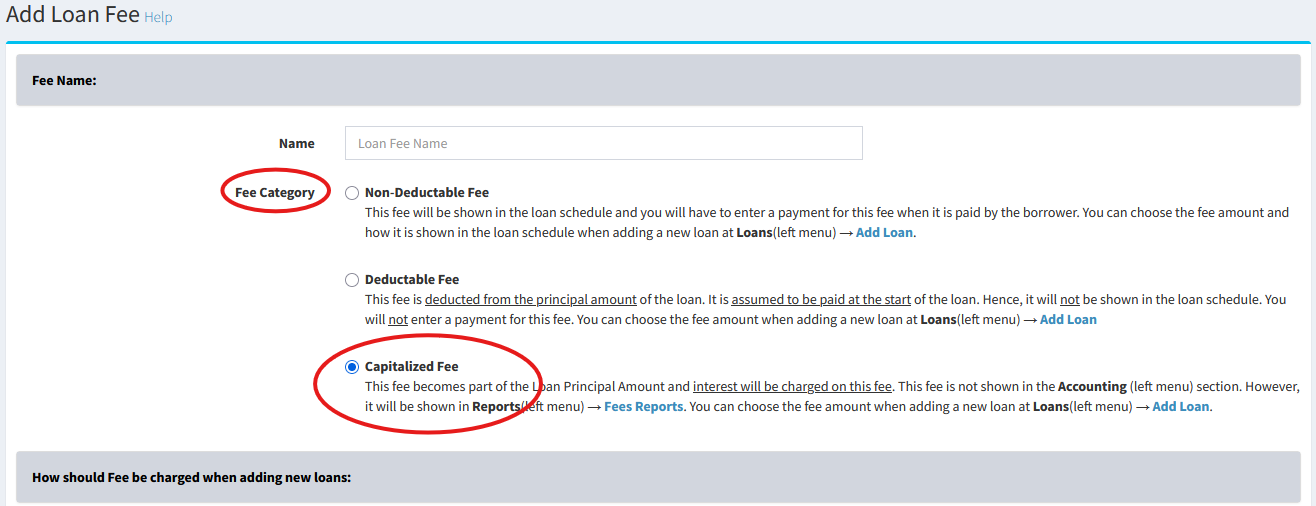
Capitalized Loan Fees
We have add an option to add Capitalized Loan Fees. Capitalized Fees become part of the Loan Principal Amount and interest will be charged on these fees.
To do this, please visit Admin(top menu) → Loans → Loan Fees → Add Loan Fee. There in the Fee Category field, please select Capitalized Fee.
-
Fees Report - Updated
We have update the Fees Report page at Reports(top menu) → Fees Report. You can now see the due and paid amounts for each fee. Also at the bottom of the page, you can see the due and paid fees for each loan.
-
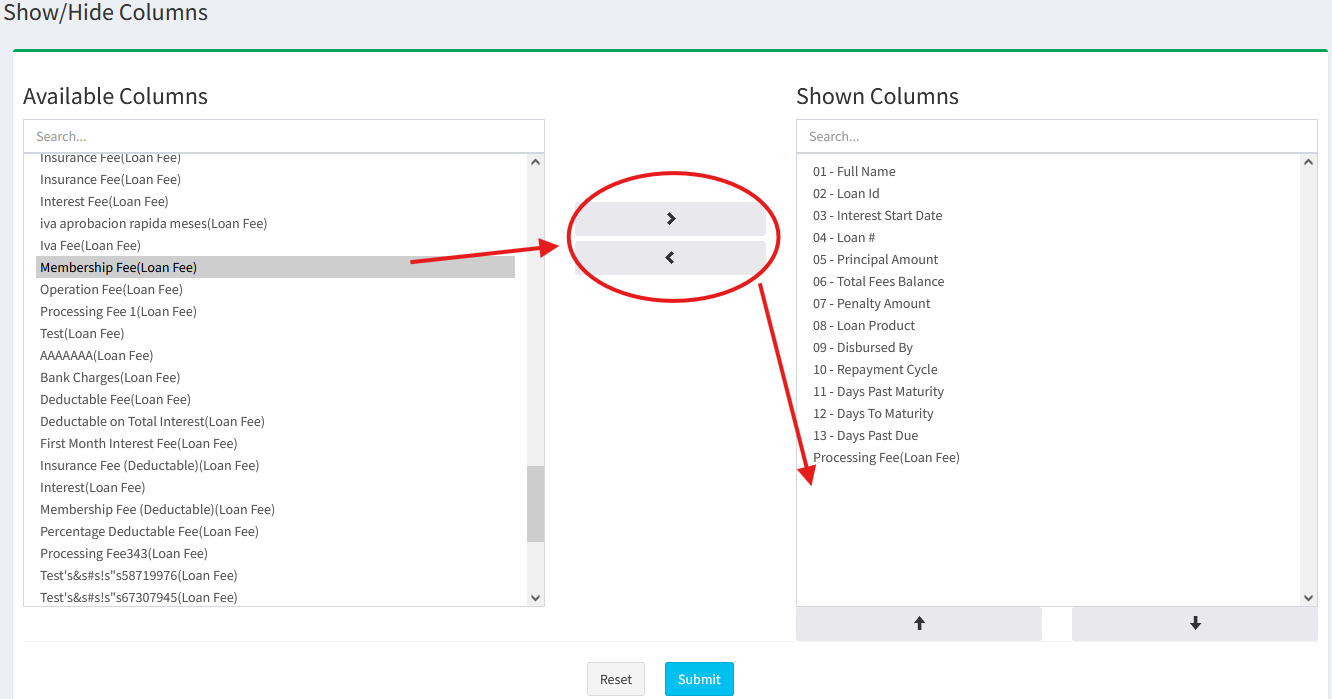
Loan Fees: Show Due Fees in View All Loans
You can now show due fees for each loan on the View All Loans page. Please visit Loans(top menu) → View All Loans. On top right of the table, please click on Show/Hide Columns button. There, please move the fees to the right box using the arrows in the middle.
-
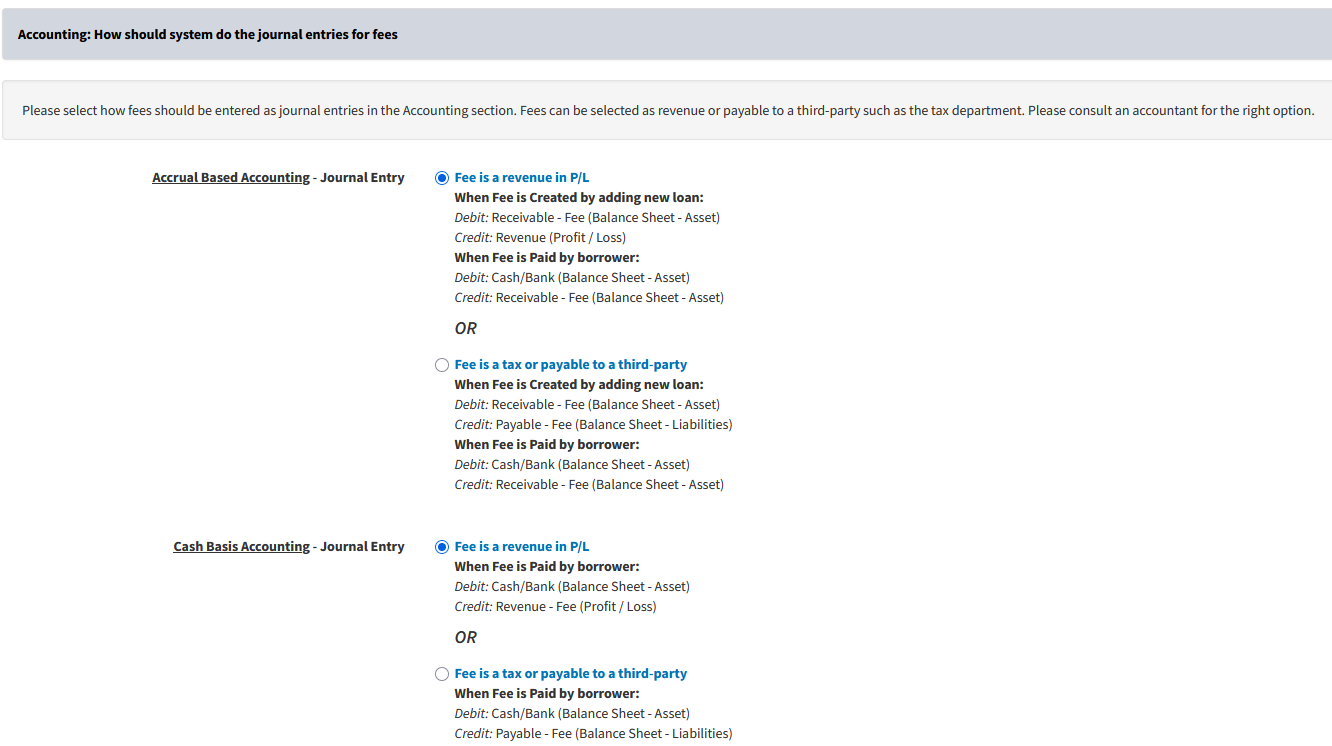
Accounting: Choose how to show fees in accounting reports such as Profit and Loss and Balance Sheet
Before, we would show all the fees in one chart of account called Fees and Commissions. This would be treated as revenue in the Profit and Loss. However, it is possible some fees are a liability and owed to a third-party such as the tax office. For example, it could be fees like GST, VAT, or other tax fees.
Please visit Admin(top menu) → Loans → Loan Fees → Edit button. There in the Accounting section, you can select how fees should be treated in the accounting reports.
-
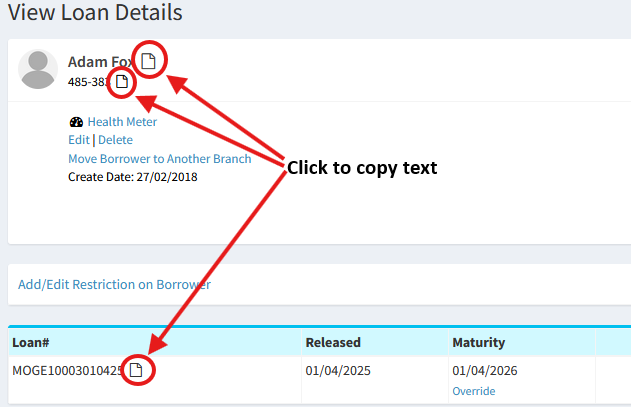
Copy Loan#, Borrower Name, and Borrower Unique Number
You can now copy Loan#, Borrower Name, and Borrower Unique Number with a single click of the mouse instead of having to manually select the text.
-
Add/Edit Staff: Show Results per Page
You can choose the number of records to show on pages like View Borrowers, View All Loans, and View Repayments.
Please visit Admin(top menu) → Manage Staff → Staff → Add Staff or Edit. There, please select the results to show per page in the Show Results Per Page field.
-
API: Early Settlement
You can now perform or delete early settlement on loans via the API.
Please read the API documentation at Early Settlement - Loans for more information.
-
API: Get Branch Id of Loan
We have added a feature to get the branch_id of a loan. This is useful if the loan exists in your account but you are receiving a 404 error when you query the loan in a certain branch_id.
Please read the API documentation at Loan for more information. There you will see the Get branch_id from loan_id field and Get branch_id from loan_application_id field endpoints.
- 6th February 2025
-
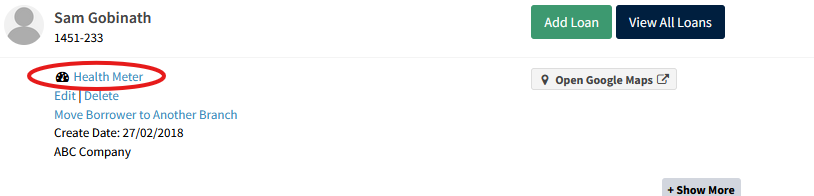
Borrower Health Meter
The Borrower Health Meter gives one of the following health ratings to each borrower:
- Poor
- Below Average
- Average
- Good
- Excellent
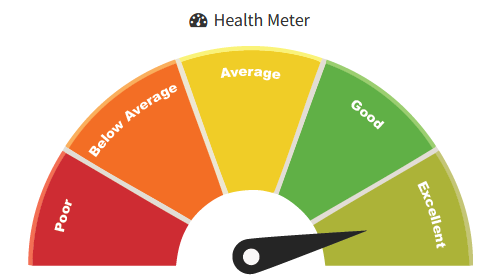
The Health Meter is a great way to check the creditworthiness of the borrower. Ideally, the health rating should be Average or more. The Health Meter is based on the repayment history, the number of fully paid and default loans, late repayments, and the arrears history. There are various statistics shown on the Health Meter page including a monthly chart. These should be checked before disbursing a loan. You can also download the Health Meter page in PDF.
To view the Borrower Health Meter, please click on Loans(top menu) → View All Loans → Pencil button. There, on top of the page, you will see the Health Meter link.
-
Penalty Settings: Pro-Rata Penalties and Number of Penalties
We have modified the penalty settings to include the following features:
- Calculate Pro-Rata Penalties
- Number of Recurring Penalties
- Recurring Penalty Interest Rate %: Select Interest Period such as Per Day/Week/Month/Year
- Add Recurring Penalty Period: New options added such as EndOfMonth, Biweekly, Bimonthly, Quarterly, Every 4 Months, Semi-Annual, Every 9 Months, and Yearly
To view the above features, please visit Admin(top menu) → Loans → Loan Penalty Settings → Set Penalty button.
The Calculate Pro-Rata Penalties is a very useful feature. It calculates penalties on a daily basis but adds it to the loan schedule based on the recurring penalty period such as weekly, monthly, yearly... Below you can see the difference:

In the above example, the penalties are added weekly at 7%/week on the Overdue Amount. The borrower pays the full overdue amount on the 5th day. The loan schedule on the left does not have any penalty added on the 7th day since the total overdue has been paid on the 5th day and there is nothing overdue on the 7th day. But the loan schedule on the right has been set to calculate pro-rata penalties. It has penalties added on the 7th day for 5 days since the borrower paid on the 5th day and there was an overdue amount for 5 days. The pro-rata penalty is calculated as 7%/week divided by 7 days = 1% per day. Since there was an overdue amount for 5 days, it is 1% x 5 days x $1000 overdue = 50 penalty.
-
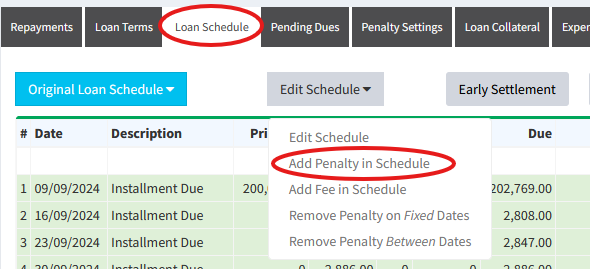
Edit Schedule: Add Penalty
You can now add penalties on certain dates for a loan. Please visit Loans(top menu) → View All Loans → Pencil button → Loan Schedule tab → Edit Schedule dropdown box. There you will see the Add Penalty in Schedule link.
-
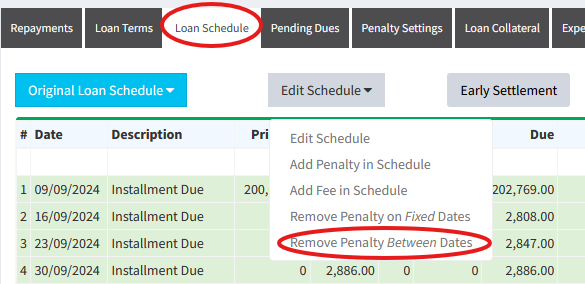
Edit Schedule: Remove Penalty Between Dates
You can now remove penalties between certain dates for a loan. Please visit Loans(top menu) → View All Loans → Pencil button → Loan Schedule tab → Edit Schedule dropdown box. There you will see the Remove Penalty Between Dates link.
-
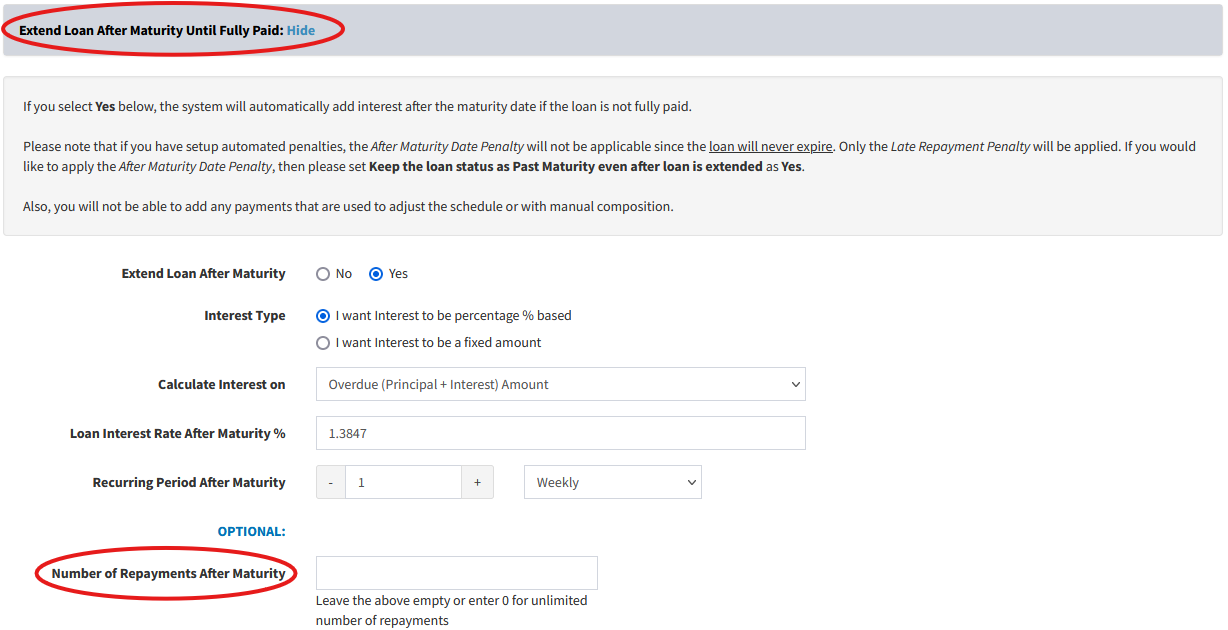
Extend Loan After Maturity Until Fully Paid: Max Number of Repayments
We have now provided an option to include a maximum number of repayments in the Extend Loan After Maturity Until Fully Paid feature.
To set this, please visit Loans(top menu) → Add Loan → Extend Loan After Maturity Until Fully Paid: Show. There, you will see the Number of Repayments After Maturity field.
-
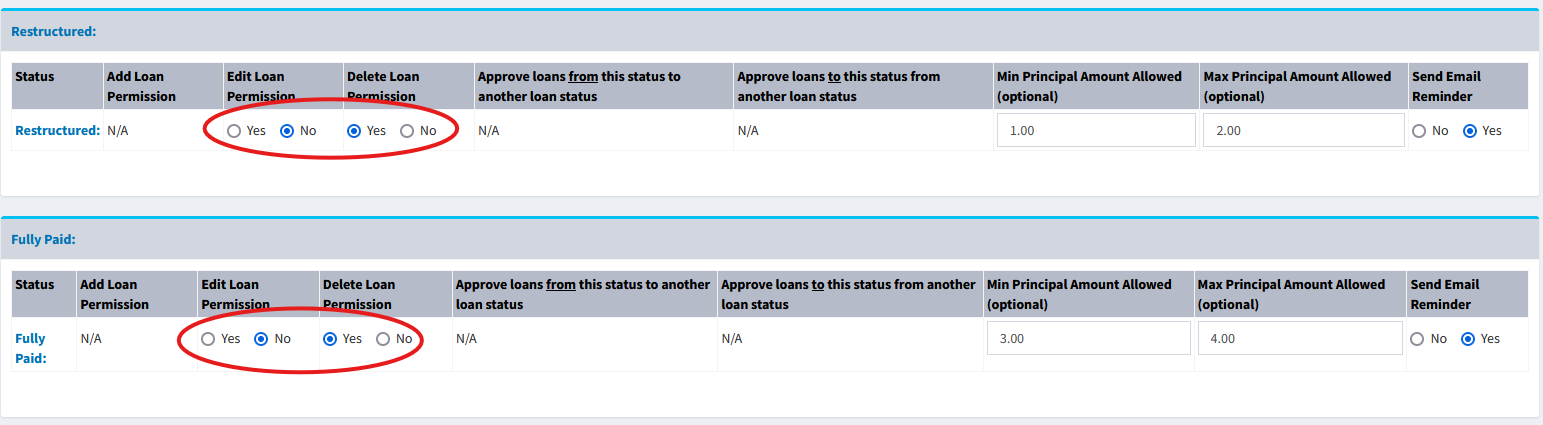
Manage Loan Status and Approvals: Set Permission for Fully Paid and Restructured Loans
You can now set permissions on whether your staff members can edit and delete fully paid and restructured loans. To set permissions, please visit Admin(top menu) → Loans → Manage Loan Status and Approvals → Set Permissions for Loan Statuses. There, please select a staff member (not owner) and click on the Set Permission button.
- 20th December 2024
-
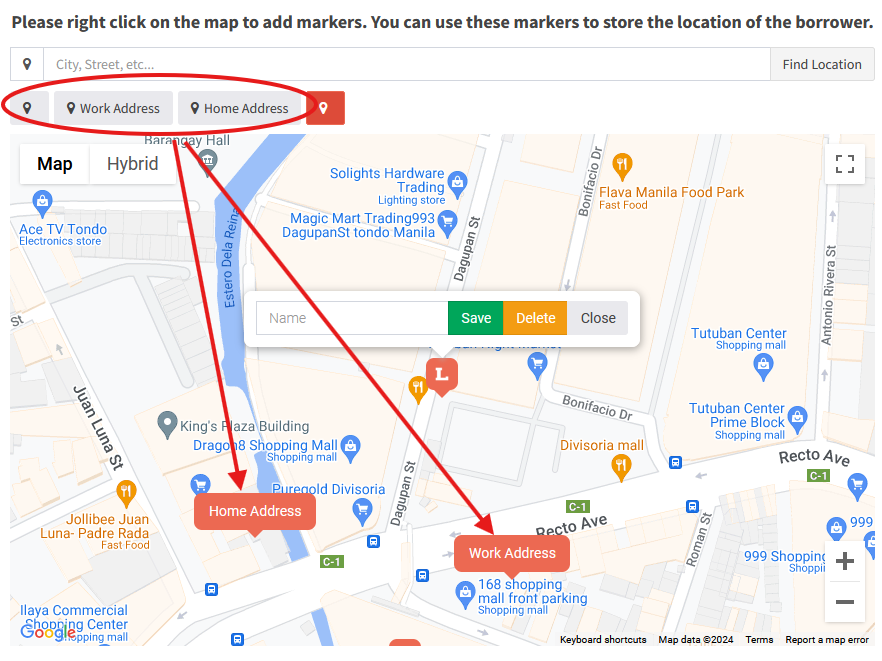
Google Maps Integration
We have integrated Google Maps into Loandisk so you can save multiple borrower addresses on Google Maps. Please visit Borrowers(top menu) → View Borrowers → Loans button. There, on top of the page, please click on the Google Maps button.
You can search for addresses in the location bar and then right click on the map to save multiple markers on the map.

-
Modify Add Borrower Fields
You can now choose which borrower fields to show, make fields required or optional, and order the fields when adding a new borrower. These fields can be seen on the Borrowers → Add Borrower page. This is particularly useful if you would like to make certain fields required so that when adding a new borrower, your staff are required to input values for those fields.
To modify borrower fields, please visit Admin(top menu) → Borrowers → Modify Add Borrower Fields.
-
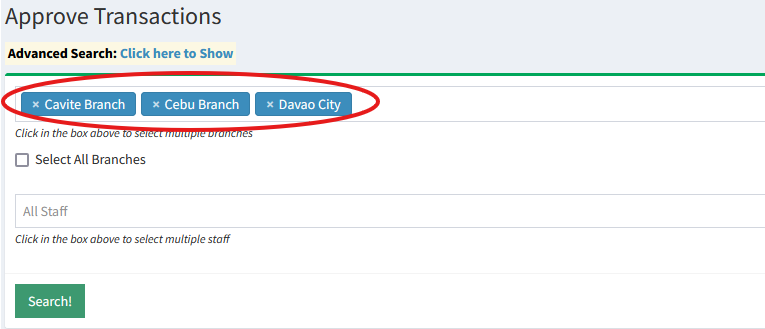
Approve Repayments in all Branches
Before, you could only approve repayments in 1 branch only. Now, we have included an option to approve repayments in multiple branches at once.
Please visit Repayments → Approve Repayments. There, on top of the page, you will see the option to select multiple branches and then click the Search button.

-
Approve Savings Transactions in all Branches
Before, you could only approve savings transactions in 1 branch only. Now, we have included an option to approve savings transactions in multiple branches at once.
Please visit Savings Transactions → Approve Transactions. There, on top of the page, you will see the option to select multiple branches and then click the Search button.
-
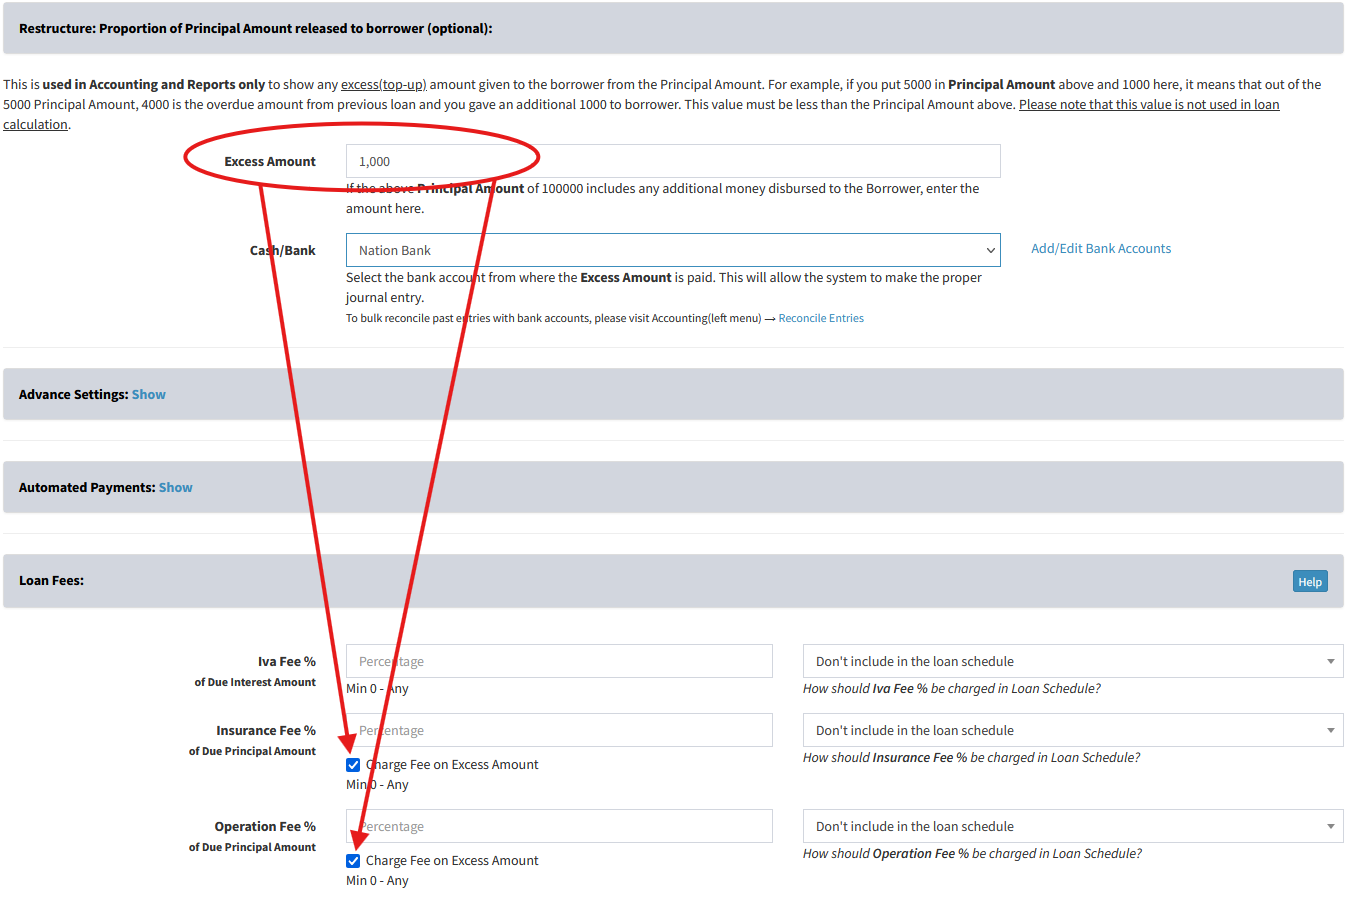
Restructure Loan: Charge Fee on Excess Amount
We have now provided an option to charge fees on the Excess Amount when restructuring a loan. Before, we only had the option to charge the fees on the Principal Amount field. However, the Principal Amount value is coming from the old loan and charging fees on this amount may not be desirable. Now, you can choose to charge fees on the Excess Amount field.
-
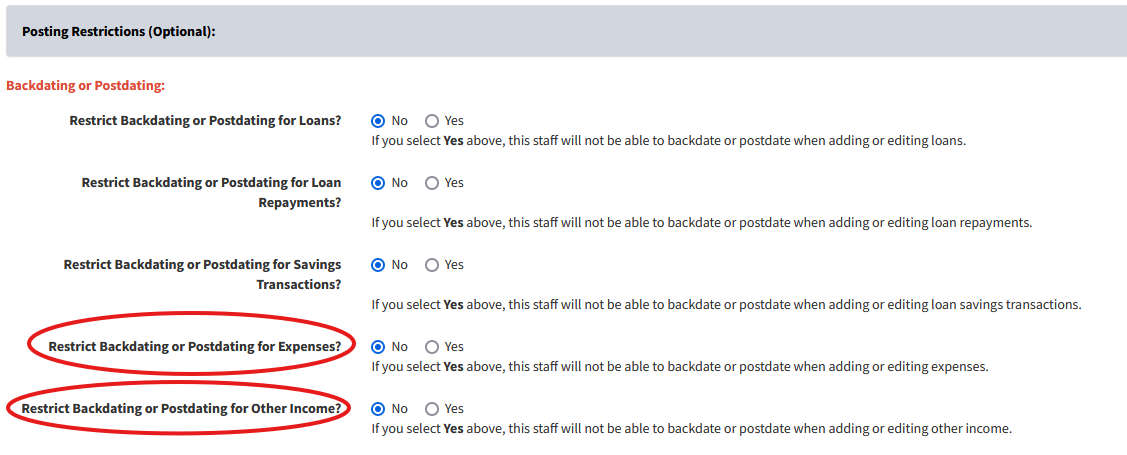
Staff Restrictions: Backdating and Postdating for Expenses and Other Income
You can now prevent backdating and postdating for certain staff members when adding or editing an expense or other income. Please visit Admin(top menu) → Manage Staff → Staff → Edit. There, you will see the Backdating or Postdating section.
-
Staff Restrictions: Add Manual Journal for Approval
We have provided an approval system for manual journals. The manual journals can be added at Accounting → Manual Journal. Please visit Admin(top menu) → Manage Staff → Staff → Edit. There, you will see the Restrict Add/Edit Manual Journals for Approval field. If you select this as Yes, any manual journal added or edited in the accounting section by this staff member will be sent to the Draft stage. Then, you can login and approve or delete the journal by visiting Accounting(top menu) → Manual Journal → Draft tab.
To receive email notifications when manual journals are added in the draft stage, please visit Admin(top menu) → Manage Staff(top menu) → Staff Email Notifications.

-
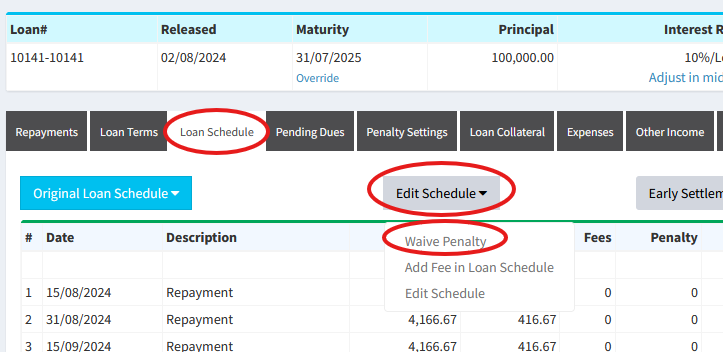
Edit Schedule: Waive Penalty
You can now waive penalties on certain dates for a loan. The system will remove penalty on the seelcted dates and not add penalties in the future on those dates for that loan.
-
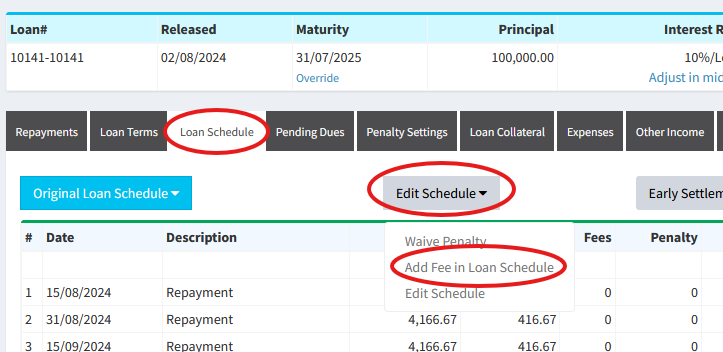
Edit Schedule: Add Fees Manually in Schedule
You can now add fees on certain dates for a loan. Please visit Loans(top menu) → View All Loans → Pencil button → Loan Schedule tab → Edit Schedule dropdown box. There you will see the Add Fee in Loan Schedule link.
-
Add Loan: Round Up to Integer
We have provided an option to round off all values in a loan up to integer. For example, 3.1 would be rounded off to 4. To set this, please visit Loans(top menu) → Add Loan → Advance Settings: Show. There, you will see the Decimal Places field.

-
Disbursement Report: Export Data for All Pages
You can now export all data from the disbursement report into an Excel sheet. To do this, please visit Reports(top menu) → Disbursement Report → Export Data for all pages.
-
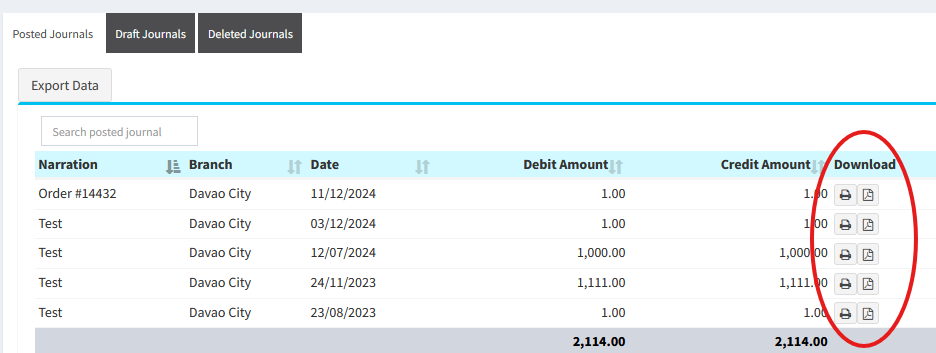
Accounting - Manual Journal: Print Manual Journal or Download in PDF
To download or print manual journals, please visit Accounting → Manual Journal. There in the Downloads column, please click on the print or PDF icon.
-
Accounting - Manual Journal: Upload Files and Link Manual Journal to Borrower, Loan, Savings Account, or Investor
You can now link manual journals to borrowers, loans, savings accounts, and investors. Also, files can be uploaded with manual journals. Please visit Accounting → Manual Journal → Add Manual Journal. There, you will see the options to upload files and link the journal.
-
Accounting - Manual Journal: Add Custom Fields
You can now add custom fields to manual journals. To add custom fields, please visit Admin(top menu) → Settings → Custom Fields → Add Custom Field. There, in the Category field, please select Add Manual Journal.
-
API: Get Disbursement Report
You can now download the disbursement report via the API. Please visit Admin(top menu) → Settings → API Settings → Reports → Disbursement Report.
-
Loan Penalty: Calculate Penalty on Total Principal Balance Amount
We have added a new option in loan penalty settings to calculate penalty on the Total Principal Balance Amount. To select this option, please visit Admin(top menu) → Loans → Loan Penalty Settings → Set Penalty button. There, in the Calculate Penalty on dropdown, you can select Calculate Penalty on Total Principal Balance Amount.
-
Sidebar Menu Static
The sidebar is now static on the left hand side of the page. Before, it would also scroll with the main page. We have made it fixed for easier navigation.
- 2nd August 2024
-
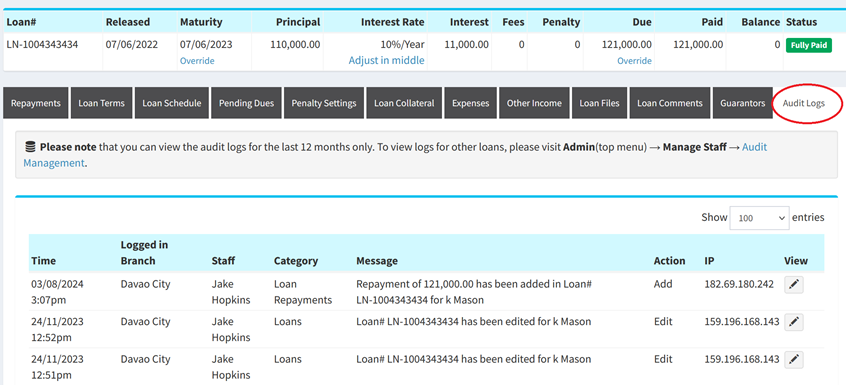
View Loan Details: Audit Logs
You can now view the audit logs for a loan. Please visit Loans(top menu) → View All Loans → Pencil button. There, on the View Loan Details page, please click on the Audit Logs tab.
-
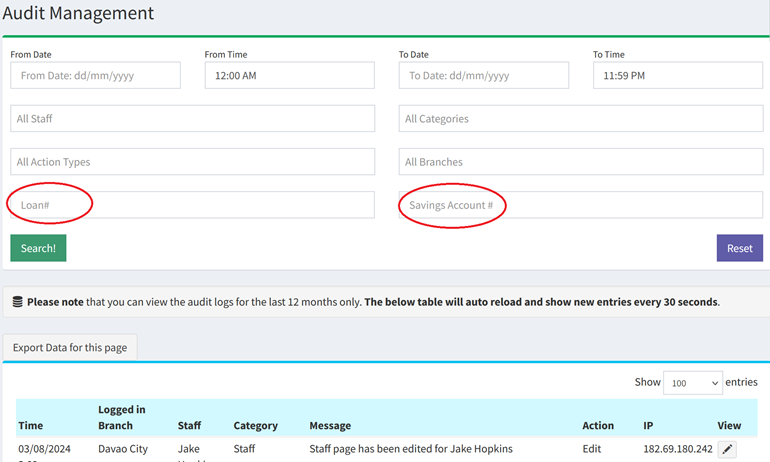
Audit Management: Search via Loan# or Savings Account#
You can now search audit logs based on Loan# and Savings Account #. Please visit Admin(top menu) → Manage Staff → Audit Management.
-
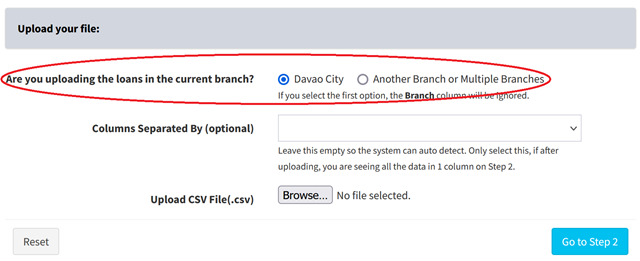
Add Bulk Loans CSV: Upload in All Branches
Before you could Upload Loans via CSV in 1 branch only. Now we have included an option to upload the loans in multiple branches at once.
Please visit Admin(top menu) → Bulk Upload → Upload Loans from CSV file. There, please select Are you uploading the loans in the current branch? as Another Branch or Multiple Branches. You need to have a Branch column in your CSV file and then put the branch id corresponding to the branch where the loan should be uploaded. You can see your branch ids at Branch Ids.
-
Upload Loan Schedule from CSV file: Keep existing loan schedule and add new schedule
Before, when bulk uploading loan schedules via CSV, the system would remove the old schedule and overwrite with the new schedule from the CSV file. You can now choose whether to overwrite the existing schedule or keep the existing schedule and add new rows to it.
Please visit Admin(top menu) → Bulk Upload → Upload Loan Schedule from CSV file. There, please select Overwrite Existing Loan Schedule? to Keep existing loan schedule and add new schedule.

-
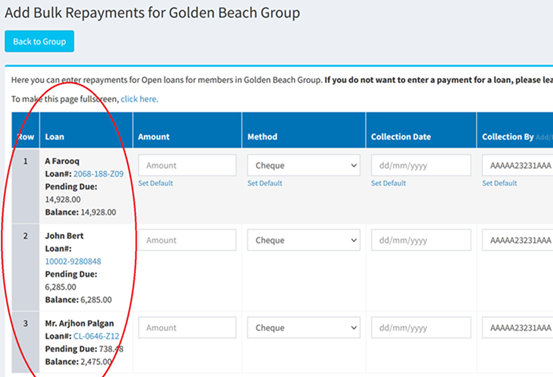
Group Loans: Add Bulk Repayments for Members in Group
We have provided a feature to Add Bulk Repayments for members in a group. The loan column will be pre-filled with the open loans of the members. This will save time from having to select loans of members and then entering the amounts.
Please visit Borrowers(top menu) → View Borrower Groups→ Pencil button. There, you will see the Add Bulk Repayments button.
-
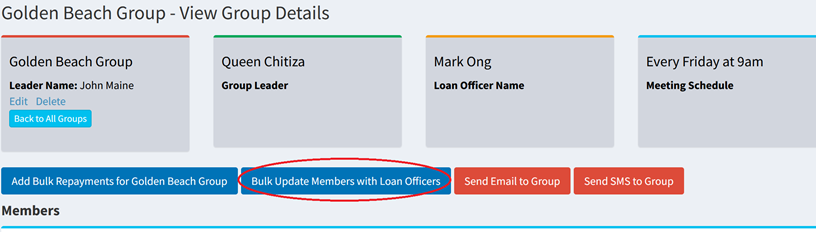
Group Loans: Bulk Update Members in Group with Loan Officers
We have provided a bulk feature to update loan officers for all members in a group. This will save time from having to manually edit each borrower and then change the loan officer.
Please visit Borrowers(top menu) → View Borrower Groups→ Pencil button. There, you will see the Bulk Update Members with Loan Officers button.
-
Restructure Loan: Only restructure if new loan is released
Before, if a loan was restructured and the new loan was under Processing status (not released to borrower), the old loan would be marked as Restructured and hence closed. We have changed this functionality so the old loan will only be marked as Restructured once the new loan is changed to Open status which is set when the loan is active and the funds have been disbursed to the borrower. If you mark the new loan as Processing, the old restructured loan will be kept open until the new loan is marked as Open/Default.
If the new loan is changed/set to Denied/Not Taken Up statuses, the old loan will be kept open and not marked as restructured.
-
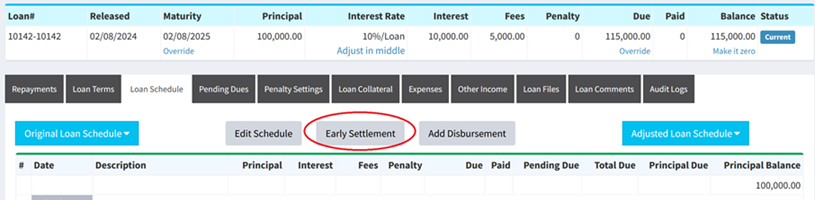
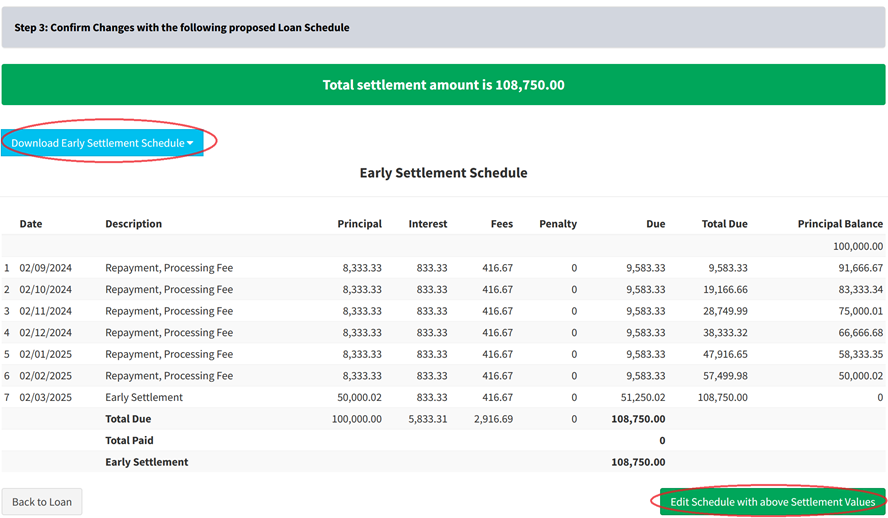
Early Settlement: Show a preview of the loan schedule after selecting settlement values
When doing an early settlement on a loan, we have provided an extra step where you can preview the loan schedule with the early settlement values before committing changes to the loan schedule. Before, it was not possible to preview the loan schedule.
You can also download the early settlement schedule and email it to the borrower before committing the changes.
This feature will allow you to only commit changes to the loan schedule once the borrower pays the early settlement balance.
To do an Early Settlement, please visit Loans(top menu) → View All Loans → Pencil button. There click on the Loan Schedule tab → Early Settlement button.
-
Daily Report
We have included a new report at Reports(top menu) → Daily Report. This report shows the summary for the day:
- Number of Due Loans today
- Expected Collections today
- Actual Collections today
- Unpaid Loan Due Amount today
- Total Number of Collections today
- Number of Borrowers with due loans today
- Loan Amount Disbursed today
- Opening cash balance today
- Closing cash balance today
- Pending Due today
- Next Day Expected Collection
- Number of Processing/Fully Paid/Default/Restructured/Not Taken Up/Denied Loans today
-
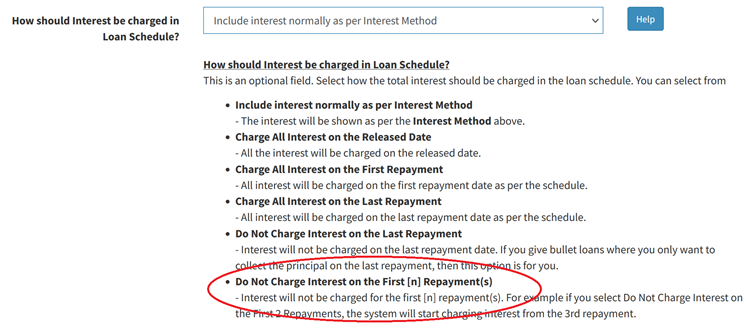
Add Loan: Do Not Charge Interest on the First [n] Repayment(s)
Please visit Loans(top menu) → Add Loan → Advance Settings: Show. There in How should Interest be charged in Loan Schedule? field, we have added the option not to charge interest in [n] repayments.
-
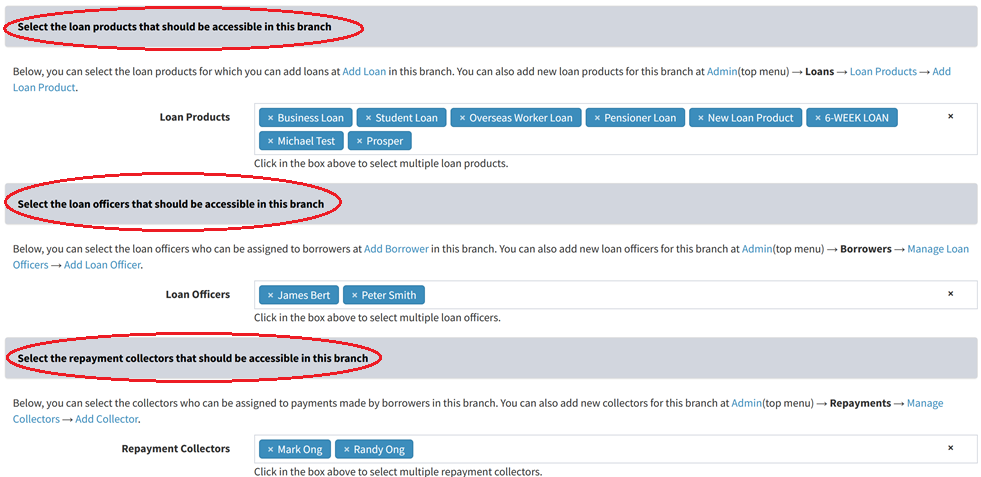
Add/Edit Branch: Select Loan Products, Loan Officers, and Repayment Collectors
Before this feature was released, after adding a new branch, you would have needed to visit the Loan Products, Loan Officers, and Repayment Collectors pages and select the new branch. We have now provided the option on the Add/Edit Branch page to select the loan products, loan officers, and collectors that should be available in the branch.
Please visit Admin(top menu) → Manage Branches → Branches → Add Branch. There you can select the Loan Products, Loan Officers, and Repayment Collectors.
-
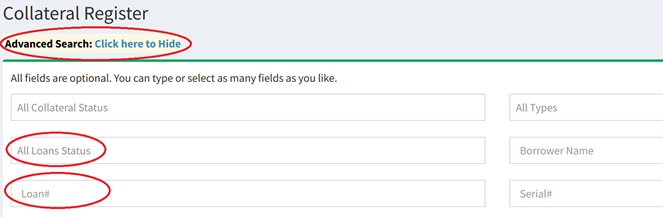
Collateral Register: Search via Loan Status or Loan#
We have added the feature to search collateral via Loan Status and/or Loan#. Please visit Collateral Register → Advanced Search: Click here to Show. There you will see the fields for Loan Status and Loan#.
-
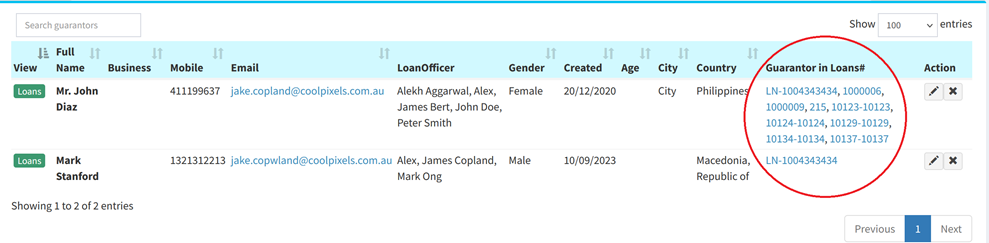
Guarantors: Show Guarantor in Loans#
Please visit Loans(top menu) → Guarantors. There, in the Guarantor in Loans# field, you can see the loans that the guarantor has been added to.
-
View Borrowers: Added New Table Columns
We have added new columns in View Borrowers. Please visit Borrowers(top menu) → View Borrowers → Show/Hide Columns button. There, you can select the following columns that have been added:
- Number of Loans
- Number of Open Loans
- Number of Fully Paid Loans
- Number of Defaulted Loans
- Number of Processing Loans
- Number of Not Taken Up Loans
- Number of Denied Loans
- Number of Restructured Loans
- Total Paid Amount for Open Loans
- Total Paid Amount for Fully Paid Loans
- Total Paid Amount for Default Loans
- Total Paid Amount for Restructured Loans
-
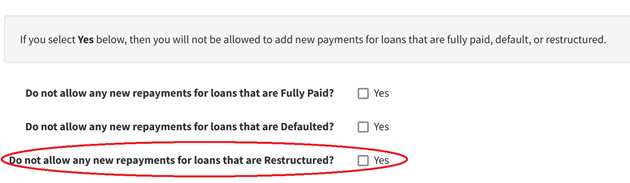
Borrower Restrictions: Do not allow payments on restructured loans
You can now prevent repayments from being added on loans that are restructured. This is useful in error checking.
To do this, please visit Borrowers(top menu) → View Borrowers → Loans button. There, you will see the Add/Edit Restriction on Borrower link. Once you click this link, you can set the Do not allow any new repayments for loans that are Restructured? field to Yes.
-
New Placeholders Added
We have added new placeholders which can be used while sending SMS/Email and also in Loan Templates: Applications/Agreements.
- {LoanPrincipalBalance}
- This will be replaced with total pending principal balance of the loan after any repayments -
{LoanPrincipalBalanceInWords}
- The above {LoanPrincipalBalance} placeholder will be replaced in words. -
{LoanInterestBalance}
- This will be replaced with total pending interest balance of the loan after any repayments -
{LoanInterestBalanceInWords}
- The above {LoanInterestBalance} placeholder will be replaced in words. -
{LoanFeesBalance}
- This will be replaced with total pending fees balance of the loan after any repayments -
{LoanFeesBalanceInWords}
- The above {LoanFeesBalance} placeholder will be replaced in words. -
{LoanPenaltyBalance}
- This will be replaced with total pending penalty balance of the loan after any repayments -
{LoanPenaltyBalanceInWords}
- The above {LoanPenaltyBalance} placeholder will be replaced in words. -
{RestructureExcessAmount}
- This will be replaced with the Excess Amount field when you restructure an existing loan. The excess amount is the top-up amount given to the borrower from the Principal Amount field.
- {LoanPrincipalBalance}
-
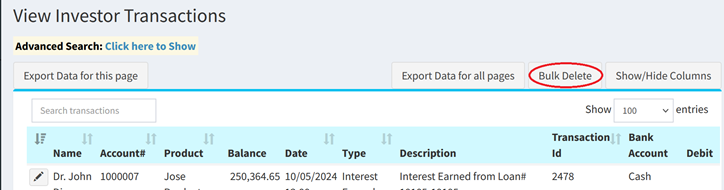
Investor Transactions: Bulk Delete Transactions
To bulk delete investor transactions, please visit Investor Accounts(top menu) → View Investor Transactions. There, on the top right of the table, you will see the Bulk Delete button. Please be careful as the bulk delete operation can not be undone.
-
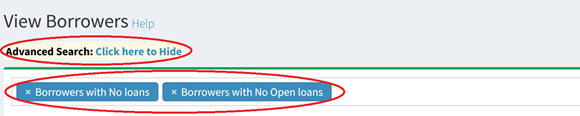
View Borrowers: Show Borrowers with No Loans
On the Borrowers(top menu) → View Borrowers page, we have added the option to do an advanced search based on Borrowers with No loans and/or Borrowers with No Open loans. Please click on Advanced Search: Click here to Show link on top of the page.
-
Loan Arrears Aging Report: Last Payment and Total Paid columns
Please visit Reports(top menu) → Loan Arrears Aging Report. There, you will see the Last Payment and Total Paid columns.
-
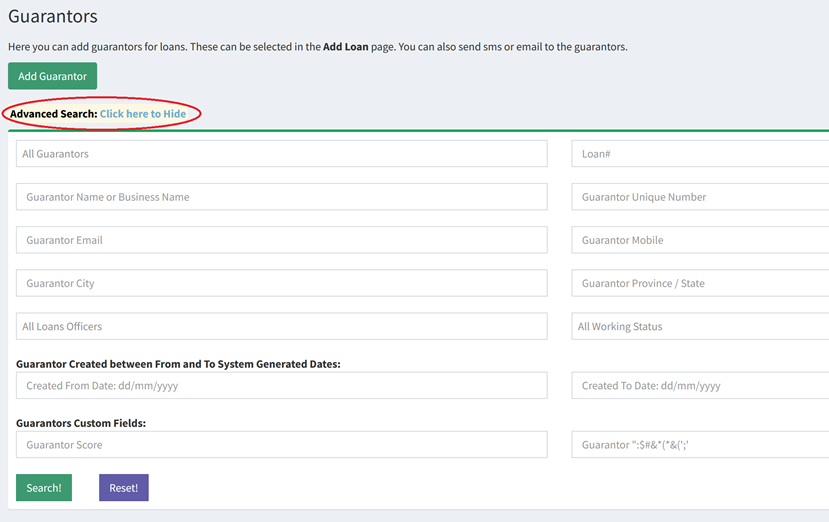
Guarantors: Show Advanced Search
Please visit Loans(top menu) → Guarantors. There, we have provided the option to do an advanced search on guarantors.
-
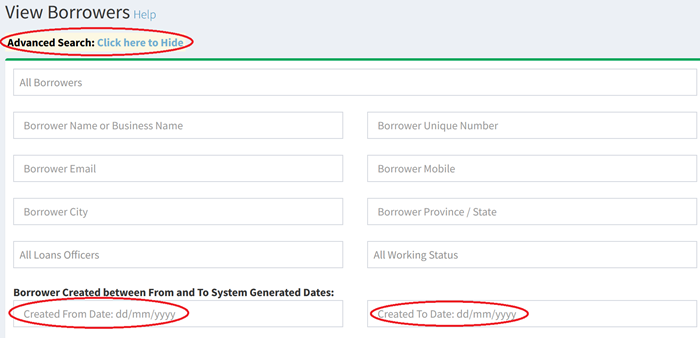
View Borrowers: Filter by System Created Date in Advanced Search
On the Borrowers(top menu) → View Borrowers page, you can now search for borrowers created between certain dates. These are the Loandisk system generated dates on when the borrower was added.
-
Export Data for all pages: Increased number of columns that can be exported
We have increased the columns that can be exported from 60 to 80 columns. You can find the Export Data for all pages button on pages like Borrowers(top menu) → View Borrowers, Loans(top menu) → View All Loans, Repayments(top menu) → View Repayments, Savings(top menu) → View Savings Accounts, and Savings Transactions(top menu) → View Savings Transactions.
-
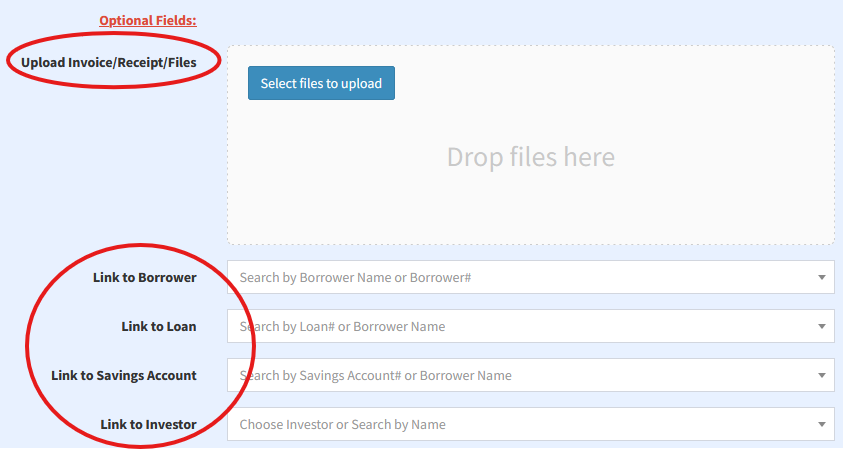
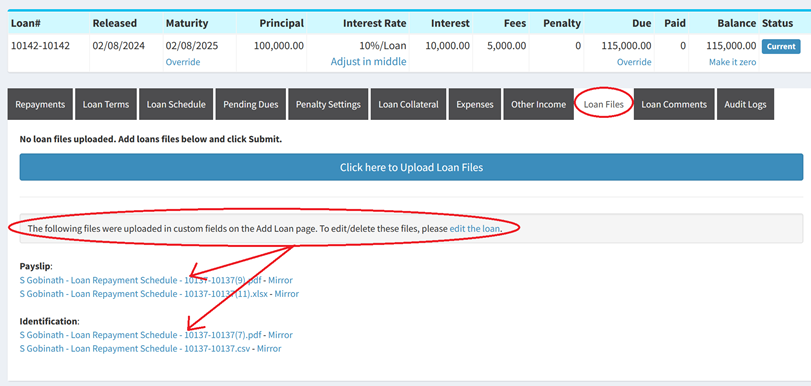
View Loan Details: Show Custom File Upload Fields in Loan Files Tab
If you have custom fields on the Add/Edit Loan page that require file uploads, then these will now be automatically shown on the Loan Files tab also.
To add custom fields, please visit Admin(top menu) → Settings → Custom Fields → Add Custom Field. There, in the Category field, please select Add Loan. In Field Type, please select File Upload.
-
Borrower Restrictions: Maximum Principal Released Amount for Open/All Loans Allowed
You can now place limits on how much funds can be released in total to the borrower when adding a new loan or a disbursement.
To do this, please visit Borrowers(top menu) → View Borrowers → Loans button. There, you will see the Add/Edit Restriction on Borrower link. Once you click this link, you can set the Maximum Principal Released Amount for Open Loans Allowed and the Maximum Principal Released Amount for All Loans Allowed fields.

-
Accounting: Show description in account ledgers
In accounting ledgers, we are now showing the description field that is present on many pages. For example, please visit Expenses(top menu) → Add Expense. At the bottom of the page, you will see the Description field. This will now show in the relevant accounting ledgers for this expense. To see the ledgers, please visit Accounting (top menu) → Chart of Accounts → View.
- 5th April 2024
-
Daily Automated Backups
We have released a feature to download daily backups of your account. This includes borrowers, loans, repayments, savings, savings transactions, expenses, other income, asset management, investors, investor transactions, payroll, and loan comments. Each of these categories will have a separate CSV file which can be downloaded in a single .zip file. For more details, please visit Admin(top menu) → Backups → Backup Settings.
You can download the daily backups from Admin(top menu) → Backups → Download Backups. Also, you can download the daily backups from the API by visiting Admin(top menu) → Settings → API Settings → Download Daily Backups.
Please note that this is a paid add-on due to server costs and increased storage.
-
Copy Loan
You can now add a new loan by copying an existing loan thereby saving time from having to add the same loan data again. Please visit Loans(top menu) → View All Loans → Pencil button. There click on the Loan Terms tab → Copy Loan button.
-
Bulk Move Borrowers to Another Branch
Before, you could only move borrowers to another branch individually which was time consuming. Now, you can move multiple borrowers to another branch at once using the bulk feature. Please visit Admin(top menu) → Borrowers → Bulk Move Borrowers to Another Branch.
-
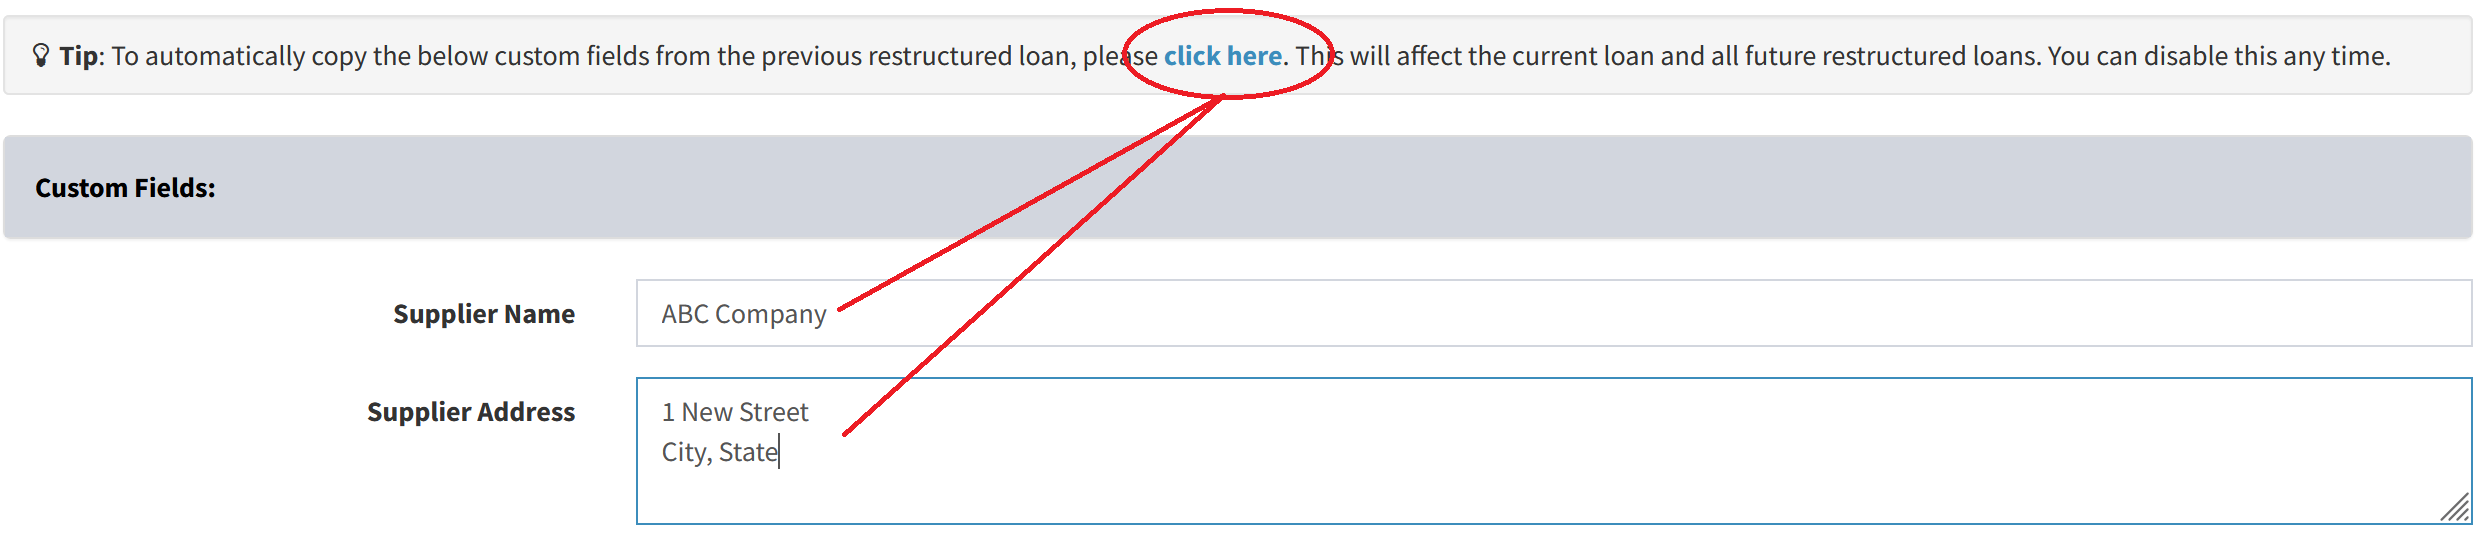
Auto Populate Custom Fields for Restructured Loans
Before, when restructuring an existing loan, you would have to type the custom fields again on the Add Loan page. We have now added the option to automatically copy the custom fields from the old restructured loan to the the new loan being created.
Please visit Loans(top menu) → View All Loans → Pencil button. There click on the Loan Terms tab → Restructure Loan button. There, above the custom fields section, you will see a Tip box where you can click to auto populate the custom fields from the previous loan.
-
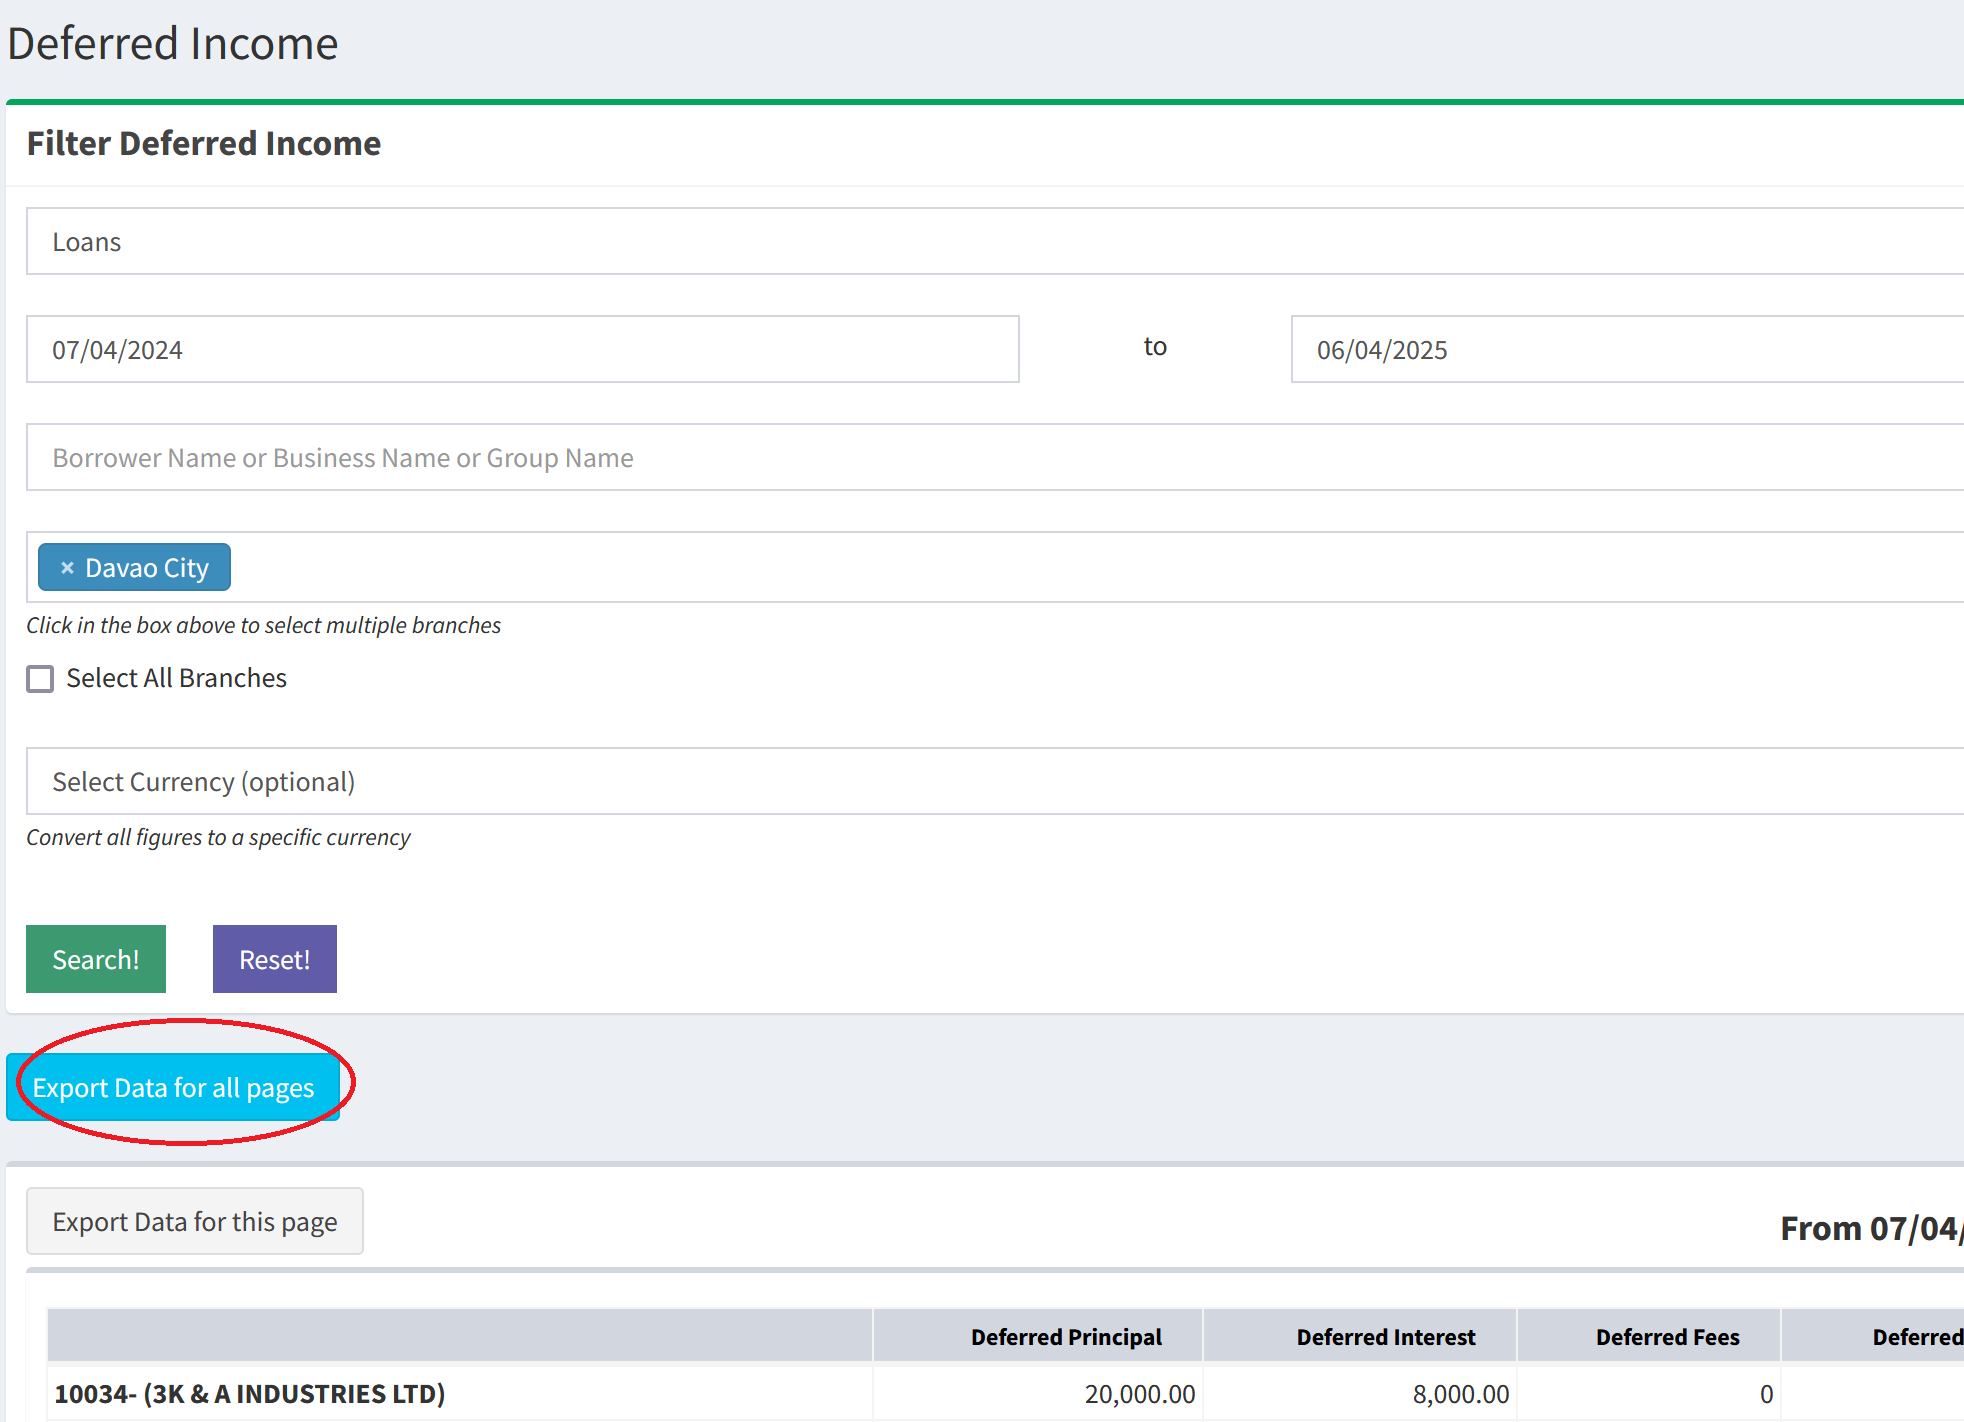
Export All Data - Deferred Income
We have added the feature to export all pages from the Deferred Income report. Please visit Reports(top menu) → Deferred Income. There, if you select the Loans or the Borrowers category, you will see the Export Data for all pages button in blue.
-
Inter Bank Transfers - Accounting
We have provided a feature to add inter bank transfers from one bank account to another bank account. This can also be done in bulk from a CSV file. Please visit Accounting(top menu) → Inter Bank Transfers.
To add Bank Accounts, please visit Admin(top menu) → Accounting → Bank Accounts.
-
Copy Staff and Guarantors - Send Email
Before, when sending emails to borrowers and guarantors, it was not possible to quickly copy staff members and loan guarantors. We have now added the option to select guarantors and staff members. Please visit Loans(top menu) → View All Loans → Pencil button. There on top right, please click on the Send Email button. On the Send Email to Borrower page, you will see the Copy Loan Guarantors (if any) and Copy Staff fields.
-
New Gender Options - Add Borrower
We have added new options in Borrowers(top menu) → Add Borrower → Gender field.
-
Custom Fields for Add Payroll
You can add custom fields for payroll at Admin(top menu) → Settings → Custom Fields. There you will see the Add Payroll category.
-
Add Opening Balances - Accounting
We have added the feature to add opening balances to accounting. Please visit Admin(top menu) → Accounting → Opening Balances. This can done on a per branch basis.
- 24 November 2023
-
Audit Management
We have released our new Audit Management feature which will allow you to view changes made by staff members in the system. For more details, please visit Admin(top menu) → Manage Staff → Audit Management.
This will allow you to see changes to records such as adds, edits, deletes, logins, and sent messages. You can also view on a per category basis such as for borrowers, loans, repayments, savings, savings transactions, expenses, payroll, other income... If the record has been deleted, you can click on the eye button on the right hand side to see exactly what has been deleted.
The table will auto refresh every 30 seconds with the new changes made by staff members.
-
Upload Repayments via CSV in multiple branches at once
Before you could only Upload Repayments via CSV in 1 branch only. Now we have included an option to upload the repayments in multiple branches.
Please visit Repayments(top menu) → Upload Repayments from CSV file. There please select Are you uploading the repayments in the current branch? as Another Branch or Multiple Branches. You need to have a Branch column in your CSV file and then put the branch id corresponding to the branch where the repayment should be uploaded. You can see your branch ids at Branch Ids
- 25th September 2023
-
Restrict Loan Officers so they can only view their own borrowers/loans/repayments/savings.
Now, you can restrict loan officers so they can only see their own borrowers and loans which have been assigned to them. To assign a borrower to a loan officer, please visit Borrowers(top menu) → Add Borrower. There you will see the Loan Officer Access field. To add and restrict the loan officers, please visit Admin(top menu) → Borrowers → Manage Loan Officers.
Please see the following video to learn more about the loan officer feature:
-
Send OTP to Borrower before Loan Disbursement
The One Time Password (OTP) feature can be used to verify that the borrower has approved the disbursement of the loan. On the Add/Edit Loan and the Approve Loans pages, when you set the Loan Status field to Open, the system will ask you for the OTP. You can send the OTP via SMS or Email to the borrower. Once the borrower receives the OTP, he/she will notify you of the OTP which you can enter while Adding/Editing/Approving loans and then click Submit. Please visit Admin(top menu) → Loans → Send OTP to Borrower before Loan Disbursement.
Please see the following video to learn more about the OTP feature:
-
API: Add Additional Disbursement to Existing Loan
We have added a new method to the API which will allow you to add an additional disbursement on an existing loan. This is the same as the Add Disbursement button on the View Loan Details page in the Loan Schedule tab.
Please read the API documentation at Add Additional Disbursement to Existing Loan for more information.
-
API: Borrower Restrictions
We have added a new method to the API which will allow you to add loan restrictions on a borrower or the entire branch. This allows you to set restrictions such as the maximum number of open loans allowed, and to stop all loans to a borrower. This is the same as the Add/Edit Restriction on Borrower link when you are viewing a borrower or a loan.
Please read the API documentation at Add Additional Disbursement to Existing Loan for more information.
-
Disbursement Report: Show/Hide Columns
We have now added the feature to show your own columns on the Reports(top menu) → Disbursement Report page. On the top right of the table, you will see the Show/Hide Columns button which you can click to select your own columns.
-
Add Recurring Payroll, Expenses, and Other Income: Weekly, Every 2 Weeks, 15th and 30th of Month
Now, you can add Payroll, Expenses, and Other Income and set them to be recurring weekly, every 2 weeks, monthly, and 15th and 30th of every month. Before, we only had the monthly option. The system will automatically add the same record on a recurring basis.
For Expenses, please visit Expenses(top menu) → Add Expense. There, please select Is Expense Recurring? as Yes and set the recurring period in Add Recurring Expense dropdown box.
For Other Income, please visit Other Income(top menu) → Add Other Income. There, please select Is Other Income Recurring? as Yes and set the recurring period in Add Recurring Other Income dropdown box.
For Payroll, please visit Payroll(top menu) → Add Payroll and click on a staff member. Then on the Add Payroll page, please select Is Payroll Recurring? as Yes and set the recurring period in Add Recurring Payroll dropdown box.
-
View Repayments: Search via Loandisk System Date
When you add a repayment, you have to enter a Collection Date. But it is possible you might have postdated or backdated the date and want to search between the Loandisk System Date on which it was added or edited.
Please visit Repayments(top menu) → View Repayments and click on the Advanced Search: Click here to Show link on top of the page. There, you will see the From Loandisk System Date and From Loandisk System Time to To Loandisk System Date and To Loandisk System Time fields. You can filter results based on these dates. To see the actual system date, please visit Show/Hide Columns on the top right of the table and select Staff Edit Date.

-
View Borrower Groups: Select Loan Officer
You can now assign loan officers to a borrower group. Please visit Borrowers(top menu) → Add Borrowers Group. There you will see the Loan Officer dropdown box.
-
Add Guarantor: Select Loan Officer
You can now assign loan officers to a guarantor. Please visit Loans(top menu) → Guarantors → Add Guarantor. There you will see the Loan Officer Access field.
New Currency: JAM-DEX
We have added a new currency for Jamaica: JAM-DEX. You can set this in Admin(top menu) → Account Settings and then change the Currency field. You can also set this in branches to override the account currency. Please visit Admin(top menu) → Manage Branches → Branches → Add Branch. There under the Optional Fields: Override Accounts Settings section, please check Override Account Settings? and then select an option in the Currency field.
Due Loans Page: Show Pending Principal/Interest/Fees/Penalty Due
Please visit Loans(top menu) → Due Loans. On top right of the table, you will see the Show/Hide Columns button which you can click to select the Pending Principal Due, Pending Interest Due, Pending Fees Due, and Pending Penalty Due columns.
- 1st June 2023
Custom Fields: Unique across the whole Account or Branch
You can now add custom fields and make them unique across all branches or the current branch only. This is useful in preventing borrowers from visiting multiple branches for loans. If you set the custom field to required, then your staff will not be able to add another borrower with the same custom field. For example, you may put some kind of unique id like a driver license number in that field. If the value already exists, then the system will give an error.
Please visit Admin(top menu) → Settings → Custom Fields. There you will see the Unique Field? field.
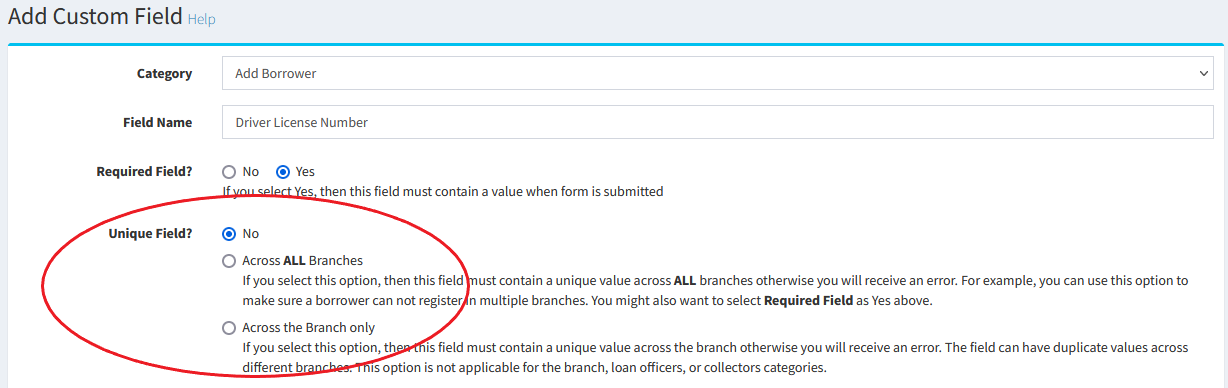
Extend Loan After Maturity: Apply to the following date
You can now stop the extend loan after maturity until a certain date. Before, it would apply until the loan is fully paid. But it is possible, you may want to apply until a certain date to prevent excessive interest being added indefinitely if the loan is not being paid.
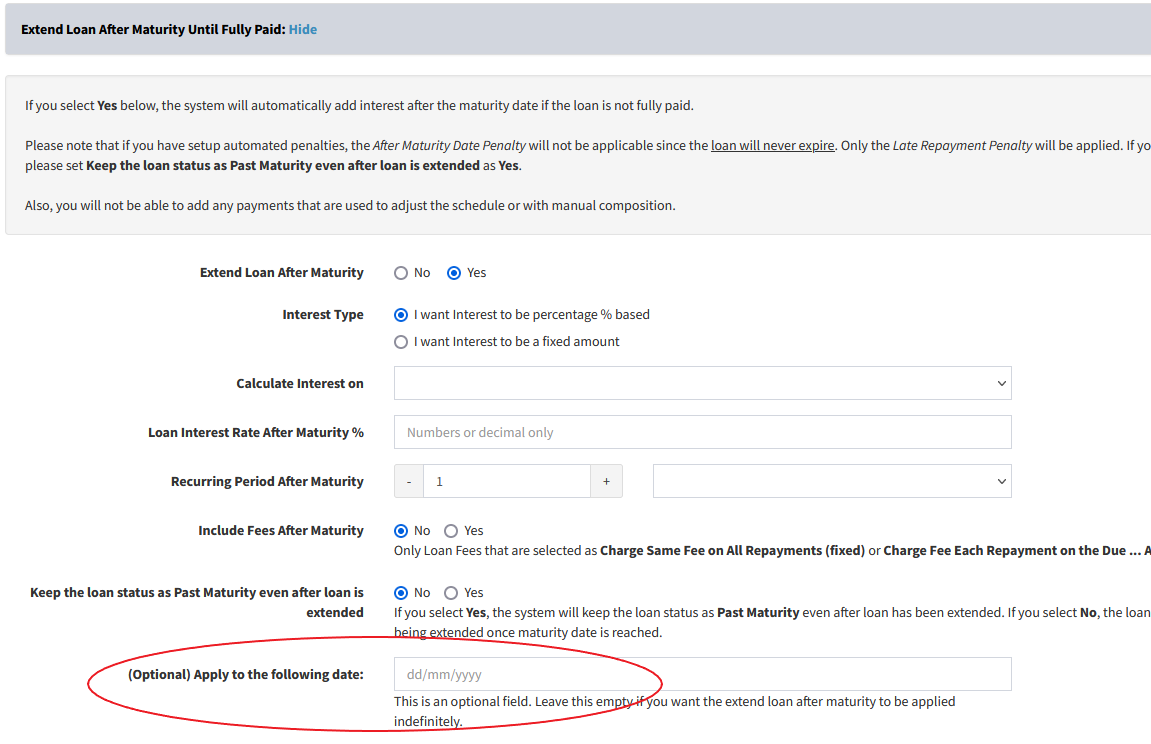
Add Collateral: Assign to multiple loans
Before, you could only allocate a collateral to a single loan. But let's say a borrower has multiple loans using the same collateral. If you assign the collateral to a new loan, then that collateral would not show on the previous loan. We have now added the feature to assign a collateral to multiple loans.
Please visit Loans(top menu) → View All Loans → Pencil button. There click on the Loan Collateral tab → Add Collateral button.
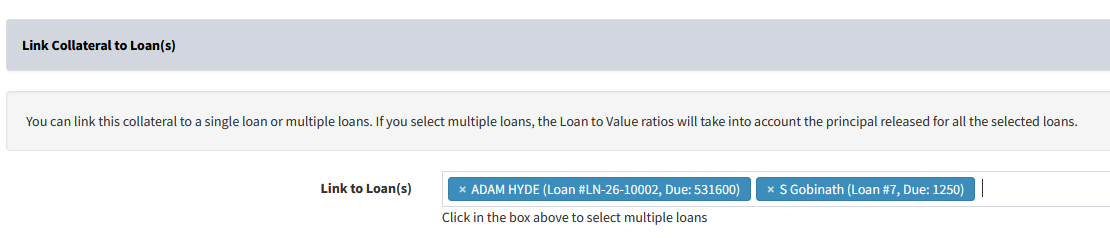
API: Advanced Search for Borrowers, Loans, Repayments, Savings, and Savings Transactions
We have added new methods to the API which will allow you to perform an advance search for Borrowers, Loans, Repayments, Savings, and Savings Transactions. For example, you may want to search for all open loans released between certain dates or search for repayments for a particular loan product.
- Advanced Search Borrowers
- Advanced Search Loans
- Advanced Search Repayments
- Advanced Search Savings
- Advanced Search Savings Transactions
Please read the API documentation for more information.
API: Due Loans
We have added a new method to the API which will allow you to get all the loans due between certain dates. You also filter based on loan product and loan officer.
Please read the API documentation at Due Loans for more information.
Penalty Settings: Stop Penalty
You can now stop the penalty at a certain date, or after a certain number of days from the released date, or after a certain number of days from the maturity date.
You can either add penalty to the entire loan product by visiting Admin(top menu) → Loans → Loan Penalty Settings. Alternatively, you can apply penalty to an individual loan only by visiting Loans(top menu) → View All Loans → Pencil button. There click on the Penalty Settings. You will see the option for Individual Penalty there.
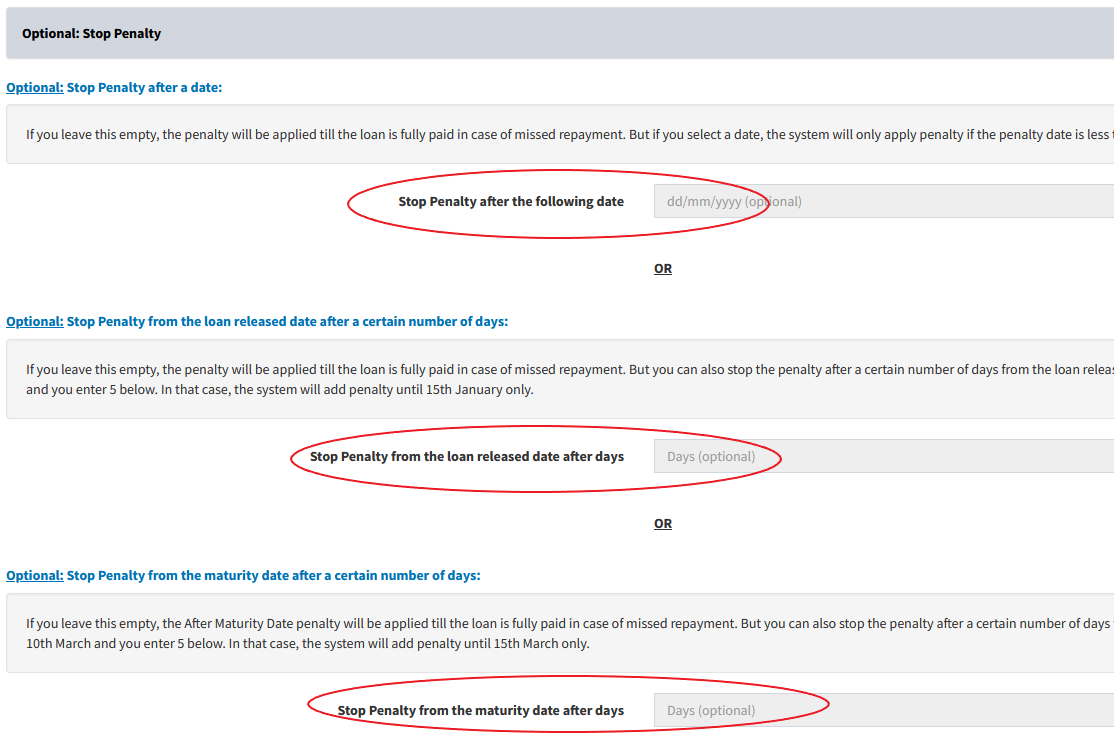
Savings Fee Withdrawals: Percentage of Transaction Amount
There are some companies who charge their clients a fee for every withdrawal made in the savings accounts. We previous had fixed amount withdrawal fee that you could set. But it is possible, you may want to set a fee which is a percentage of the transaction amount. For example, if you set the withdrawal fee to be 1% and the client withdraws $1000, then the fee will be $10. In this case, two transactions will be added by the system; withdrawal of $1000 and fee of $10.
Please visit Admin(top menu) → Savings → Savings Fees. There please click on Add Savings Withdrawal Fee. You can choose the withdrawal types and the savings products to which the fee applies. You can also add multiple withdrawal fees.
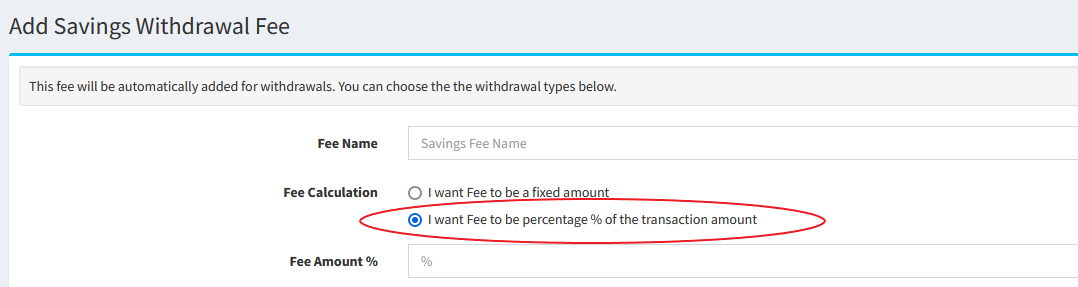
Update Loan Status Dates and Times
You can now manually update the loan status dates and times. For example, if you set the loan as default today, the system will allocate today's date as the default date. But it is possible the default date might have been many days before. This feature allows you to update all the parent status dates and times
Please visit Loans(top menu) → View All Loans → Pencil button. There click on the Loan Terms tab. At the bottom, you will see the Update Loan Status Dates and Times button.
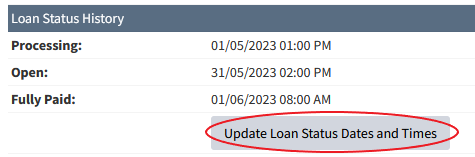
Add Borrower: Set Custom Unique Number
You can now set a custom unique number when adding a new borrower. For example, you may want to include today's date in the Unique Number field or the Staff Id of the staff member who is entering the borrower.
Please visit Borrowers(top menu) → Add Borrower. There you will see the Unique Number field and Set Custom Unique Number next to it.

Add Loan: Staff Id in Loan Unique Number
You can now include a unique system generated Staff Id of the staff member who is adding the loan. This is a good way to keep track of which staff member added the loan just by looking at the unique number of a loan.
Please visit Loans(top menu) → Add Loan. There you will see the Loan # field and the Set Custom Loan # link next to it.

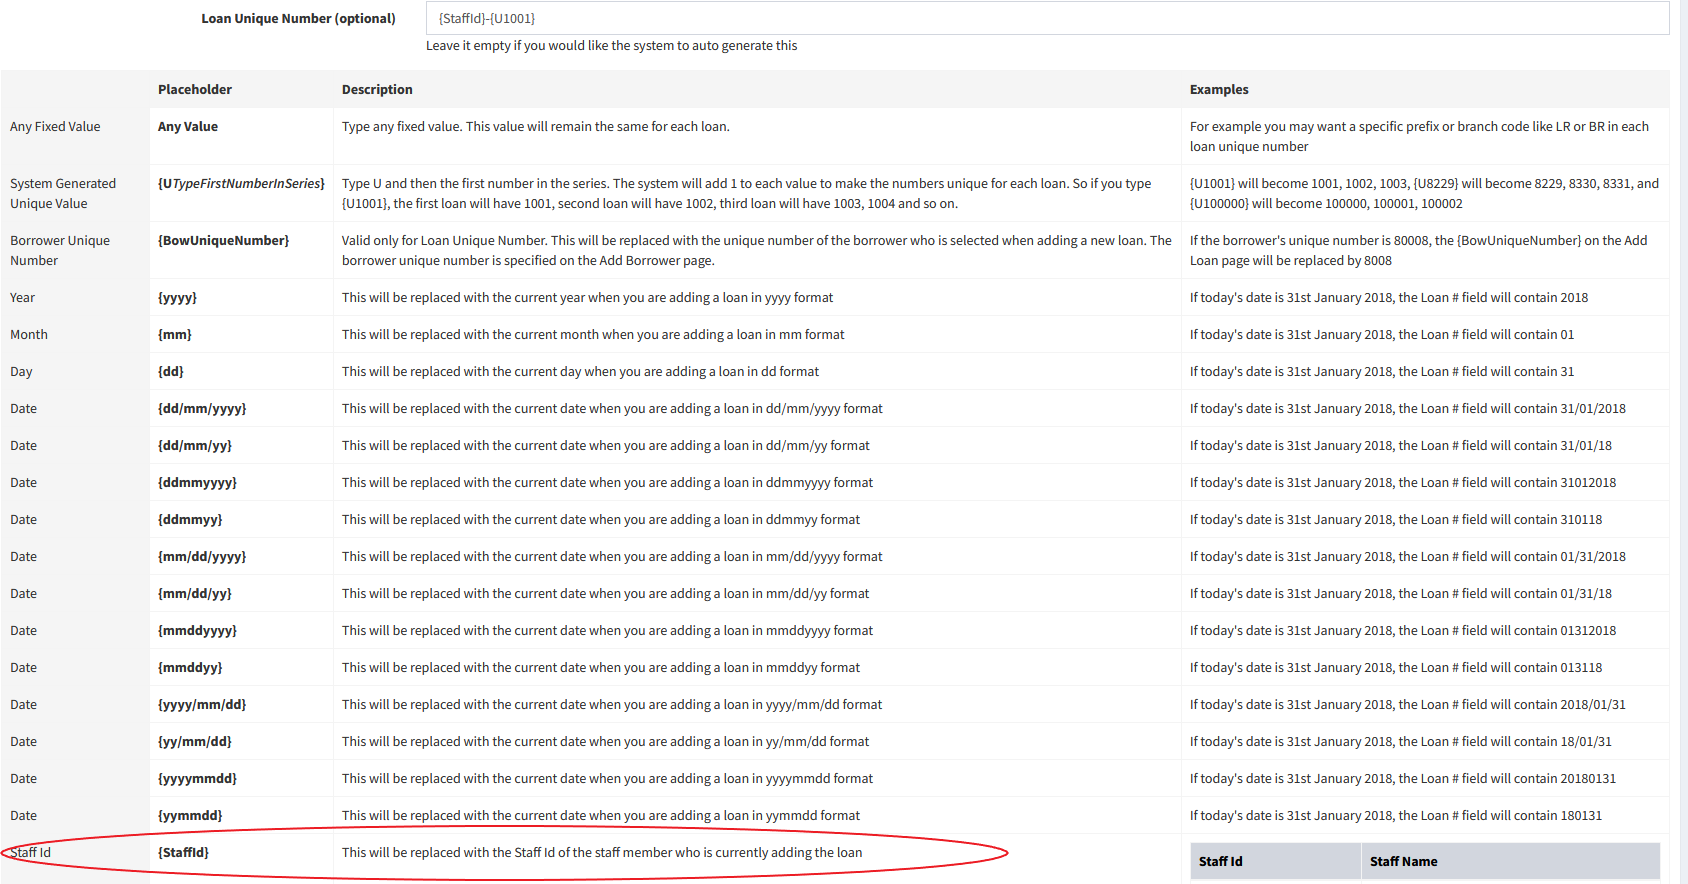
Loan Arrears Aging Report: Export Data for all pages
You can now export data for all the pages for the Loan Arrears Aging Report. Once the data has been generated, you will receive an email. Then, you will need to click on the Export Data for all pages again to download the file.
Please visit Reports(top menu) → Loan Arrears Aging Report. There, you can click on Export Data for all pages button.
Borrower Restrictions: Do not allow any new repayments for Fully Paid or Default loans
You can now prevent repayments from being added on loans that are fully paid or defaulted. This is useful in error checking.
To do this, please visit Borrowers(top menu) → View Borrowers → Loans button. There you will see the Add/Edit Restriction on Borrower link. Once you click this link, you can set the Do not allow any new repayments for loans that are Fully Paid? and Do not allow any new repayments for loans that are Defaulted? fields to Yes.
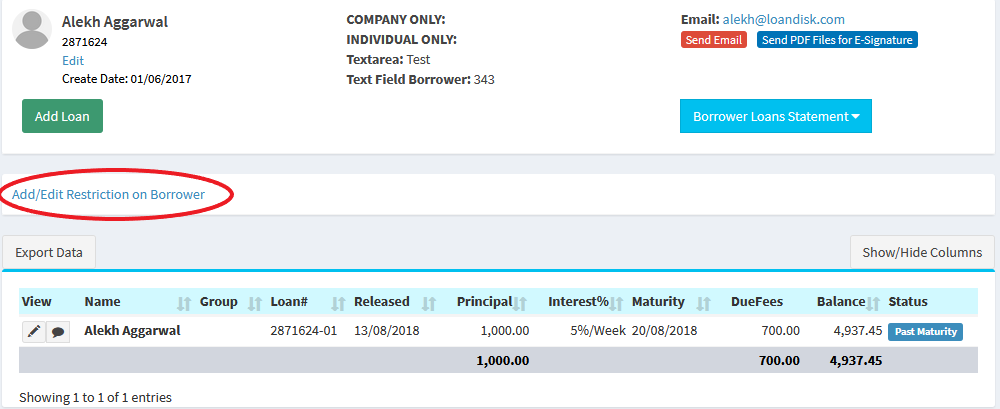
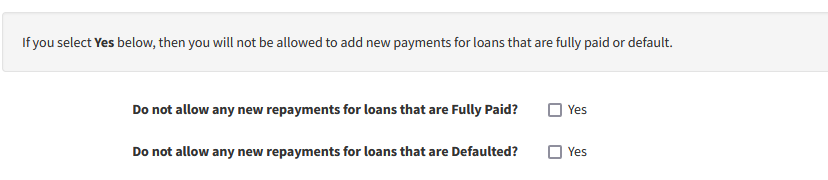
Send SMS and Email to Borrower Groups
You can now send SMS and email to all members of a borrower group or multiple groups.
To do this, please visit Borrowers(top menu) → Send SMS to All Borrowers and Send Email to All Borrowers. There, you will see the Select Borrower Groups Below section where you can select borrower groups.

Upload Other Income from CSV file
You can now upload other income in bulk from a CSV file. Before you could only add other income individually at Other Income (top menu) → Add Other Income.
To do this, please visit Admin(top menu) → Bulk Upload → Upload Other Income from CSV file.
Custom Fields for Add Staff
You can add custom fields for staff members at Admin(top menu) → Settings → Custom Fields. There you will see the Add Staff category.
This is useful in storing additional details like employee number, contract, start and end dates, and other staff information.
Home Branch: New Chart
We have added a new chart on the Home Branch page which shows the Loan Collections vs Due Loans - Open Loans. Before we had the Loan Collections vs Due Loans - Open Loans (Cumulative) chart which showed the total due until that period. The new chart only shows the due for that period only. For example, if you are viewing monthly charts and looking at January 2023, the Loan Collections vs Due Loans - Open Loans chart will show the due and paid for January 2023 only but the Loan Collections vs Due Loans - Open Loans (Cumulative) chart includes the dues from previous months also in January 2023 so if you have pending dues from previous months, that figure will also show in the cumulative chart.
View Repayments: New Column
For the Repayments(top menu) → View Repayments page, we have added the Loan Balance column.
To select the above column, please visit Repayments(top menu) → View Repayments and click on Show/Hide Columns(top right of table) button and move the column to the right box.
Daily Collection Sheets: Loan Status field
We have added the Loan Status field in Collection Sheets(top menu) → Daily Collection Sheet.
You can move the Loan Status field from the Available Columns box to the Shown Columns box.
- 17th February 2023
Accounting Updated
We have updated the accounting feature at Accounting (top menu) and included the following features.
- Cash or Accrual Based Accounting. You can set your method at Admin(top menu) → Accounting → Settings.
- Add Bank Accounts at Admin(top menu) → Accounting → Bank Accounts
- Add Taxes at Admin(top menu) → Settings → Taxes
- Cash flow Accumulated has been updated at Accounting (top menu) → Cash flow Accumulated
- Profit / Loss has been updated at Accounting (top menu) → Profit / Loss
- Balance Sheet has been updated at Accounting (top menu) → Balance Sheet
- Trial Balance has been added at Accounting (top menu) → Trial Balance
- Branch Equity has been updated at Accounting (top menu) → Branch Equity
- General Ledger Summary has been added at Accounting (top menu) → General Ledger Summary
- Reconcile Entries has been added at Accounting (top menu) → Reconcile Entries
- Chart of Accounts has been added at Accounting (top menu) → Chart of Accounts
- View Ledger has been added at Accounting (top menu) → Chart of Accounts → View
- Manual Journal has been added at Accounting (top menu) → Manual Journal
Please see the following video to learn more about the accounting feature:
- 19th September 2022
European Numbering Format
Currently, the numbers are displayed in the American format which uses comma as a thousand separator and dot as a decimal separator. For example, 1000.91 is represented as 1,000.91 in the American format. However, in the European format, it is shown as 1.000,91.
You can now change the numbering format in Admin(top menu) → Settings → Account Settings. There you will see the Decimal Separator and Thousand Separator fields.
Please note that there are 2 limitations to the European format on Loandisk:
- The numbers still need to be entered in the American format in forms.
- On the Home Branch page, the numbers will still show in the American format in the charts. We do plan to fix this in the future.

Auto Send SMS and Email: New Loan Status Categories Added
Before, you could only send auto messages to the parent loan statuses such as Processing, Open, Fully Paid, Default, Not Taken Up, and Denied. But there was no way to send auto messages to child categories. We have now added all the loan statuses on the Auto Send SMS and Auto Send Email pages.
If you add a new loan status, it will automatically show as a category. This is particularly useful, if you move a loan through different child loan statuses and would like the borrower to receive automated messages.
For SMS, please visit Admin(top menu) → SMS Settings → Auto Send SMS. For email, visit Admin(top menu) → Email Settings → Auto Send Emails. There you will see all of the loan status categories.
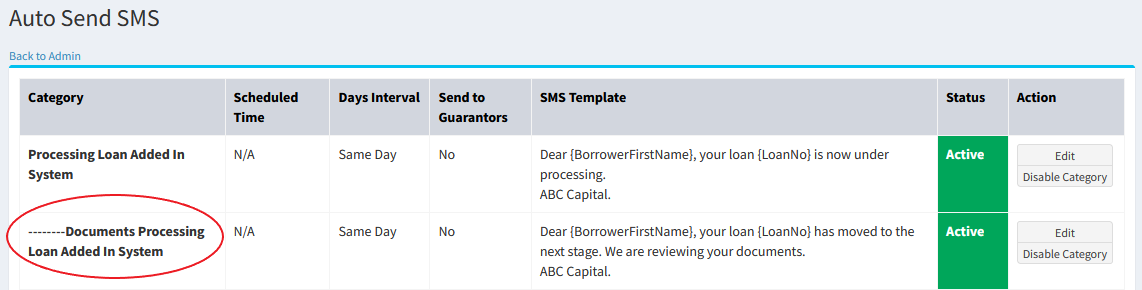
Loan Arrears Aging Report: Select the From and To Days
We have added the feature to manually select the from and to days on the Reports(top menu) → Loan Arrears Aging Report.
Be default, we show loans that are overdue between 1-30 days, 31-60 days, 61-90 days, 91-180 days, and more than 180 days. But you may want to see loans overdue between 91-120 days. You can do this by entering your own days in the search box on the top of the page.
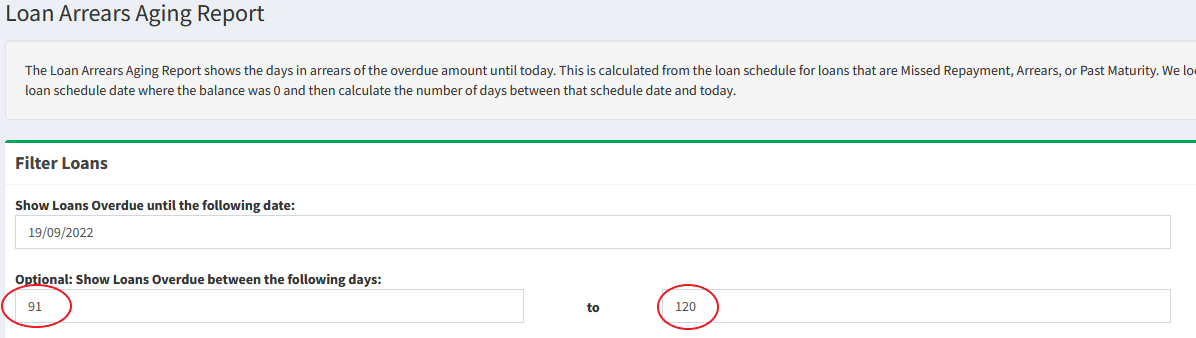
Home Branch Page: Average Loan Disbursement Size
We have added the Average Loan Disbursement Size on the Home Branch page. This shows the average amount of funds given to borrowers for all loans.
Some other minor changes have also been made to the Home Branch page such as showing the Principal Released and Collections figures on a This Year and This Month basis.
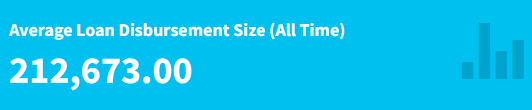
Loan Product: Auto Select Loan Status
Currently, when you add a new loan at Loans(top menu) → Add Loan, the Loan Status field is auto-selected to the Open status. We have now given you the option to auto-select another Loan Status. For example, you may want to start a new loan in the Processing status. This will save you time from having to keep changing the Loan Status field to another status every time you add a new loan.
Please visit Admin(top menu) → Loans → Loan Products → Edit. There you will see the Loan Status field where you can select the loan status that should be auto-selected for new loans.
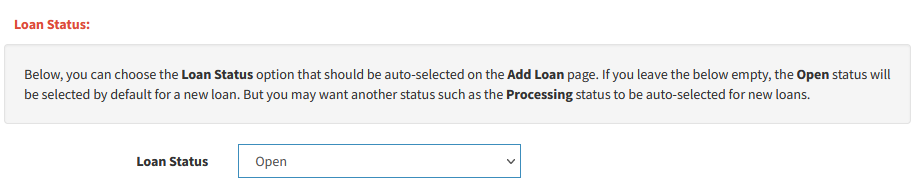
- 7th July 2022
System Upgrade
We have upgraded our systems and increased performance and capacity by 4 times. The upgrade will result in quicker response times for clients who have millions of borrowers and loans with us. Also, it will enable other clients to scale up with ease.
Custom Fields: Unique Value
You can now set a Custom Field to have a unique value across a branch. If a duplicate value is entered, the system will give an error. You will have to type a unique value to proceed. This is useful if you are storing unique numbers or borrower identification related information in custom fields.
Please visit Admin(top menu) → Settings → Custom Fields. There you will see the Unique Field across the Branch? field.
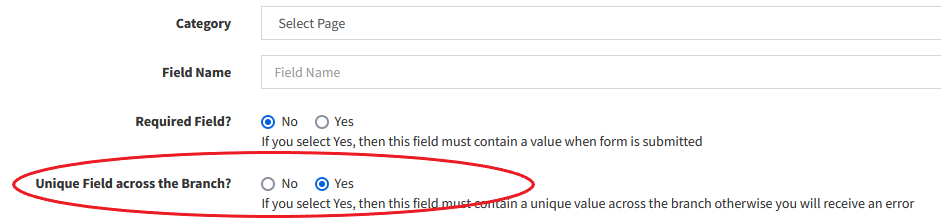
Show/Hide Columns: Parent Custom Fields
You can now show Borrower Custom Fields on the View All Loans and the View Repayments pages. You can also show the Loan Custom Fields on the View Repayments page.
Please visit Loans(top menu) → View All Loans → Show/Hide Columns button. There you will see Borrower Custom Fields. You can select these columns and move them to the right box to show them on the View All Loans page.
Please visit Repayments(top menu) → View Repayments → Show/Hide Columns button. There you will see Borrower Custom Fields and Loan Custom Fields . You can select these columns and move them to the right box to show them on the View Repayments page.
Advanced Search: Search via Parent Custom Fields
You can now search for Borrower Custom Fields on the View All Loans and the View Repayments pages. You can also search for Loan Custom Fields on the View Repayments page.
Please visit Loans(top menu) → View All Loans. There, click on the Advanced Search: Click here to Show link on top of the page. There you will see Borrower Custom Fields. You can filter results based on these custom fields.
Please visit Repayments(top menu) → View Repayments.There, click on the Advanced Search: Click here to Show link on top of the page. There you will see Borrower Custom Fields and Loan Custom Fields. You can filter results based on these custom fields.
Loan Product: Set Loan Release Date to Today's Date
Before when adding a new loan, you would have to select a date in the Loan Release Date field. Most of the times, this date would be today's date. We have now given you the option to auto-fill the Loan Released Date field with today's date.
Please visit Admin(top menu) → Loans → Loan Products → Edit. There under Loan Release Date, you will see the Set Principal Released Date to Today's date option.

New Chart: Borrowers with First Loan (New Clients)
We have added a new chart on the Home Branch page which shows the number of borrowers with their first loan in a certain time period such as monthly. These are borrowers who do not have any previous loans with the branch. You can think of these borrowers as new clients.
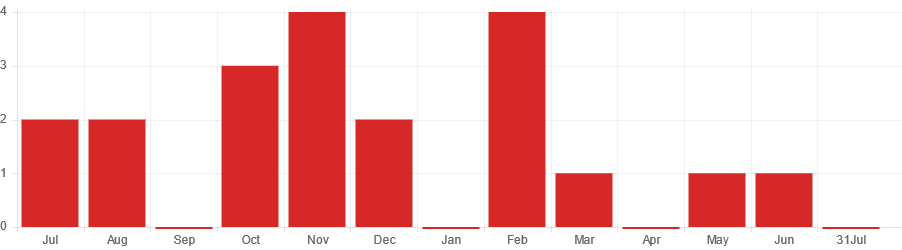
New Placeholders
We have added new placeholders which you can include in Loan Templates: Applications/Agreements, SMS, and Email.
- {PrincipalDueAmount}
This will be replaced with the scheduled principal due amount based on the loan schedule including any previous principal due amounts and after deducting any excess principal payments made. For past maturity date loans, it will be the total overdue principal amount. - {PrincipalDueAmountInWords}
The above {PrincipalDueAmount} placeholder will be replaced in words. For example 1000.05 will be converted to One Thousand Dollars And 5/100. To replace Dollars with your currency, visit Admin(top menu) → Account Settings and change the Currency in Words field. - {InterestDueAmount}
This will be replaced with the scheduled interest due amount based on the loan schedule including any previous interest due amounts and after deducting any excess interest payments made. For past maturity date loans, it will be the total overdue interest amount. - {InterestDueAmountInWords}
The above {InterestDueAmount} placeholder will be replaced in words. - {FeesDueAmount}
This will be replaced with the scheduled fees due amount based on the loan schedule including any previous fees due amounts and after deducting any excess fees payments made. For past maturity date loans, it will be the total overdue fees amount. - {FeesDueAmountInWords}
The above {FeesDueAmount} placeholder will be replaced in words. - {PenaltyDueAmount}
This will be replaced with the scheduled penalty due amount based on the loan schedule including any previous penalty due amounts and after deducting any excess penalty payments made. For past maturity date loans, it will be the total overdue penalty amount. - {PenaltyDueAmountInWords}
The above {PenaltyDueAmount} placeholder will be replaced in words.
API Web Hooks: Added
If you have setup Web Hooks at Admin(top menu) → Settings → API Settings, the system will now send a loan Web Hooks for these events also.
- Loan or Repayment is deleted
- Loan Status is changed to any other value
- 28th February 2022
Two-Factor Authentication
You can now setup Two-Factor Authentication by visiting Settings(top menu) → Two-Factor Authentication. This will increase the security of your account as it will require you to type a code from the Google Authenticator app on your mobile phone when you login. This will help prevent unauthorised access to your account. Please note that this is optional.
You can also disable Two-Factor Authentication by visiting Settings(top menu) → Two-Factor Authentication.
Add Repayment: Auto fill form with Amount and Date
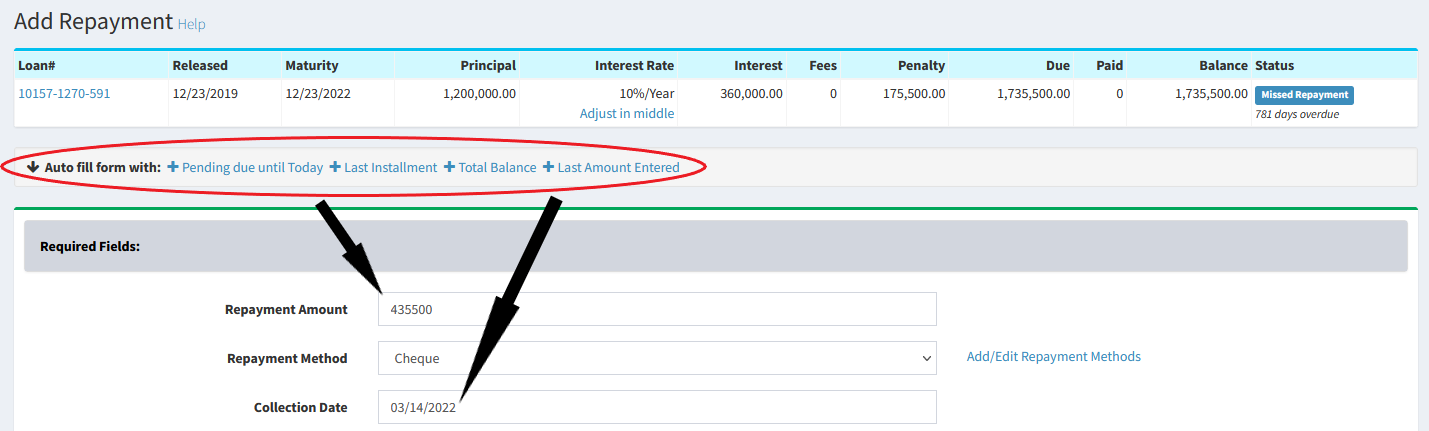
You can use the above links to auto fill the Add Repayment form. The Collection Date will be replaced with today's date. The Repayment Amount field will be replaced as follows:
-
Pending due until Today
This will fill the form with the due amount until today including any overdue amount.
-
Last Installment
This will fill the form with the last installment amount until today. It does not include any overdue amount before the last installment.
-
Total Balance
This will fill the form with the total balance of the loan. This is calculated as total due - total paid.
-
Last Amount Entered
This will fill the form with the last payment amount entered for the same loan.
Please note that if there is no pending due, last installment, or last amount entered for the loan, or the total balance is 0, then the Repayment Amount field will be kept blank.
Approve Loans: Bulk Update Open Loans to Default
Previously, if you wanted to change multiple open loans to default, you would need to visit each loan individually by going to Loans(top menu) → View All Loans → Pencil button. There in the Loan Terms tab, you would need to click the Edit button and change the Loan Status field to Default. Now, you can do a bulk update of multiple loans into default. For example, you may want to change your Past Maturity loans to default.
To do this, please visit Loans(top menu) → Approve Loans. There under Open, you will see Past Maturity or other child statuses. You can click Change next to them. Please note that you must have permission to do this. To set permissions, please visit Admin(top menu) → Loans → Manage Loan Status and Approvals → Set Permissions for Loan Statuses.
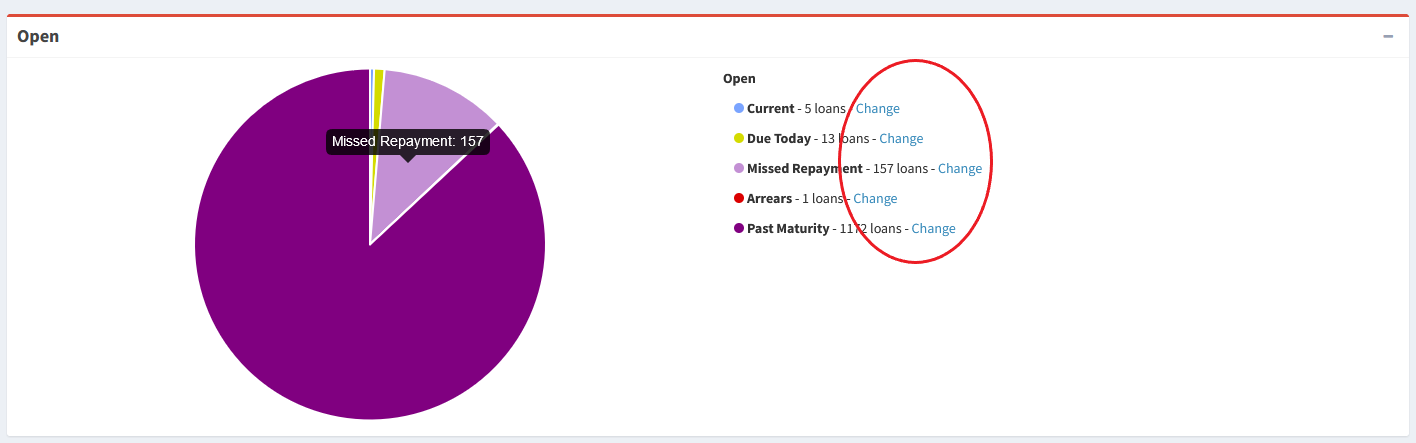
- 27th December 2021
Savings Fee Withdrawals
There are some companies who charge their clients a fee for every withdrawal made in the savings accounts. Before, you would be required to add two transactions; one for withdrawal, and one for fee. Now, you can automate this and the system will automatically add a fee for every withdrawal.
Please visit Admin(top menu) → Savings → Savings Fees. There please click on Add Savings Withdrawal Fee. You can choose the withdrawal types and the savings products to which the fee applies. You can also add multiple withdrawal fees.
Savings Fee Report
To view a summary of your savings fees and the amount earned, please visit Savings(top menu) → Savings Fee Report. You can also do a date range search.
Staff Email Notifications for Approve Repayments and Savings Transactions
If you have restricted your staff so that every time they enter a repayment or savings transaction for approval, you can now receive email notifications for all the pending repayments and transactions added in the last 1 hour.
To do this, please visit Admin(top menu) → Manage Staff → Staff Email Notifications. There, under Approve Repayments and Approve Savings Transactions, select the staff who should receive the email notifications.
Send Email and SMS to All Borrowers: Open and Closed Savings Accounts
Before, if you wanted to send bulk SMS or emails to all borrowers with savings accounts, the system would send to borrowers who had open and closed savings accounts. Now, you can filter the borrowers and only choose the savings accounts that are open or closed.
To do this, please visit Borrowers(top menu) → Send SMS to All Borrowers and Send Email to All Borrowers. There, you will see the All Borrowers with Savings Accounts, All Borrowers with Open Savings Accounts, and All Borrowers with Closed Savings Accounts options.
Delete Bulk Savings Transactions
You can now bulk delete savings transactions. This is useful in case you have uploaded many entries at once in error. Please visit Savings Transactions(top menu) → View Savings Transactions. There, please click on the Bulk Delete button on top right of the table.
Download Invoices/Receipts in PDF
Please visit Settings(top menu) → Billing. There, in the Invoice/Receipt column, you can download the PDF version of invoices and receipts.
- 22th September 2021
Export Data for All Pages - Tables
Before, when exporting tables on pages such as Borrowers(top menu) → View Borrowers, Loans(top menu) → View All Loans, Repayments(top menu) → View Repayments, Savings(top menu) → View Savings Accounts, and Savings Transactions(top menu) → View Savings Transactions you had to manually export each page by clicking the Export Data button. Also, the tables had a limit of 30 columns. Now, we have provided the Export Data for all pages button where you can export all pages and also choose up to 60 columns to export.


Export Data for All Pages - Reports
Before, when exporting reports on pages such as Reports(top menu) → Borrowers Report, Loans Report, Deferred Income - Borrowers, Deferred Income - Loans, Outstanding Report - Borrowers, and Outstanding Report - Loans, you had to manually export each page by clicking the Export Data button. Now, we have provided the Export Data for all pages button where you can export all pages.

Web Form Builder and API
We have provided some extra features for web forms at Admin(top menu) → Settings → Web Form Builder and API. You can now do the following:
-
Create Folders:
You can create folders for each form. This will allow you to organise your submissions in proper categories. You can use them as stages also and move the initial submission through different folders.
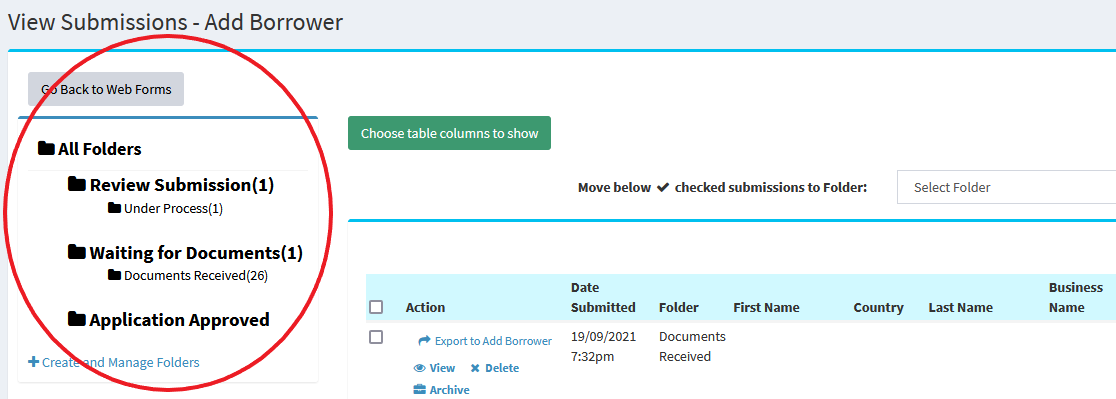
-
Set Default Folder for Submissions:
When the user submits the submission, you can choose which folder it goes to.
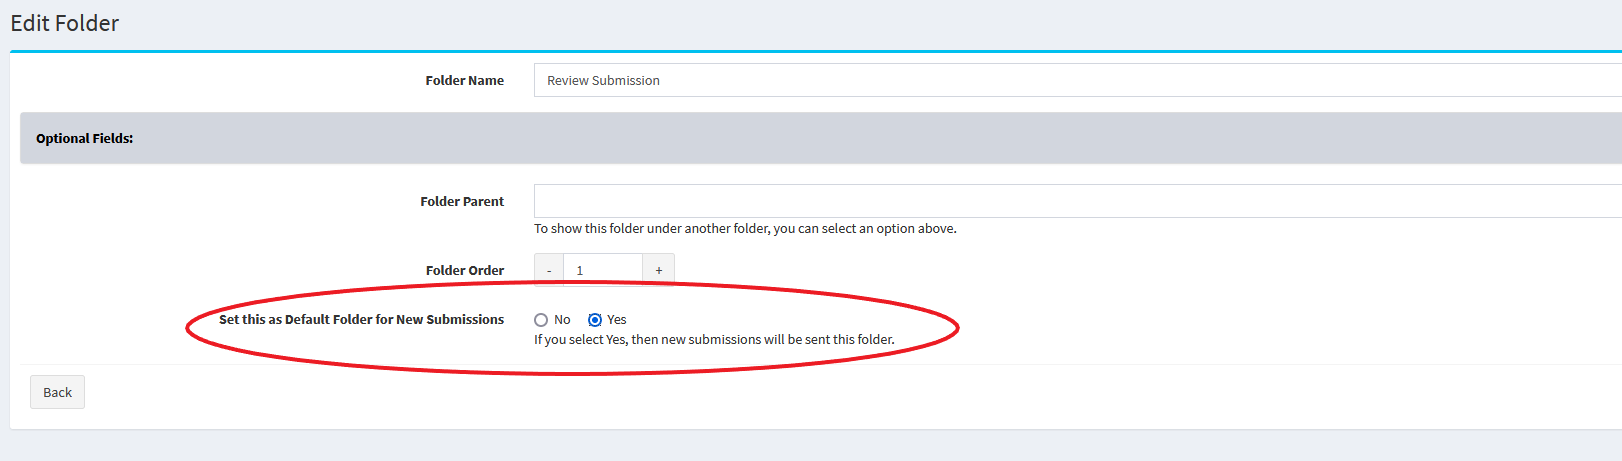
-
Automated Email Notifications to User Submissions:
When the user submits the submission, you can send an automated email to the user and put placeholders in the email.
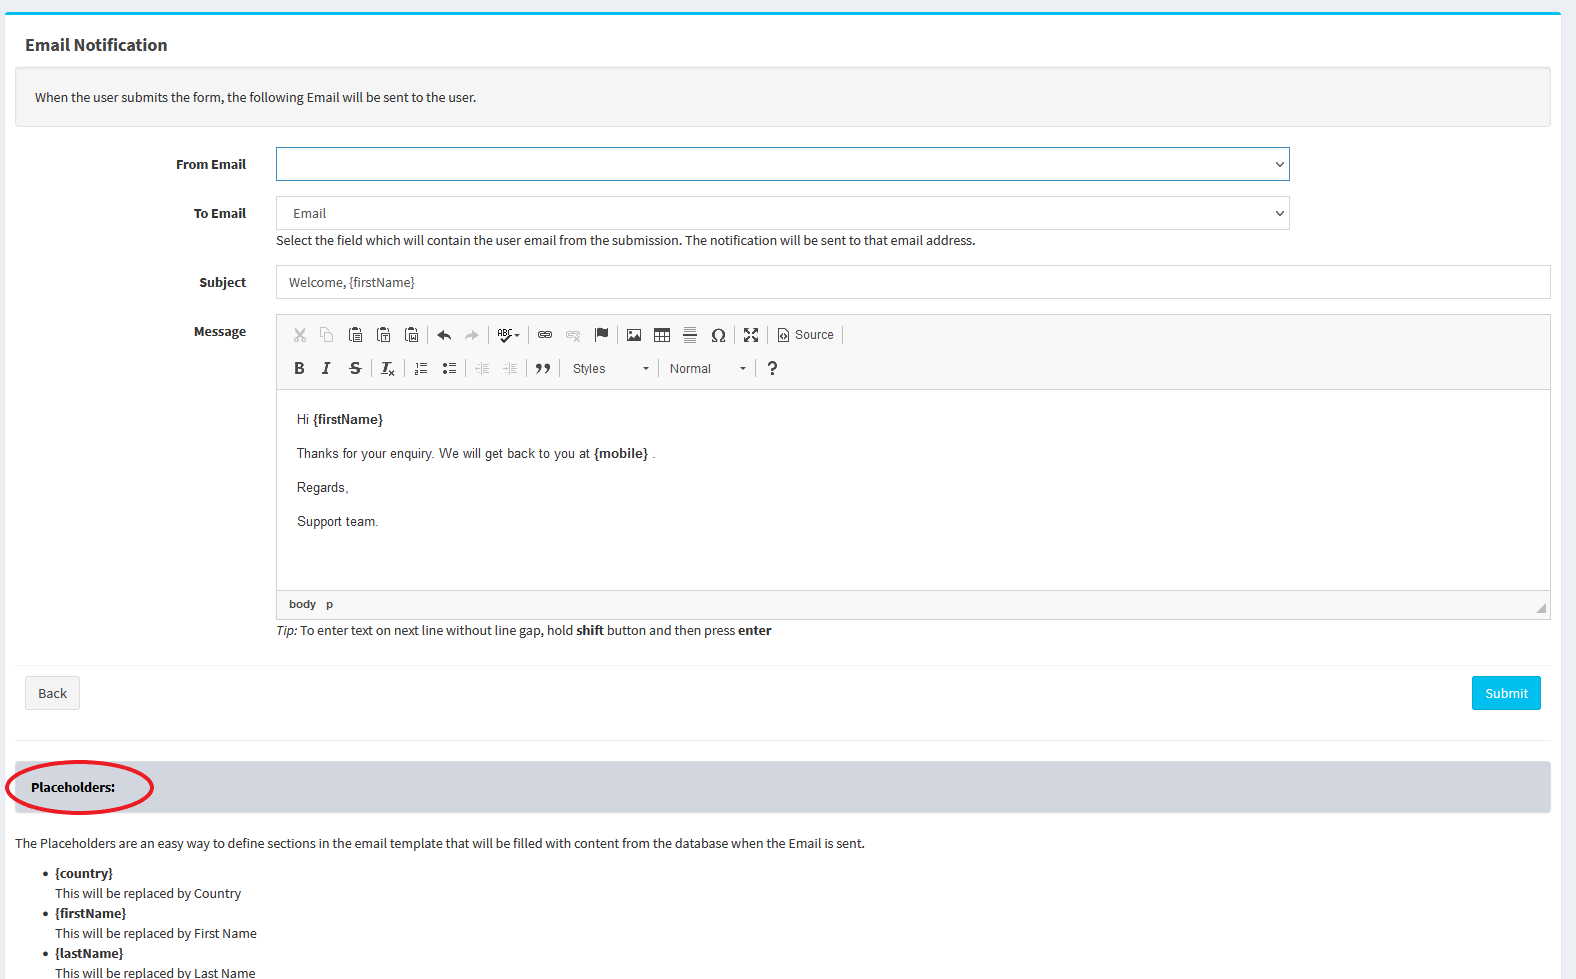
-
Choose columns to show in Submissions:
On the page which shows all the submissions for a particular form, you can choose which columns to show in the table.
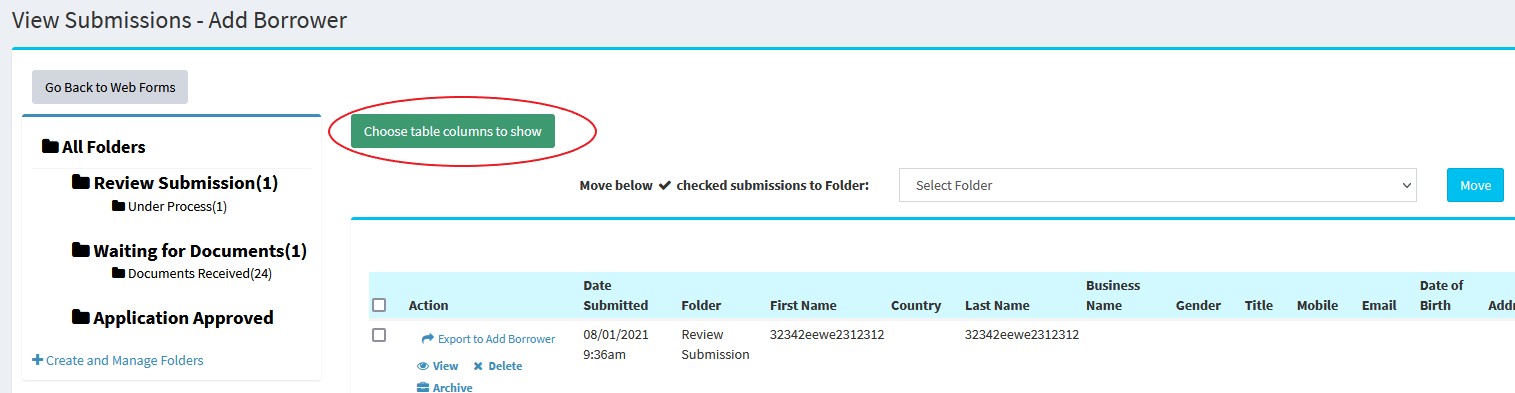
- 4th June 2021
Savings Status: Active, Overdrawn, and Closed
When you add a savings account, the system will automatically set one of the status to the savings account:
- Active
If the savings account has more than 0 balance, the system will mark the savings account as Active. - Zero Balance
If the savings account has 0 balance, the system will mark the savings account as Zero Balance. - Overdrawn
If the savings account negative balance, the system will mark the savings account as Overdrawn. - Closed
You can manually mark the savings account as closed. In that case, no further transactions can be added and the system will not add any future interest or fees to the savings account. You can restore the savings account and make it active again.
To mark a savings account as closed, please visit Savings(top menu) → View Savings Accounts → Pencil button → Close Account.

Investor Account Status: Active, Overdrawn, and Closed
When you add a investor account, the system will automatically set one of the status to the investor account:
- Active
If the investor account has more than 0 balance, the system will mark the investor account as Active. - Zero Balance
If the investor account has 0 balance, the system will mark the investor account as Zero Balance. - Overdrawn
If the investor account negative balance, the system will mark the investor account as Overdrawn. - Closed
You can manually mark the investor account as closed. In that case, no further transactions can be added and the system will not add any future interest or fees to the investor account. You can restore the investor account and make it active again.
To mark an investor account as closed, please visit Investor Accounts(top menu) → View All Investor Accounts → Pencil button → Close Account.

Savings Fees: Should the fee be added if the savings account has zero or negative balance?
Before, if you had setup savings fees, the system would add fees even if the balance is negative. Now, we have given the option to not add any fees to savings accounts if the balance is negative.
To do this, please visit Admin(top menu) → Savings → Savings Fees → Add Savings Fee button. There please select the Should the fee be added if the savings account has zero or negative balance? field to No.
Investor Fees: Should the fee be added if the investor account has zero or negative balance?
Before, if you had setup investor account fees, the system would add fees even if the balance is negative. Now, we have given the option to not add any fees to investor accounts if the balance is negative.
To do this, please visit Admin(top menu) → Investors → Investor Fees → Add Investor Fee button. There please select the Should the fee be added if the investor account has zero or negative balance? field to No.
Bulk Update Borrowers With Loan Officers
Before, to assign a loan officer to multiple borrowers, you would have to manually edit each borrower and select the loan officer. Now, you also have the option to bulk update borrowers with loan officers which will save time.
To do this, please visit Admin(top menu) → Borrowers → Bulk Update Borrowers With Loan Officers.
- 4th March 2021
API Web Hooks for Borrowers and Loans
Here you can setup Web Hooks. This is useful if you would like Loandisk to notify your script in case a loan or borrower is updated. This means that you do not have to keep querying the Loandisk API for updates. The Web Hooks will notify your script which can then query the Loandisk API to get the updated details.
There are 2 types of Web Hooks below:
-
Borrowers Web Hooks URL
This will only send a Web Hooks if a new borrower is added or an existing borrower has been updated with new details at Borrower(top menu) → Add Borrower. It will not send a notification if a loan has been added or updated for the borrower.
-
Loans Web Hooks URL
This will only send a Web Hooks if a new loan is added or an existing loan has been changed:- New loan added
- New repayment or an existing repayment updated
- Penalties, Early Settlement, Edit Schedule, and other features which changes the balance, status, or schedule of the loan
You can add the Web Hooks at Admin(top menu) → Settings → API Settings.
To see the documentation, please visit Admin(top menu) → Settings → API Settings → Documentation.
- 25th February 2021
Invite Borrowers and Client Control Panel Updated
We have updated the Invite Borrowers feature and the Client Control Panel. The following changes have been made.
- New look for the client panel
- Add pages to the client panel
- Add page text to existing pages
- Choose which loans to show on the Loans page of the client panel
- Insert web forms in the client panel
- Upload files in the client panel
- Show company logo in the client panel
- Reorder pages in the client panel
- View loan files in the client panel
- View expenses in the client panel
- Choose which table columns to show for pages such as Loans, Repayments, Savings, Expenses, Other Income, Collateral.
- Change Password in the client panel
- Invite borrower via API at Admin(top menu) → Settings → API Settings → API Documentation
Please watch the below video on how to do this.
- 31st December 2020
Move Borrower to Another Branch
We have added a new feature where you can move a borrower to another branch. To use this feature, please visit Borrowers(top menu) → View Borrowers → Loans button on the left hand side. There on the top, you will see the Move Borrower to Another Branch link. You can also use our API to move a borrower to another branch.

Bulk Upload Loan Schedule
To import loan schedules in bulk via a CSV file, please visit Admin(top menu) → Bulk Upload → Upload Loan Schedule from CSV file.
Search for Borrowers/Loans/Savings/Investors in Other Branches
If you have multiple branches, you can now search for records in other branches without having to log into that branch. This is particularly useful if you do not know where a borrower is located. You can search for it and the system will tell you the branch of the borrower if the branch is different to the one that you are logged into.
Please visit the top search bar which is present on all pages and click the arrow button. Please note that you can only search in branches where you have been given access. This access is given when adding a staff member. If you are the owner of the account, you can search in all branches.

Select Guarantors in Other Branches
When adding a loan, you can now select borrowers or guarantors from other branches. Before you could only select borrowers or guarantors in the branch that you were logged into. Please visit Loans(top menu) → Add Loan. There at the bottom of the page, you will see the Select Guarantors field.
Transfer from Savings to Loans in Other Branches
You can now transfer money from a savings account to a loan located in another branch. Before you could only transfer to a loan located in the same branch as the savings account. Please visit Savings(top menu) → View Savings Accounts → Pencil button → Transfer money to Loan Account. There in the Transfer to Loan field, you can select a loan from other branches.
Transfer from Savings to Savings in Other Branches
You can now transfer money from a savings account to another savings account located in a different branch. Before you could only transfer to a savings account located in the same branch as the savings account. Please visit Savings(top menu) → View Savings Accounts → Pencil button → Transfer money to another Savings Account. There in the Transfer to another Savings Account field, you can select a savings account from other branches.
Upload Files via API
You can now upload files for borrowers and loans via the API. You will need to request a presigned URL from the API. The presigned URL can be used to directly upload files from your server to our AWS bucket. The files will show on your Loandisk account in 15-30mins after uploading. Please read the API documentation for more information.
- 15th November 2020
Adjust Interest Rates in Middle of a Loan
We have added a new feature where you can adjust interest rates in the middle of a loan. Please watch the below video on how to do this.
Currency Conversion
On the Home Branch page and in Reports(top menu) and Accounting(top menu), we have added a currency box. This can be used to convert the amounts to a particular currency. This is particularly useful if you have branches in multiple currencies and would like to view consolidated reports in one currency. By selecting a currency, you can convert all the amounts to a specific currency.
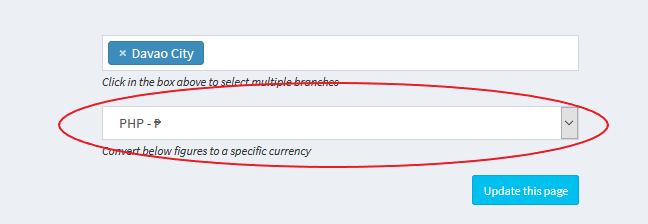
Auto SMS/Email: Add Borrower Confirmation
We have added a new category which allows you to send sms and/or email every time a borrower is added to the system. For SMS, visit Admin(top menu) → SMS Settings → Auto Send SMS. For email, visit Admin(top menu) → Email Settings → Auto Send Emails. There you will see the Add Borrower Confirmation category.
Custom Fields: Default Value
When adding a custom field, we have added a new option where you can specify a default value. This means that every time you visit the category page, you will see this default value.
For example, let's say you have a custom field called Terms and Conditions on the Add Borrower page and you do not want to keep typing the same terms and conditions every time you add a new borrower. With this feature, you can enter the terms and conditions in the Default Value field. In this case, every time you visit the Add Borrower page, you will see the Terms and Conditions pre-filled with the Default Value.
Please visit Admin(top menu) → Settings → Custom Fields. There you will see the Default Value (optional) field.

Savings Transaction Types
When adding a savings transaction, you will see the Type field where you can select an option under Credit or Debit. Before, it was not possible to add your own types under Credit or Debit. Now you can do this by visiting Admin(top menu) → Savings → Savings Transaction Types.
Investor Transaction Types
When adding an investor account transaction, you will see the Type field where you can select an option under Credit or Debit. Before, it was not possible to add your own types under Credit or Debit. Now you can do this by visiting Admin(top menu) → Investors → Investor Transaction Types.
Send SMS/Email to All Borrowers: New Loan Status
Please visit Borrowers(top menu) → Send SMS to All Borrowers and Send SMS to All Borrowers. There you will see that we have added all the loan statuses. You can now send SMS and email to a specific category of borrowers. For example, you may want to send SMS to all borrowers with a missed repayment. In that case you can select All Borrowers with Missed Repayment Loans.
Please note that we look at the last loan of the borrower.
Loan Schedule Description
When you add a loan, and click on the Loan Schedule tab, you will see that the system adds Repayment in the description field of the loan schedule.

Before, the only way to change this is to edit the schedule which is time consuming. You can now set your own description by visiting Admin(top menu) → Loans → Loan Products → Edit. There under Advance Settings, you will see the Loan Schedule Description field.
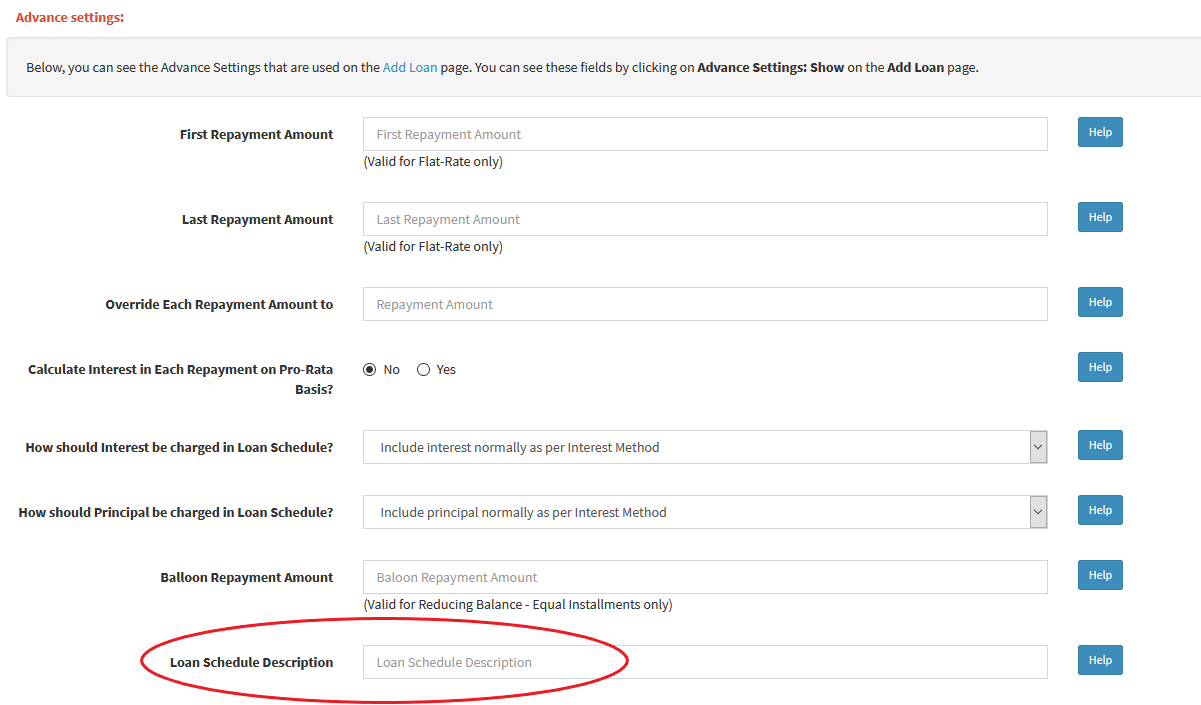
System Generated Penalty: To Date
Before, when applying System Generated Penalties, it was not possible to specify a manual date until which the penalties should be applied. The system would add penalties as long as the loan is overdue. But it is possible you may want to stop the penalties on a certain date.
If you would like to stop system generated penalties for a specific loan until a certain date, please visit Loans(top menu) → View All Loans → Pencil button. There click on the Penalties Settings tab. Under the 2. Individual Penalty option, you will see the click here link. There at the bottom of the page, enter a date in the Apply Penalty to the following date: field.
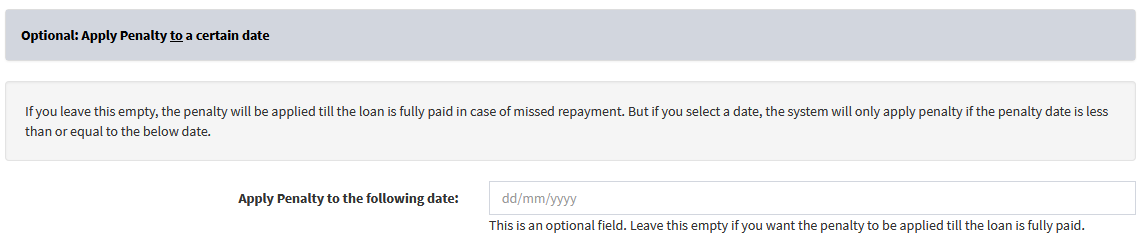
Extend Loan After Maturity: Keep Past Maturity status
For the Extend Loan After Maturity Until Fully Paid feature, we have added the option of keeping the Past Maturity status after the loan is extended. Before, the loan would never be classified as Past Maturity since it is constantly being extended as it expires. With this option, you can keep the Past Maturity status and still extend the loan.
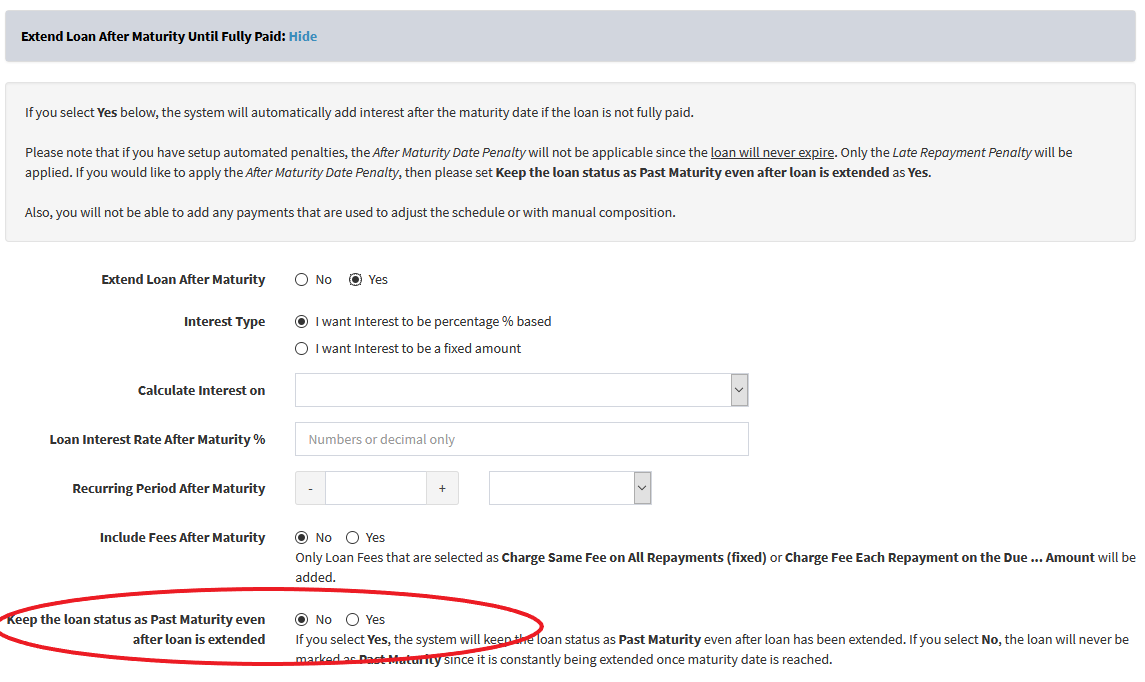
Extend Loan After Maturity: Bulk Update
If you would like to bulk update your loans with the Extend Loan After Maturity Until Fully Paid feature or remove this from your loans in a certain loan product or branch, you can visit Admin(top menu) → Loans → Bulk Update Loans with Extend Loans After Maturity. There you can select which loans to update based on branches, loan statuses, and loan products.
Edit Collection Sheet - Bulk Update Loan Schedule
The Bulk Update Loans Schedules feature at Admin(top menu) → Loans → Bulk Update Loans Schedules can now be applied to an individual loan. To do this, please visit Loans(top menu) → View All Loans → Pencil button → Loan Schedule tab → Edit Schedule. There you will see the link to bulk update the individual loan schedule.

This is particularly useful if you have a loan with hundreds of installments and you want to remove interest or penalty between certain dates quickly.
Add Borrower: Last Name is Optional
Before, when adding a borrower, you had to specify First Name and Last Name and/or Business Name. There are some countries where people do not have last names. Hence, we have made the Last Name field as optional.
- 15th September 2020
Bulk Delete Repayments
To bulk delete repayments, please visit Repayments(top menu) → View Repayments. There, on the top right of the table, you will see the Bulk Delete button. Please be careful as the bulk delete operation can not be undone.
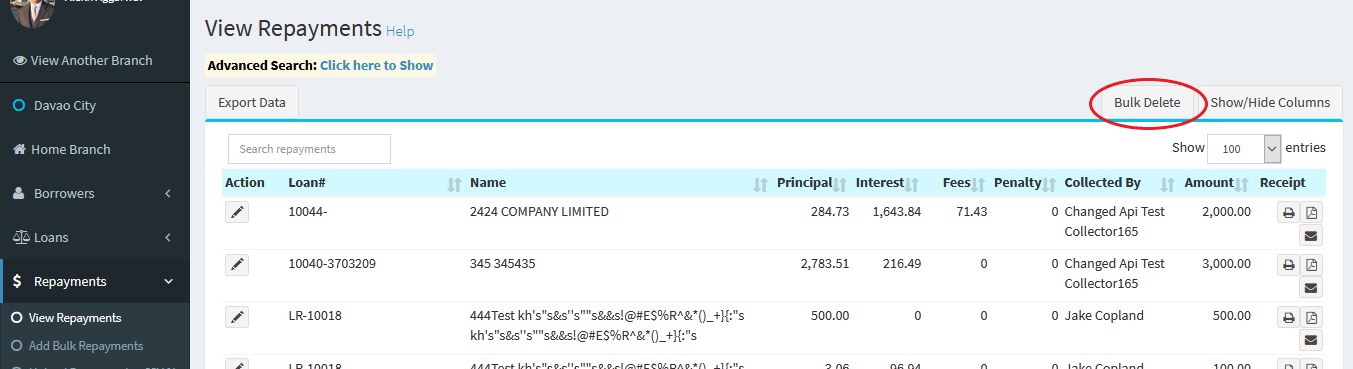
Upload Repayments via CSV: Advance Settings
Before when uploading payments via CSV file at Admin(top menu) → Bulk Upload → Upload Repayments from CSV file, it was not possible to recalculate the schedule or have manual composition. You can now specify this in your CSV file.
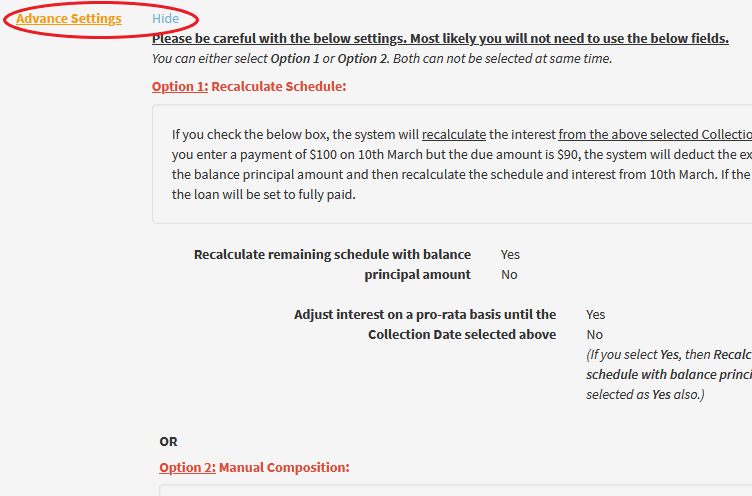
Add Loan: Loan Interest Per Loan
Please visit Loans(top menu) → Add Loan. There you will see the Loan Interest field. We have added another option where you can specify the interest on a Per Loan basis. For example, you may want to give the loan at $1,000 at 10% Per Loan for 5 months (Flat Rate). In this case, the system will calculate the total interest as $1,000 x 10% = $100 / 5 months = $20 interest per month. The principal will be divided as $1,000 / 5 months = $200. So, for each month, a total of $20(interest) + $200(principal) = $220 per month will be charged.
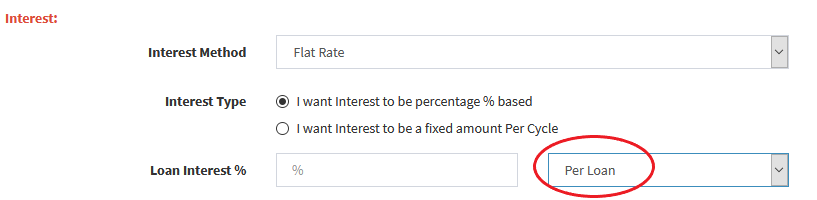
Add Loan: How should Principal be charged in Loan Schedule
Please visit Loans(top menu) → Add Loan. There in Advance Settings, we have added the How should Principal be charged in Loan Schedule? option. This is useful in case you do not want to charge principal on certain dates in the loan schedule. For example, you might be giving a loan for 12 months but you do not want to charge principal for the first 3 months and only charge interest. With this option, you can do that.
The following options can be selected:
- Include principal normally as per Interest Method
- Charge All Principal on the Released Date
- Charge All Principal on the First Repayment
- Charge All Principal on the Last Repayment
- Do Not Charge Principal on the Last Repayment
- Do Not Charge Principal on the First [n] Repayment(s)

Pro-Rata Collections Monthly Report
Please visit Reports(top menu) → Pro-Rata Collections Monthly. There you can see the pro-rata collections for each month. For example, you may have a loan that is released on the 1st January and is due on 31st December but you want to see the pro-rata dues for each month in between the schedule dates. This report will calculate the pro-rata collections for each month.
- 14th July 2020
Auto Send SMS and Email: Apply to Branches
You can now setup automated SMS and Email and restrict them to certain branches. Before, the system would send automated SMS and Email for all branches in your account.
Please visit Admin(top menu) → SMS Settings → Auto Send SMS or Admin(top menu) → Email Settings → Auto Send Emails. There click on Edit button. You will see the Apply to Branches section where you can select the Select Branches Below option and then choose multiple branches.
Daily Collection Sheet: New Options
We have added two new options at Collection Sheets(top menu) → Daily Collection Sheet.
-
Show last collection only if a loan has multiple collections due between the above From Date and To Date
If you have multiple collections for a loan between the from and to dates, the system would have previously shown all collections. This can be confusing as the loan officer would not know which collection to look at. If you select this option, the system will only show the last collection.
-
Do not include System Generated Penalties that are due between the above From Date and To Date
If you have system generated penalties for a loan between the from and to dates, the system would have previously shown those penalties. Even though they are due, they are not technically the collection dates in the original loan schedule. If you select this option, the system will ignore the system generated penalty due dates.
Add Loan: Balloon Repayment Amount
We have added a new option on the Add Loan page. It is only valid for Reducing Balance - Equal Installments interest method. You can put a balloon payment on the last repayment cycle. This will reduce the repayment amount but will increase the total interest. On the last repayment, the repayment amount + balloon payment will be charged. To see this, please visit Loans(top menu) → Add Loan → Advance Settings: Show. There you will see the Balloon Repayment Amount field.
View All Loans: New Columns
Please visit Loans(top menu) → View All Loans → Show/Hide Columns button. There you will see Borrower Age, Borrower City, Borrower Country, Borrower Date of Birth, Borrower Email, and Borrower Gender fields. You can select these columns and move them to the right box to show them on the View All Loans page.
Bulk Upload: Save Row Headers for Future Use
If you are using the Bulk CSV Upload feature, we have provided the option to save the row headers so you don't have to keep selecting them again every time you use the buk upload feature.
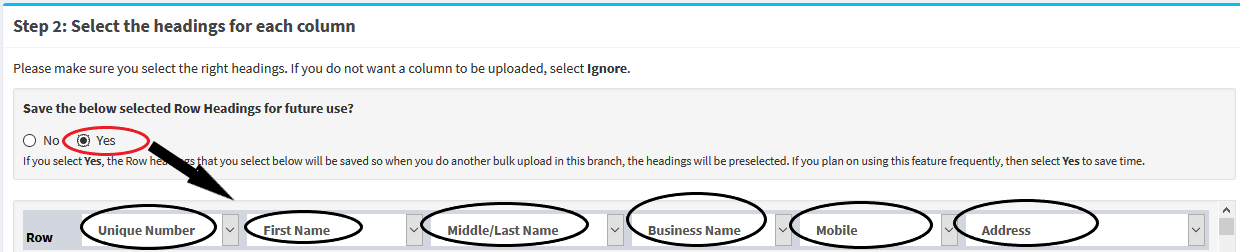
You can see the above feature on the below pages:
- Upload Borrowers from CSV file
- Upload Loans from CSV file
- Upload Repayments from CSV file
- Upload Expenses from CSV file
- Upload Savings Accounts from CSV file
- Upload Savings Transactions from CSV file
- 30th June 2020
Send Monthly Statements and Balances
You can now setup automated SMS and Email and send monthly loan statements, loan schedules, borrower statements, savings statements, and investor statements.
Monthly Auto SMS:
To send monthly SMS for savings balance or investor balance, visit Admin(top menu) → SMS Settings → Auto Send SMS. There you will see at the bottom the following categories:
- Send Monthly Savings Balance
- Send Monthly Investor Balance
Please click on Edit button to set the date of the month and time when the SMS should be sent. You will see the placeholders below the page that you can use for the above categories.
For the Send Monthly Savings Balance category, you can use the following placeholders:
For the Send Monthly Investor Account Balance category, you can use the following placeholders:
Monthly Auto Email:
To send monthly email, visit Admin(top menu) → Email Settings → Auto Send Emails. There you will see at the bottom the following categories:
- Send Monthly Individual Loan Statement
- Send Monthly Original Loan Schedule
- Send Monthly Adjusted Loan Schedule
- Send Monthly Borrower Statement for All Loans
- Send Monthly Savings Balance
- Send Monthly Investor Account Balance
Please click on Edit button to set the date of the month and time when the SMS should be sent. You can also choose to attach the statements to the email. You will see the placeholders below the page.
Web Form API
You can now build forms on Loandisk and then embed those forms on your website. When someone submits the form on your website, you will receive a response on Loandisk. You can visit at Admin(top menu) → Settings → Web Form Builder and API. To see how this feature works, please watch the below video.
- 30th April 2020
Investors
You can now add investors, investor accounts, and add loan investments. We also have a portal where investors can login to view their investments and apply for new investments. To see how this feature works, please watch the below video.
Add Footer to Documents
You can now add footer description to borrower reports(PDF and printable) such as Repayment Receipt, Loan Statements, Client Statements, Loan Schedules, and Loan Comments. This is usefeul in putting your business registration number or terms and conditions at the bottom of all the documents.
Please visit Admin(top menu) → Borrowers → Format Borrower Reports. There at the bottom of the page, you will see the Footer section.
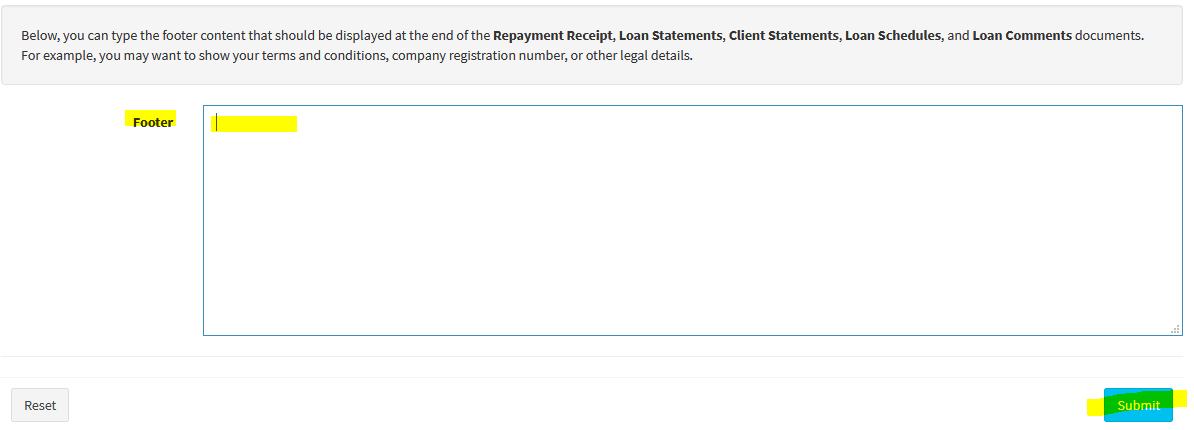
- 1 March 2020
Add Loan Status and Manage Loan Approvals
You can now add loan statuses, manage loan approvals, and set permissions for staff members on which loan statuses they can add, edit, delete, and approve. To see how this feature works, please watch the below video.
Download Borrower Statement and Loan Statement
We have modified the borrower and loan statement feature so now you can download the statement between certain dates and in ascending or descending order.
Please visit Loans(top menu) → View All Loans → Pencil button. There click on the Loan Terms tab. Then you will see the Loan Statement dropdown box which has the Download Statement option. Similarly you will see the Borrower Loans Statement on the top right hand side of the page.
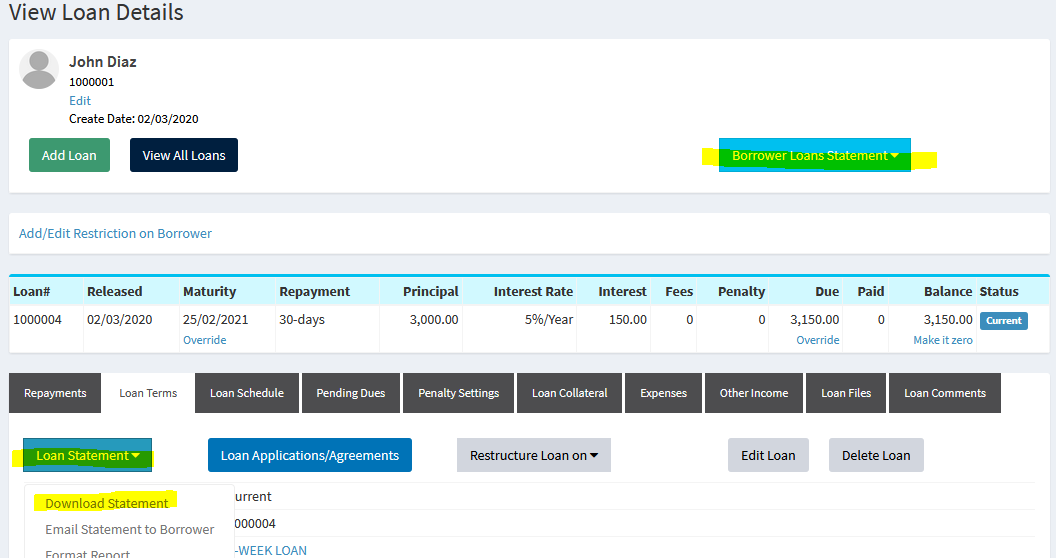
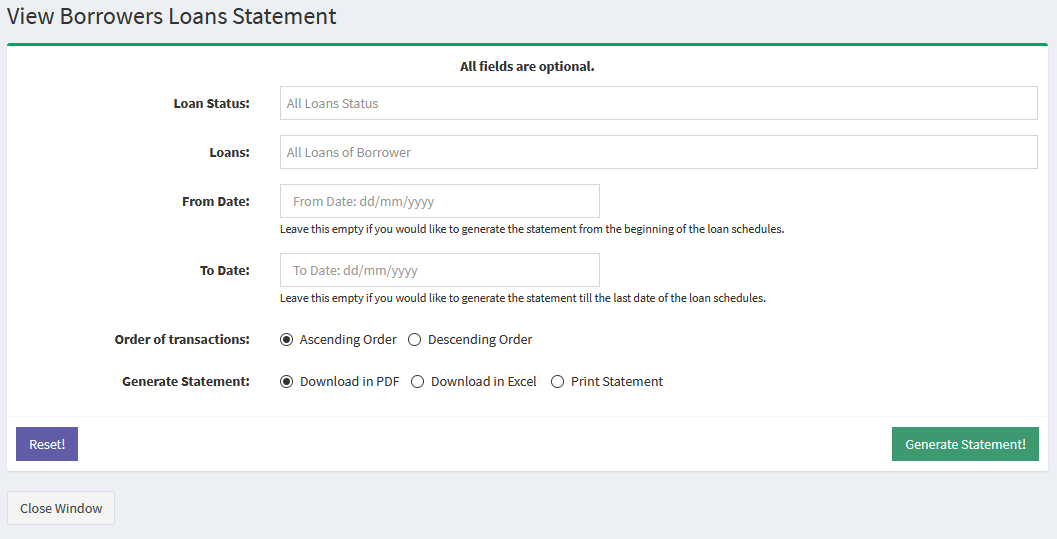
Transfer money to another Savings Account
Before, you could only add a transaction within the same savings account or to another loan account. Now, you can transfer a transaction to a savings account of another borrower. To do this, please visit Savings(top menu) → View Savings Accounts → Pencil button. There click the Transfer money to another Savings Account button.
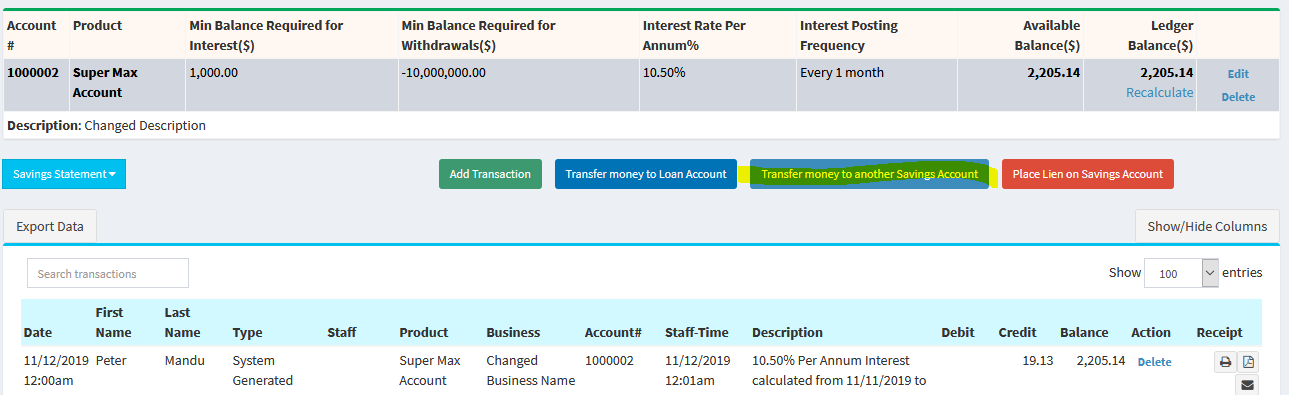
Home Branch Charts: Borrower Age Group
We have added 2 new charts on the home branch page which show the total number of open, fully paid, and default loans per age group and the recovery rate per age group.
To see these charts, please visit Home Branch page and scroll to the bottom of the page to see these charts.
This is a great way to see which age group has the most loans and the higher or lowest recovery rates. These charts will only show properly if you have added date of birth for the borrowers. To add date of birth for your existing borrowers, visit Borrowers(top menu) → View Borrowers → Pencil button. There you will see the Date of Birth field where you can select a date.
Penalty Settings: Apply penalty from a certain date
You can now select from which date the penalty settings should apply. Before, the penalty would have applied from the start of the loan schedule. Now, you can select a from date.
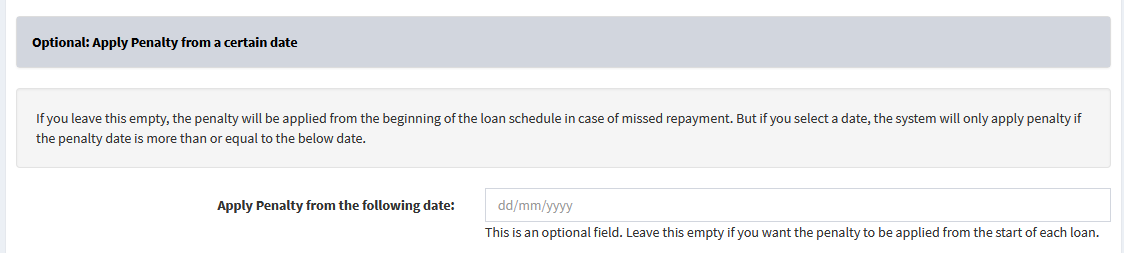
You can either add penalty to the entire loan product by visiting Admin(top menu) → Loans → Loan Penalty Settings. Alternatively, you can apply penalty to an individual loan only by visiting Loans(top menu) → View All Loans → Pencil button. There click on the Penalty Settings. You will see the option for Individual Penalty there.
Custom Fields for Loan Officer and Collector
You can add custom fields for loan officers and collectors at Admin(top menu) → Settings → Custom Fields. There you will see the Add Loan Officer and the Add Collector categories.
These will show on the pages at Admin(top menu) → Borrowers → Manage Loan Officers → Add Loan Officer and Admin(top menu) → Repayments → Manage Collectors → Add Collector.
Show/Hide Columns: First Name, Last Name, Savings Available Balance, and Savings Ledger Balance
We have added First Name, Last Name, Savings Available Balance, and Savings Ledger Balance which you can show in various tables such as Loans(top menu) → View All Loans → Show/Hide Columns and Borrowers(top menu) → View Borrowers → Show/Hide Columns.
After Maturity Penalty Settings and Extend Loan: Apply to Total Principal Amount Released
For the Extend Loan After Maturity Until Fully Paid and After Maturity Date Penalty feature, we have added the option of calculating the interest/penalty on the Total Principal Amount Released. If you select this option, the system will look at the total principal released to the borrower. In case of Extend Loan After Maturity Until Fully Paid, if the loan is expired and not fully paid, the system will add interest on the total principal released. For After Maturity Date Penalty, it will calculate penalty on the total principal released after maturity.
Miscellaneous changes
Borrower Restriction: We have included the option to add a description field. You can see this at Borrowers(top menu) → View Borrowers → Loans button. There click on Add/Edit Restriction on Borrower link. At the bottom of the page, you will see the Description field.
Top Search Bar: You can now search for mobile numbers and email addresses on the search bar which is located on the top of the page.
Profit/Loss: You can now filter the Profit/Loss for a particular loan. Please visit Reports(top menu) → Profit / Loss. There you will see the Filter Report by Loan# field on the top of the page.
- 20 January 2020
Borrower Restrictions
You can now place restrictions on borrowers for receiving a new loan. For example, you may not want your borrowers to receive a new loan if they have an existing default loan. Or you might want to restrict how much total outstanding principal they can have before a new loan is granted. This is useful for preventing other staff members from accidentally adding new loans for borrowers who should not be allowed.
To do this, please visit Borrowers(top menu) → View Borrowers → Loans button. There you will see the Add/Edit Restriction on Borrower link.
There you have the following options:
- Maximum Number of Open Loans Allowed
- If you type a number for this field, then the system will only allow new loans if the current total open loans is less than this number. If you put 0 here, then no new loans will be allowed. - Maximum Principal Outstanding Amount Allowed
- If you type a number for this field, then the system will only allow a new loan or disbursement if the total principal outstanding amount for all open loans + the principal released for new loan is less than or equal to this amount. If you put 0 here, then no new loans will be allowed. - Maximum Total Outstanding Amount Allowed
- If you type a number for this field, then the system will only allow a new loan or disbursement if the total outstanding amount for all open loans is less than this amount. Please note that the new loan will not be included in this calculation. If you put 0 here, then no new loans will be allowed. - If Borrower has a Default Loan, stop any new loans?
- If you select Yes for this field and the borrower has a default loan in the past, then you will not be allowed to add new loans for this borrower. - Stop any New Loans to Borrower?
- If you select Yes for this field, then you will not be allowed to add new loans for this borrower. - Minimum Savings Balance Required for New Loan
- If you type an amount for this field, then the system will only allow a new loan or disbursement if the total savings balance is more than or equal to this amount.
You can either choose to apply this settings for the current borrower or all borrowers in the branch. If you apply the settings to all borrowers in the branch, then any existing restriction settings for borrowers will be overwritten.
New Columns for View All Loans
We have added some new columns for the View All Loans page.
- Interest Balance
- Fees Balance
- Interest Balance
To choose these columns, please visit Loans(top menu) → View All Loans. There click on Show/Hide Columns button on top right of the table.
Enable/Disable Automated Payments for All Loans
If you are currently using Automated Payments feature in loans, you can enable or disable it for loans rather than do it individually. To do this please visit Admin(top menu) → Loans → Bulk Update Loans with Automated Payments.
- 10 December 2019
Architecture Change
Over the last 2 months, we have been busy laying the foundation and changing the base architecture of Loandisk. We will be moving to a new cloud provider on 21st December 2019. This is being done to provide a highly available setup which will give the following benefits:
- 24x7 availability and close to 100% uptime
- Increased security
- Robust backup solution
- Fast speeds around the world
Since this is a big move, it is possible there might be unexepected issues on 21st December, 22nd December, and 23rd December. The site might not work as expected or there might be downtime. We will try our best to ensure there is no downtime. Your data will remain safe during this move.
Once this is completed, we will begin working on new features from January 6th 2020.
For any assistance, please contact us at support@loandisk.com
- 14 October 2019
E-Signature
You can now send PDF files to your borrowers which they can complete and sign electronically. To see how this feature works, please watch the below video.
My Pending Repayments or Transactions
This feature is for staff members who have been resticted so whenever they add repayments or savings transactions, it goes to approval stage (Admin(top menu) → Manage Staff → Staff → Add Staff or Edit → Restrict Add/Edit Repayments for Approval or Restrict Add/Edit Savings Transactions for Approval to Yes). The staff member can now view their repayments and savings transcations pending for approval in a separate link. Before you would have to give them access to the Approve Repayments or the Approve Transactions link. This would mean the restricted staff member can see the repayments or transactions from other staff members.
With this feature, you do not need to give the staff member access to those pages. If they have been restricted, they will automatically see the following links in the top menu:
- My Pending Repayments
- My Pending Transactions
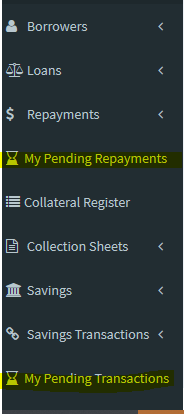
Once they click on these pages, they can see their repayments/transactions pending for approval only.
- 12 September 2019
Add Loan: Pro-Rata Interest
You can now add a loan and set the interest to be calculated on a pro-rata basis for each repayment cycle.
For Monthly/BiMonthly/Quarterly/Every 4 Months/Semi-Annual loans, the system will look at the Days in a Month for Loan Interest Calculation field in Account Settings. For Yearly loans, it will look at the Days in a Year for Loan Interest Calculation field. Then, it will calculate the daily interest by dividing the amount due by the days figure in Account Settings. The daily interest will then be multiplied with the number of days between repayment dates to calculate the pro-rata interest amount.
Let's assume we have a monthly cycle loan released on 1st January and the first repayment is due on 1st February for $300. Firstly, the system will divide $300/30 days(Days in a Month for Loan Interest Calculation field in Account Settings) = $10/day. Secondly, there are 31 days between 1st January and 1st February. To get the pro-rata amount for the first repayment, it is 31 days x $10/day = $310.
To do the above, please visit Loans(top menu) → Add Loan. There please click Advance Settings: Show. There you should set Calculate Interest in Each Repayment on Pro-Rata Basis? field to Yes.

Loan: Make Balance Zero
Sometimes, you may want to close the loan early and make the balance zero if you are not expecting any more payments and the client has underpaid or overpaid. We have put a Make it zero link below the balance figure which you can use to turn the loan balance into 0.
Please visit Loans(top menu) → View All Loans → Pencil button.

Underpayment: If the client has paid less than the total due amount and you want to make the balance 0, then this feature will remove the balance amount from the loan schedule. So in the above screenshot, since the client has paid 34.38 less than the due amount, the system will remove 34.38 from the loan schedule in descending order by date. The principal will not be edited. Only the interest, penalty, or fees will be reduced. For this reason, to use this feature, the total paid amount must be equal to or more than the principal amount (money released to borrower).
Overpayment: If the client has paid more than the total due amount and you want to make the balance 0, then you have 2 options. If you are going to keep the excess payment, then you can choose the add the extra payment to the loan schedule. Alternatively, if you have refunded the excess payment to the client, then you can choose to edit the payments by removing the excess payment from the payments in descending order by date.
Loan Applications/Agreements: Auto Generate Tables
In the Loan Applications/Agreements option in the Loan Terms tab, let's say you want to show the loan schedule or all the payments in the document. Before, that was hard to do since loans can have different number of repayments. Now, you can do this easily by creating a table in the docx file and specifying the table placeholders in the first row. The system will automatically add the rows to the table from the loan schedule.
For example, if you had the following in your docx file, the result would be the loan schedule table:
Before:
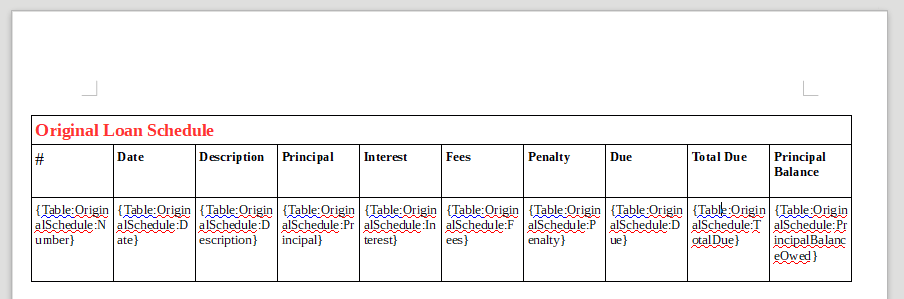
After:
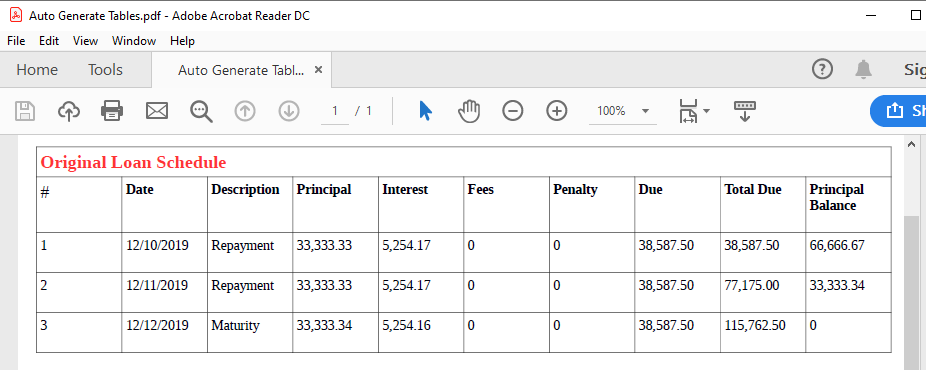
To see how this works, please download the sample file. Then, visit Admin(top menu) → Loans → Loan Templates: Applications/Agreements → Add Loan Template. There upload the sample file you just downloaded and make sure you check all the loan products.
After doing the above, visit Loans(top menu) → View All Loans → Pencil button. There click on the Loan Terms tab. Then click on Loan Applications/Agreements button and select the PDF option. You will notice that the file now shows the schedule and any payments made.
Loan Files: Image Thumbnails and Gallery
When you upload files for a loan, you can now see a thumbnails of all the image files that are uploaded. This makes it easier to browse through documents especially if you have lots of files uploaded. If you click on the thumbnail, you can view it in a gallery where you can also download and zoom into the file.
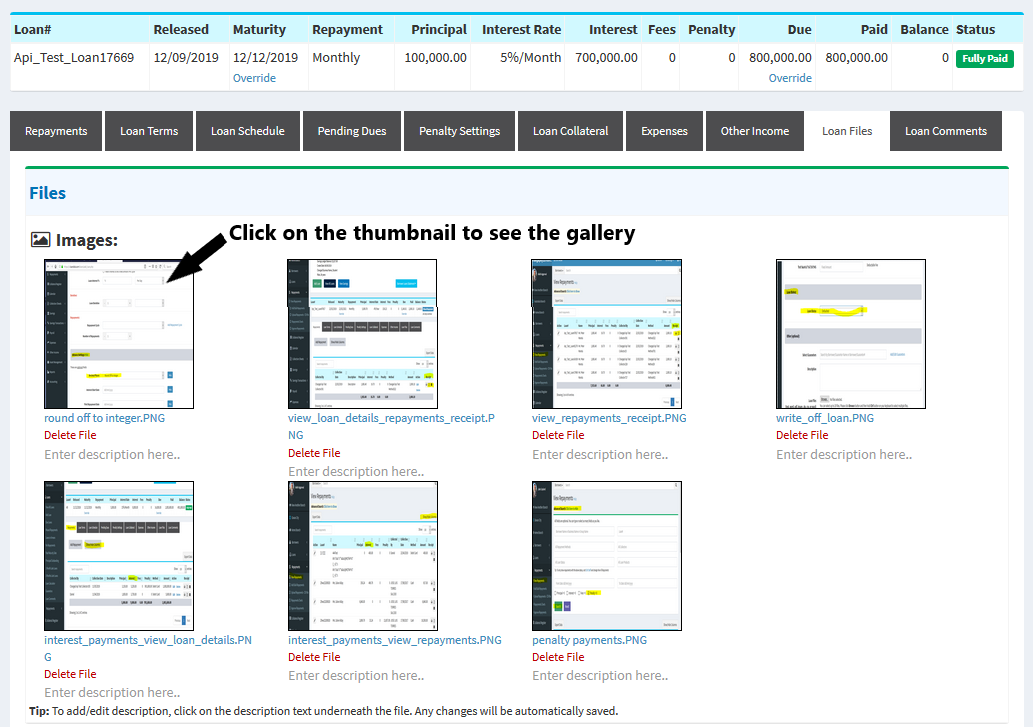
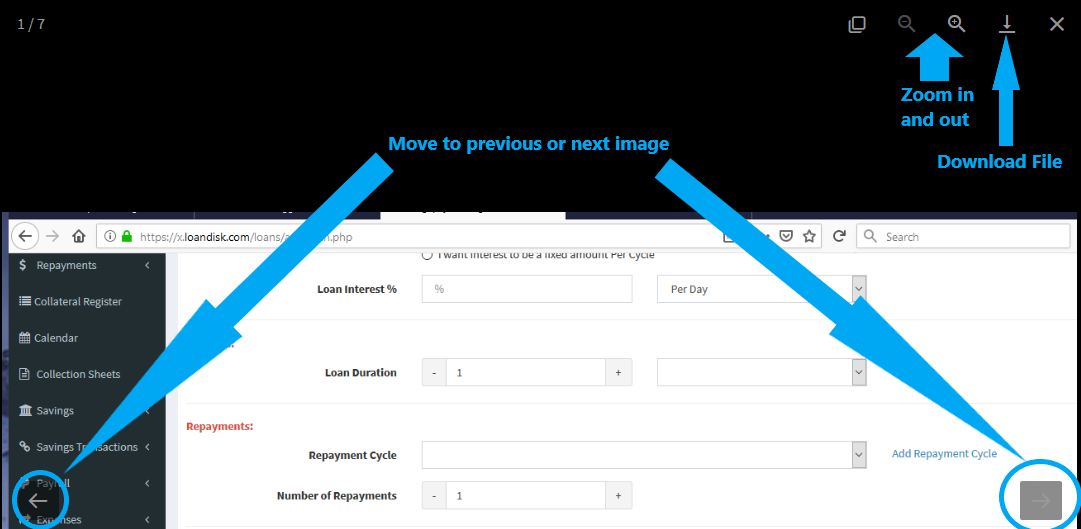
Please visit Loans(top menu) → View All Loans → Pencil button. There click on the Loan Files tab. If you upload some sample image files, you will see them in a gallery.
Also, you can now add description to files. You will see a Description box below the files where you can type text. It will automatically be saved as you type it.
Loan Files: Description
You can now add description to the loan files. You will see a Description box below the files where you can type text. It will automatically be saved as you type it.
Please visit Loans(top menu) → View All Loans → Pencil button. There click on the Loan Files tab. If you have files uploaded, you will see the description box.
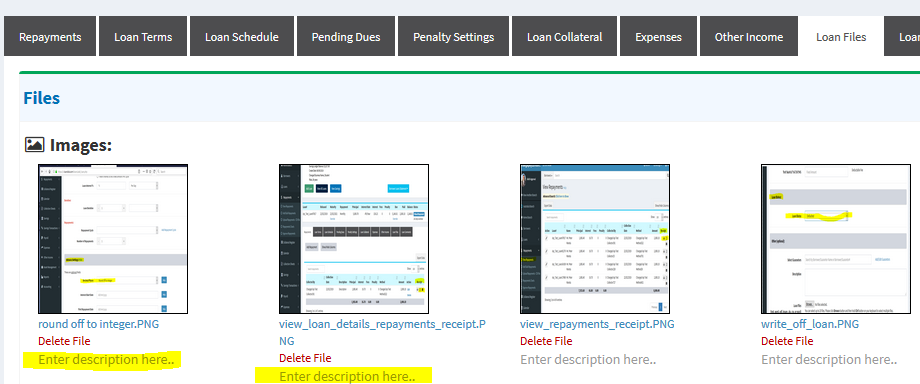
Edit Schedule: Set Default
When editing a loan schedule, you can click on the Set Default link below the first row. For example, if you click Set Default below the Description box, the rest of the rows will be populated with the same description as the first row. Please be sure to click Submit to save the changes.
Please visit Loans(top menu) → View All Loans → Pencil button. There click on the Loan Schedule tab. There you will see the Set Default links.
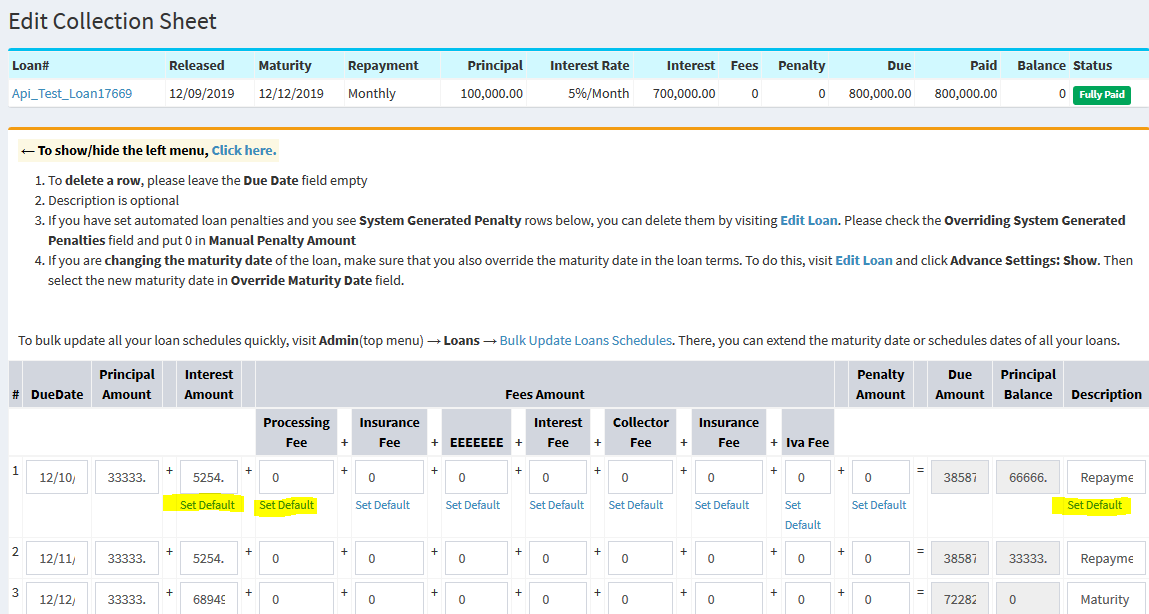
Savings Product: Branch Access
Before, when you added a savings product, it was available to all branches. Now, you can select the branches where the savings product can be used.
Please visit Admin(top menu) → Savings → Savings Products → Add Savings Product → Access to Branch. There select the branches that should have access to the savings product.
- 1 August 2019
Savings Interest Methods
Before, when calculating interest in a savings account, we were using the Last Savings Balance to calculate the interest. For example, if the interest was set to be calculated on the 20th March and the last balance was $1000, then interest would be calculated on $1000. But it is possible the customer might have deposited $1000 on 19th March but would still receive 1 month's interest for that $1000.
We have now added a new method which will calculate the interest on a Pro-Rata Basis. So in the above example, the interest on $1000 would only be for 1 day assuming the balance was added on 19th March and interest is being calculated on 20th March.
Please check the below table on how the different interest methods can affect the interest. Let's assume we want 12 per annum interest that should be posted monthly at end of month:
Date Credit Debit Savings Balance Interest Method:
Last Savings BalanceInterest Method:
Pro-Rata Basis1st April 1000 1000 15th April 1000 2000 4.60
12% pa / 365 days = 0.032..% per day.
14 Days from 1st April to 14th April.
0.032..% per day x 14 days x 1000 Balance (maintained from 1st April to 14th April)/100 = 4.6020th April 1500 500 3.29
5 Days from 15th April to 19th April.
0.032..% per day x 5 days x 2000 Balance (maintained from 15th April to 19th April)/100 = 3.2930th April
(end of month)500 5
(12% pa / 12 months * 500 (last balance) / 100)1.81
11 Days from 20th April to 30th April.
0.032..% per day x 11 days x 500 Balance (maintained from 20th April to 30th April)/100 = 1.81Total Interest added on 1st May for 1st April to 30th April 5 9.70
(4.60 + 3.29 + 1.81)Now let's look at another example:
Date Credit Debit Savings Balance Interest Method:
Last Savings BalanceInterest Method:
Pro-Rata Basis1st April 1000 1000 15th April 1000 2000 4.60
12% pa / 365 days = 0.032..% per day.
14 Days from 1st April to 14th April.
0.032..% per day x 14 days x 1000 Balance (maintained from 1st April to 14th April)/100 = 4.6020th April 8000 10000 3.29
5 Days from 15th April to 19th April.
0.032..% per day x 5 days x 2000 Balance (maintained from 15th April to 19th April)/100 = 3.2930th April
(end of month)10000 100
(12% pa / 12 months * 10000 (last balance) / 100)36.17
11 Days from 20th April to 30th April.
0.032..% per day x 11 days x 10000 Balance (maintained from 20th April to 30th April)/100 = 36.17Total Interest added on 1st May for 1st April to 30th April 100 44.06
(4.60 + 3.29 + 36.17)Above you can see how the large deposit on 20th April caused the Last Savings Balance method to have a higher interest at end of month compared to Pro-Rata Basis .
To apply the interest method, please visit Admin(top menu) → Savings → Savings Products → Add Savings Product → Interest Method. There you can choose whether to use Last Savings Balance or Pro-Rata Basis.
New Categories for SMS/Email: Instant Notifications
We have added new categories for instant notifications via SMS and email. If you have setup Auto SMS or Auto Email, you now send instant notifications for the following categories:
- Processing Loan Added In System
- Default Loan Set In System
- Denied Loan Set In System
- Not Taken Up Loan Set In System
- Borrower Birthdays
For example, when you add a new loan and set the Loan Status as Processing, you may want to send an automated SMS to the borrower that the loan is currently under processing. Then, if you decide to reject the loan, you can edit the loan and set it to Denied. In that case you may want to send another notification that the loan was not approved. You can do this with the above categories.
We have also added another category: Borrower Birthdays. If you have specified the date of birth of the borrower, the system will send a birthday greeting if you enable the Borrower Birthdays category. The greeting will be sent the same day.
To do this for SMS, visit Admin(top menu) → SMS Settings → Auto Send SMS. For email, visit Admin(top menu) → Email Settings → Auto Send Emails. There, click Edit button for one of the above categories. You need to make sure you select Same Day in Send Email/SMS dropdown. This will cause the SMS/Email to be immediately sent to the customer. Also, please remember to click on the Activate Category button.
Send SMS/Email to All Borrowers
Before, when sending SMS or email to all borrowers, you could only send to all borrowers or manually select specific borrowers. But some lending companies want to send a message to all borrowers who have open loans. To see this, please visit Borrowers(top menu) → Send SMS to All Borrowers and Send SMS to All Borrowers. There you can see we have added the following options:
- All Borrowers with Open Loans
- All Borrowers with Processing Loans
- All Borrowers with Fully Paid Loans
- All Borrowers with Default Loans
- All Borrowers with Not Taken Up Loans
- All Borrowers with Denied Loans
- All Borrowers with No Open Loans
- All Borrowers with Savings Accounts
Also, we have added the option to filter borrowers based on loan products or savings products. For example, you may want to send a message to all borrowers in a certain loan product. Any borrower that has a loan in that loan product will receive the message. You will see the Filter Loan Products and Filter Savings Products options where you can select the product(s).
Expenses for Loans
Previously the Expenses(top menu) feature didn't allow expenses to be linked with loans. This made it difficult to capture expenses for loans.
Please visit Loans(top menu) → View All Loans → Pencil button. There you will see the Expenses tab. You can click Add Expenses button to add an expense for the loan.
Another option is you can go straight to Expenses(top menu) → Add Expense and select the loan in Link to Loan field.
New Loan Status for Defaulted Loans
We have added some new loan status options: Credit Counselling and Collection Agency. These are under the Defaulted loan status which means the borrower has defaulted on the loan and you do not expect to get any further payments from the borrower.
Please visit Loans(top menu) → View All Loans → Pencil button. There on the View Loan Details page, please click on the Loan Terms tab → Edit Loan. Below, you will see the Loan Status section where you can select the loan status.
- 26 May 2019
Add Loan: Extend Loan After Maturity Until Fully Paid
You can now create an unlimited loan where the loan never expires and is automatically extended past the maturity date. Some lending companies offer revolving loans where if the customer has not fully paid the loan by maturity date, the loan schedule is automatically extended with new interest.
To do the above, please visit Loans(top menu) → Add Loan. There you will see the Extend Loan After Maturity Until Fully Paid section. The following fields are present:
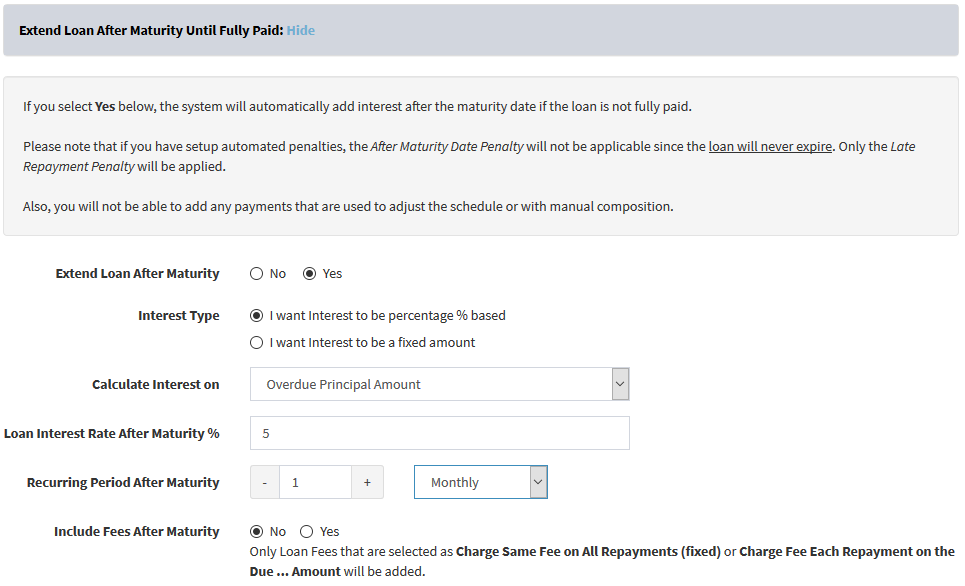
- Extend Loan After Maturity
Select Yes if you would like to enable it. - Interest Type
If you want interest to be calculated as a percentage of the overdue amount, then select I want Interest to be percentage % based . Alternatively, if you would like interest to be a fixed amount, then select I want Interest to be a fixed amount. - Calculate Interest on
If you have selected I want Interest to be percentage % based above, then interest will be calculated on one of the options selected here. So if you select Overdue Principal Amount the interest will be calculated on the overdue principal amount. Alternatively, if you have selected I want Interest to be a fixed amount, then the fixed amount interest will only be added if there is overdue principal amount. - Loan Interest
If you have selected I want Interest to be percentage % based above, enter the interest rate % that will be calculated on the overdue amount. Alternatively, if you have selected I want Interest to be a fixed amount, then enter the fixed amount of interest that will be added. - Recurring Period After Maturity
Here you can select the repayment cycle after maturity. So if you select 1 month, then the loan will be extended automatically by 1 month once loan expires. - Include Fees After Maturity
If you select Yes here, then the system will also add fees to each repayment. Only Loan Fees that are selected as Charge Same Fee on All Repayments (fixed) or Charge Fee Each Repayment on the Due ... Amount will be added.
We have also provided the extended loan feature in loan products. If you enable it for a certain loan product, it will auto-populate the Add Loan page whenever you add a loan for that loan product.
- 24 June 2019
Original/Adjusted Loan Schedule: Choose Columns and Rows to Show
You can now choose which columns and rows should appear when you download the Original Loan Schedule or the Adjusted Loan Schedule.
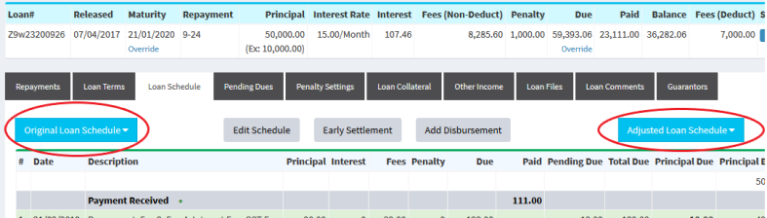
Please visit Admin(top menu) → Borrowers → Format Borrower Reports.
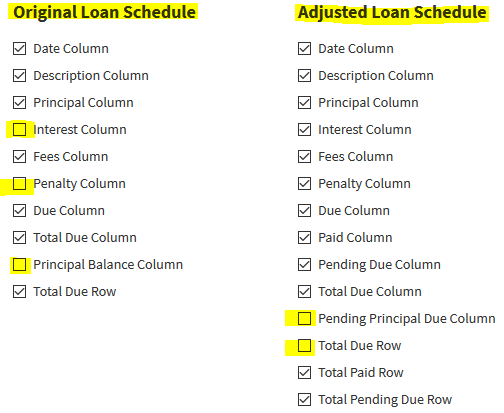
There you can uncheck the boxes for the fields that should not appear in the loan schedule.
Borrower Login: Customise Loan Schedule Table
If you have invited borrowers to Loandisk by clicking on Borrowers(top menu) → Invite Borrowers, you can choose which columns and rows they can see when they are on the Loan Schedule tab.
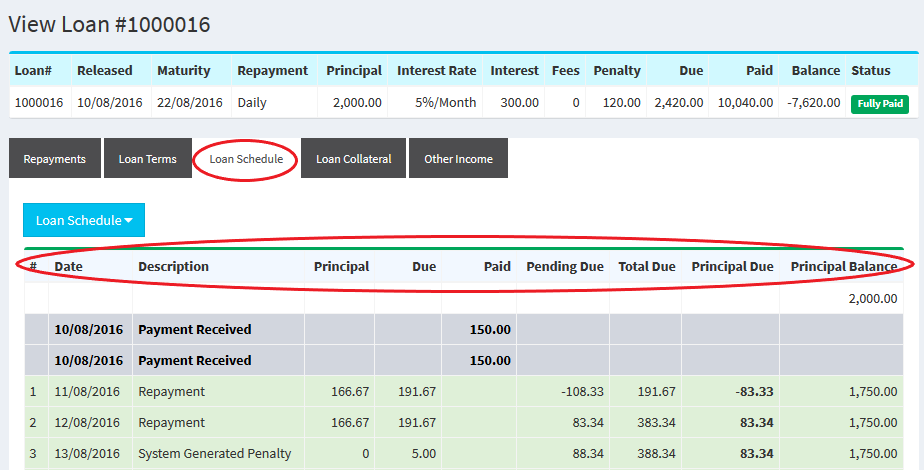
As you can see above, the Interest, Fees, and Penalty columns are not showing in the table. To do the above, please visit Admin(top menu) → Borrowers → Invite Borrowers Settings. There choose the fields that should appear in the table.
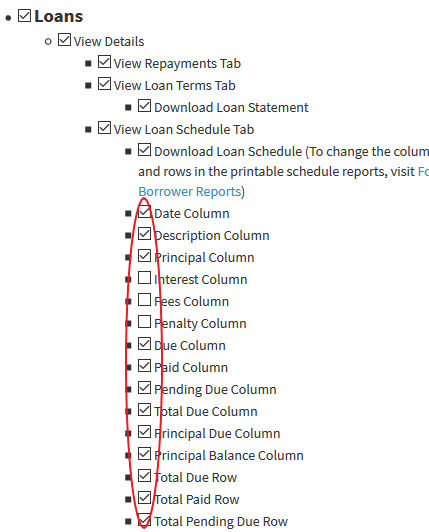
Loan Arrears Aging Report
We have added a report where you can see the overdue days for your loans. To see this, please visit Reports(top menu) → Loan Arrears Aging Report. There you can see 4 tables which shows loans that are overdue:
- Between 1 and 30 days
- Between 31 and 90 days
- Between 91 and 180 days
- More than 180 days
Add Loan Product: Choose Default Custom Field Values for Add Loan
If you are using custom fields for loans at Admin(top menu) → Settings → Custom Fields, then this feature is for you.
When adding a loan product, you can choose the default values that should appear in the Custom Fields section when you are adding a new loan. The custom fields will become populated with the default values on the Loans(top menu) → Add Loan page when you select this loan product.
- 26 May 2019
Add Loan: Extend Loan After Maturity Until Fully Paid
You can now create an unlimited loan where the loan never expires and is automatically extended past the maturity date. Some lending companies offer revolving loans where if the customer has not fully paid the loan by maturity date, the loan schedule is automatically extended with new interest.
To do the above, please visit Loans(top menu) → Add Loan. There you will see the Extend Loan After Maturity Until Fully Paid section. The following fields are present:
- Extend Loan After Maturity
Select Yes if you would like to enable it. - Interest Type
If you want interest to be calculated as a percentage of the overdue amount, then select I want Interest to be percentage % based . Alternatively, if you would like interest to be a fixed amount, then select I want Interest to be a fixed amount. - Calculate Interest on
If you have selected I want Interest to be percentage % based above, then interest will be calculated on one of the options selected here. So if you select Overdue Principal Amount the interest will be calculated on the overdue principal amount. Alternatively, if you have selected I want Interest to be a fixed amount, then the fixed amount interest will only be added if there is overdue principal amount. - Loan Interest
If you have selected I want Interest to be percentage % based above, enter the interest rate % that will be calculated on the overdue amount. Alternatively, if you have selected I want Interest to be a fixed amount, then enter the fixed amount of interest that will be added. - Recurring Period After Maturity
Here you can select the repayment cycle after maturity. So if you select 1 month, then the loan will be extended automatically by 1 month once loan expires. - Include Fees After Maturity
If you select Yes here, then the system will also add fees to each repayment. Only Loan Fees that are selected as Charge Same Fee on All Repayments (fixed) or Charge Fee Each Repayment on the Due ... Amount will be added.
We have also provided the extended loan feature in loan products. If you enable it for a certain loan product, it will auto-populate the Add Loan page whenever you add a loan for that loan product.
- 15 May 2019
Whitelabel Borrower Login
If you would like borrowers/clients to login using your site and access their loans, repayments, and savings accounts, then this feature is for you. Your borrowers will not have any knowledge of Loandisk.
The following are the steps:
-
You need to point CNAME record for your whitelabel domain URL to https://www.loandisk.com. Please contact your IT Manager/Web Developer/System Administrator and ask them to visit the link at /whitelabel-borrower-login.php.
For example, if your domain is YourCompanyName.com and you want clients to login using clients.YourCompanyName.com, then please login into your domain provider from where you purchased the YourCompanyName.com domain name.
In the domain control panel for YourCompanyName.com, setup a CNAME record for the clients subdomain to https://www.loandisk.com assuming you want clients to login at clients.YourCompanyName.com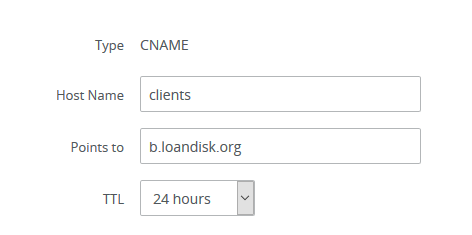
-
Add your whitelabel domain URL on the Invite Borrowers page. Your clients will login using this URL.
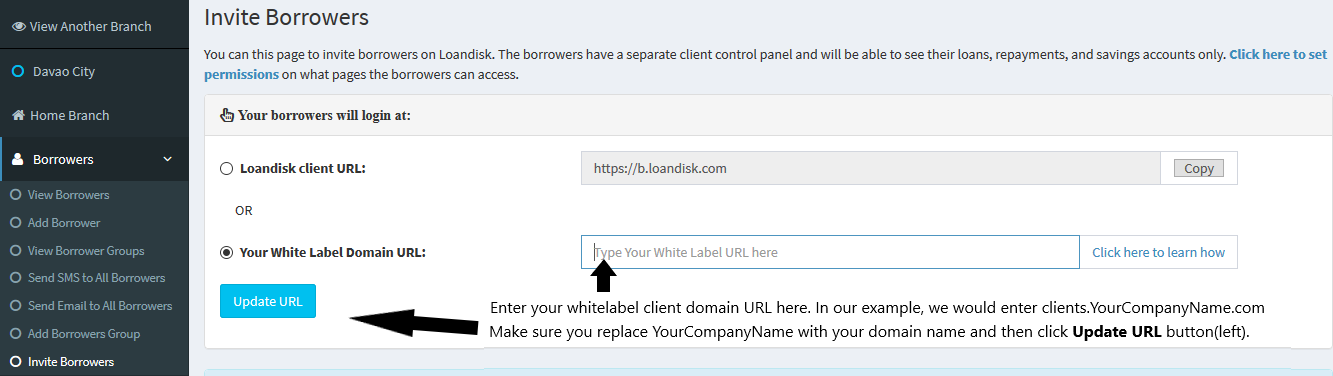
- Visit the Invite Borrowers page to invite borrowers. Your borrowers will login with your whitelabel domain URL.
For more information on how the above works, please click here.
Send Email: Cc and Bcc
Before, it was not possible to add Cc or Bcc to emails sent to borrowers from Loandisk. We have now added the option to do this as can be seen in the following image:
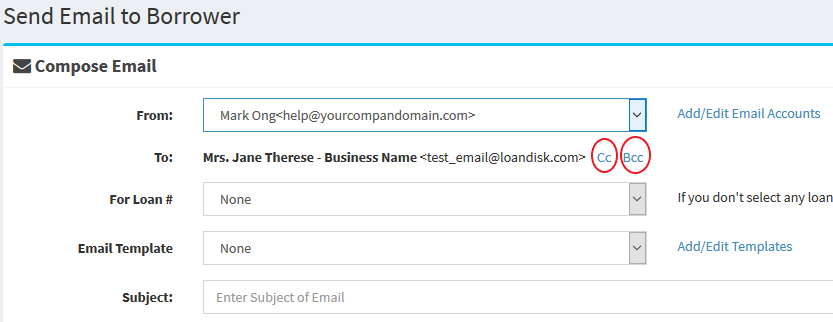
In the above image, you can click on the Cc and Bcc link which will show a text box. There you can type the emails separated by comma. As you type the email, you will also be able to select the borrowers that have emails or past email addresses to whom you have sent emails.
- 22 April 2019
Penalty Settings: Setup individual penalty for a loan
Before, you could set penalty for loan products which would affect all loans in that loan product. Now we have provided the functionality to override the loan product penalty settings and setup individual penalty for a particular loan.
To setup individual penalty, please visit any loan and then click on the Penalty Settings tab as can be seen in the following image.
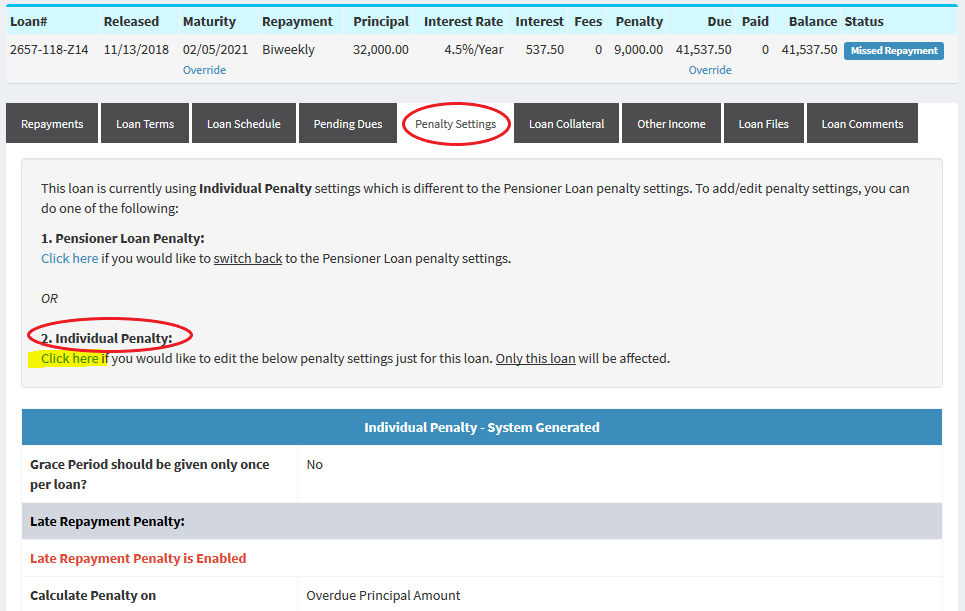
You can either keep using the loan product penalty settings or click on the yellow marked link above to setup individual penalty.
If you are using individual penalty settings, you can switch back to the loan product penalty settings as can be seen above. This will delete the individual penalty settings for that loan and penalty will be recalculated based on the loan product penalty settings.
Penalty Settings: Grace period once per loan
Before, the grace period would be applied after each installment date before calculating penalties for a loan. For example, if you setup grace period as 2 days, it would only add penalties on the third day after each installment date. However, some lending companies only want to apply grace period once per loan on the first penalty. You can now do this by visiting the penalty settings page and then setting the Grace Period should be given only once per loan? field to Yes.
- 15 April 2019
Collection Sheets: Choose Columns, Order Columns, Rename Columns
The collection sheets located at Collection Sheets(top menu) → Daily Collection Sheet, Missed Repayment Sheet, and Past Maturity Date Loans can now be customised.
You can choose the columns that should show in the collection sheets by moving the column headings from the Available Columns box to the Shown Columns box. This can be done by using the arrows in the middle of the two boxes.
Also, you can reorder the column headings in the Shown Columns box by using the arrows below the box. This will affect the order in which the column headings are shown in the collection sheets.
To rename collection sheet headings, please visit Admin(top menu) → Borrowers → Rename Collection Sheet Headings. This is useful for showing headings in your local language which can then be given to the collectors in the field.
Branch Holidays: Set holiday to next repayment cycle
We have changed the branch holidays feature to allow holidays to be set to the next repayment cycle. Before, you could only set to the next day that is not a holiday.
When you add a new loan and the loan schedule has branch holidays, the system will set those dates based on one of the following options:
- Next day that is not a holiday
- Next Repayment Cycle
Below you can see what will happen to the loan schedule for each of the above options:
Let's assume that we have the below weekly loan and 1st January 2019 (01/01/2019) is a branch holiday in the following loan schedule:
1. Next day that is not a holiday:If you select this option, the following will happen.
BEFORE HOLIDAY:
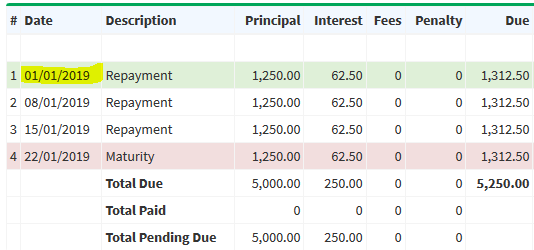 AFTER HOLIDAY:
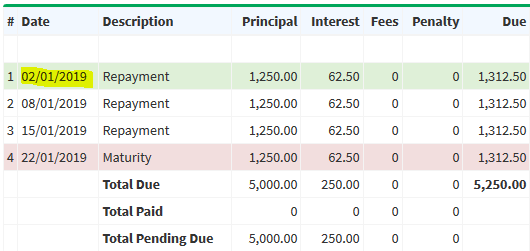
As you can see above in the BEFORE HOLIDAY picture, there is a branch holiday on 01/01/2019. This has been changed to 02/01/2019 (2nd January 2019) in the AFTER HOLIDAY picture since that is the next day after the holiday.
2. Next Repayment Cycle:If you select this option, the following will happen.
BEFORE HOLIDAY:
AFTER HOLIDAY:
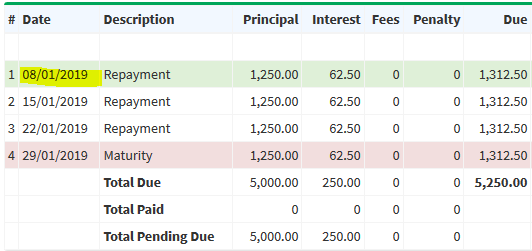
As you can see above in the BEFORE HOLIDAY picture, there is a branch holiday on 01/01/2019. This has been changed to 08/01/2019 (8th January 2019) in the AFTER HOLIDAY picture since that is the next repayment cycle after the holiday. The schedule dates after the holiday have all been extended by 1 week since it is a weekly repayment cycle loan.
To add/edit holidays, please visit Admin(top menu) → Branches → Branch Holidays.
- 8 April 2019
API V2
We have released a more comprehensive API which will allow you to add borrowers, loans, repayments, savings, and savings transactions. Please read the API documentation for more information.
The Repayments API is particularly useful since it will allow you to link the payments received by your payment processing company with Loandisk. For example, if your clients pay you via mobile money, debit card, or credit card through a payment processing company, then every time payment is received, you can send a POST request to the Repayments API on Loandisk. This will cause the repayment to be automatically entered into Loandisk without the need for any manual entries.
Similarly for the Savings Transactions API, you can also do the above.
For loans, we have added the option to retrieve the original or adjusted loan schedule.
The API now has the following features:
- Add, Update, Get, Delete Borrowers
- Add, Update, Get, Delete Loans
- Get Original Loan Schedule
- Get Adjusted Loan Schedule
- Get all Loans of Borrower
- Add, Update, Get, Delete Repayments
- Get all Repayments of Loan
- Add, Update, Get, Delete Repayment Methods
- Add, Update, Get, Delete Repayment Collectors
- Add, Update, Get, Delete Savings
- Get all Savings of Borrower
- Add, Update, Get, Delete Savings Transactions
- Get all Savings Transactions of Savings Account
You can download the updated SDK at PHP SDK.
- 4 March 2019
Loans API
We have released our Loans API that will allow you to get all the loans from Loandisk and also upload loans from your website to Loandisk. You can also edit loans. Please read the API documentation for more information.
This is particularly useful if you would like people to apply for loans on your website. Using our API, you can transfer the loan application to Loandisk. We would recommend uploading it as Processing status which means that the loan has not been released yet. Then you can login into Loandisk and set the status to Open (which means loan has been approved and released) or Denied (application has been rejected).
Custom Fields Sort
Before, on pages such as Borrowers(top menu) → View Borrowers and Loans(top menu) → View All Loans, it was not possible to sort custom fields. Now, you can sort them by clicking the up/down arrow. This is convenient in case you have dates in custom fields and would like to sort it.
Bullet Loans: Do not charge interest on last repayment schedule
Currently when you add a new loan by visiting Loans(top menu) → Add Loan, you will notice Interest-Only option in Interest Method field. The following is a sample loan schedule for the Interest-Only method:
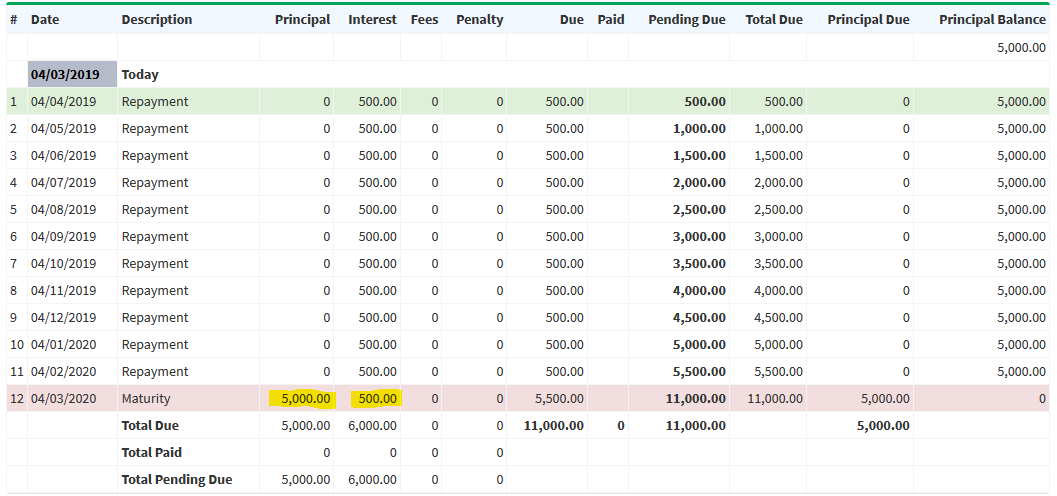
You will notice the full principal is charged on the last installment date but the interest is equally divided among all installment dates.
However, some lending companies do not want to charge any interest on the last installment. These loans are sometimes called Bullet Loans. If you do not want to charge any interest on the last schedule date, then visit Loans(top menu) → Add Loan → Advance Settings: Show. There in How should Interest be charged in Loan Schedule? field, select Do Not Charge Interest on the Last Repayment. In that case, the following schedule will be created.
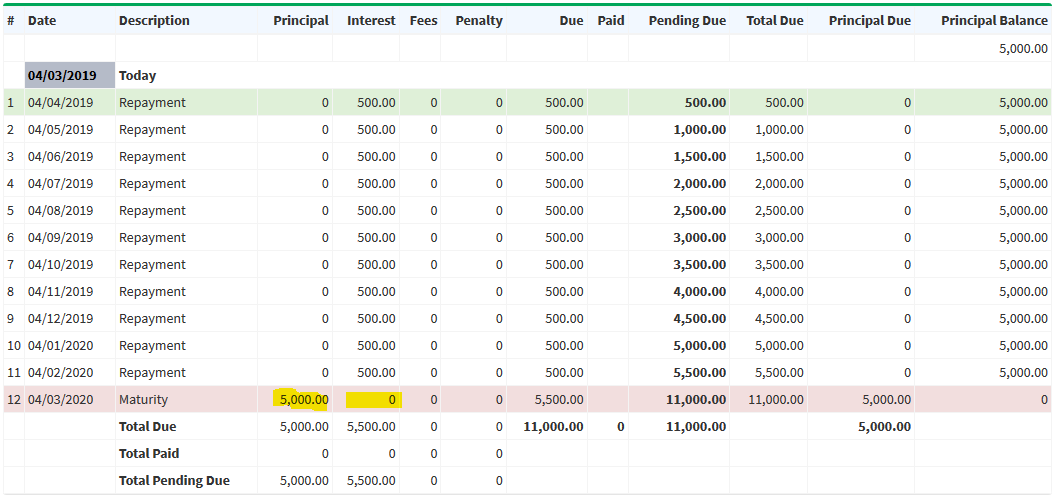
Add Repayment: Adjust interest on a pro-rata basis until the Collection Date selected
Please look at the following loan schedule where flat rate interest method is used.
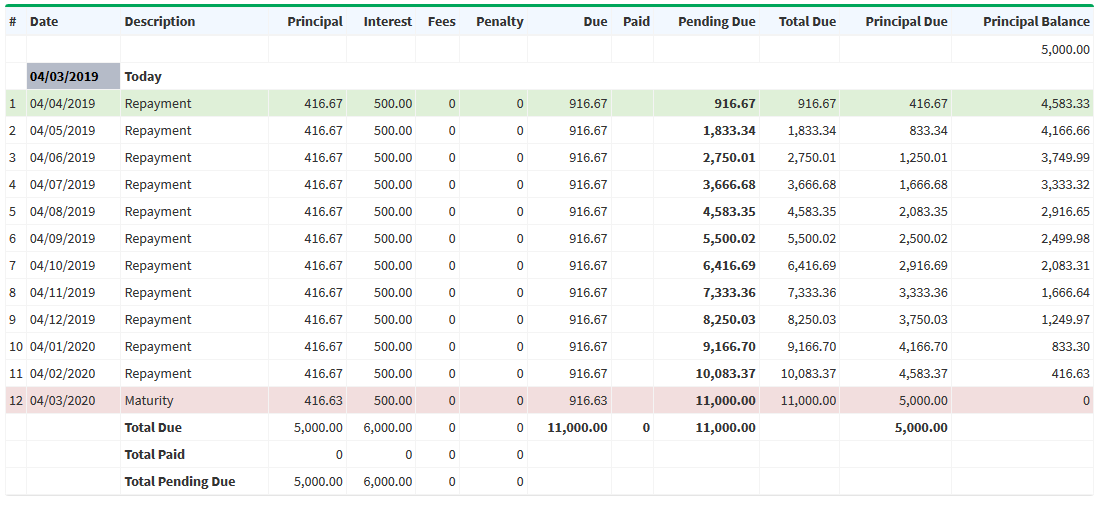
Let's say you have received an excess payment of 2,000 on 18/04/2019. Currently, when adding a repayment for a loan, if there is excess payment you can adjust the remaining schedule based on the remaining principal amount by selecting Recalculate remaining schedule with balance principal amount on the Add Repayment page. However, this would only adjust from the next schedule date as can be seen from the following schedule:
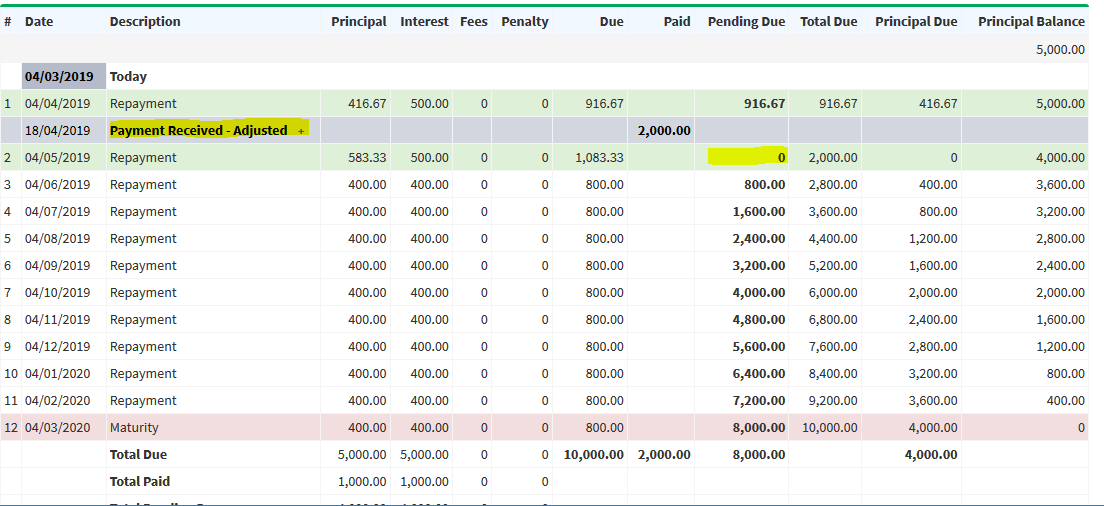
In the above picture, it is assumed the payment was for 04/05/2019 and the schedule has been adjusted on 04/05/2019 hence the Pending Due is 0. Sometimes lending companies only want to adjust on a pro-rata basis until the collection date. This is done so money can still be collected at the regular installment dates. To do this, please visit the Add Repayment page and click on Advance Settings: Show. There check Adjust interest on a pro-rata basis until the Collection Date selected above option. In this case, the following will be the result:
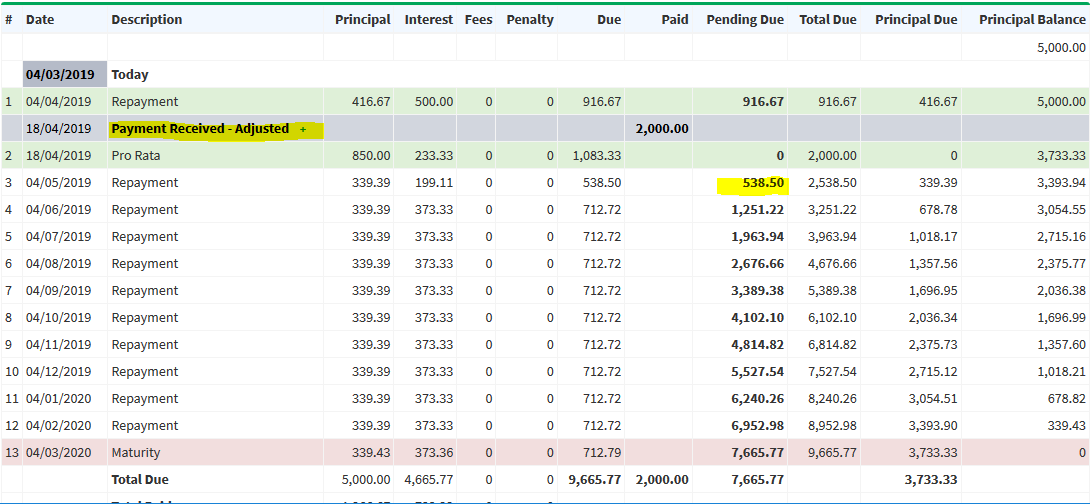
As you can see above, the Pending Due on 04/05/2019 is 538.50 since the adjustment has been made on pro-rata basis until the repayment collection date of 18/04/2019. The pro-rata interest has been calculated from 04/04/2019 to 18/04/2019 which is 233.33. Then, the remaining schedule is calculated based on remaining principal amount. The interest on 04/05/2019 is calculated on pro-rata basis from 18/04/2019 to 04/05/2019.
View Borrowers Advanced Search
On the Borrowers(top menu) → View Borrowers page, we have added the option to do an advanced search based on Loan Officer or Working Status of borrower. Please click on Advanced Search: Click here to Show link on top of the page.
No Repayments Advanced Search
On the Loans(top menu) → No Repayments page, we have added the option to do a search based on Loan Status or Loan Officer. This is useful in case you want to search for loans where no payments have been made between certain dates for a specific loan status such as Open Loans.
Disbursement Report
On the Reports(top menu) → Disbursement Report page, we have added the option to exclude loans that have not been released from the disbursement report. For example, you may not want to show loans that have the Processing or Denied status. To do this, please check the Do not include loans that have not been released option.
Transaction Id
For savings transactions, we have provided the option to include the Transaction Id of the savings transaction. To do this, please visit Savings Transactions(top menu) → View Savings Transactions. There click on Show/Hide Columns button on top right of the table. You will see the Transaction Id option in Available Colmns box. You can move this to the right Shown Columns box by using the arrows in the middle.
- 20 January 2019
Bulk Update Loan Schedules
Before, updating all your loan schedules at once was not possible. For example let's say you wanted to extend the maturity date of all past maturity loans. You would have to individually edit the schedule of each loan which would be time consuming. Now, you can quickly do a bulk update of all your loan schedules at once.
Please visit Admin(top menu) → Loans → Bulk Update Loans Schedules. There you can update as follows:
- Change Loan Schedule Date to another Fixed Date
- This is useful for changing a specific date to another date. For example, let's say you decide not to collect any payment on 1st January 2019. You can use this option to change 1st January 2019 to another date in all your loans. - Extend Loan Schedule Dates by the following Repayment Cycle
- This is useful in extending your installment dates in your loan schedules based on the selected repayment cycle. For example, if you have many missed repayment or arrears loans, you may want to extend the loan schedules of all the installment dates by 1 month. - Extend Maturity Date of Loans by the following Repayment Cycle
- This is useful in extending the maturity dates of your loans based on the selected repayment cycle. For example, you may decide to extend the maturity date of your past maturity loans by 2 weeks.
You must also select at least 1 of each of the following options:
- Branches
- Loan Status
- Loan Products
Only loans that are in the above selected branches, loan statuses, and loan products will be updated. This will help you target specific category of loans.
- 12 January 2019
View All Loans, View Repayments - Set Default View
The Loans(top menu) → View All Loans page shows all the loans you have in the branch. But you might want to only show Open and Processing loans when you click View All Loans.
Similarly, the Repayments(top menu) → View Repayments page shows all the repayments you have in the branch. But you might want to only show payments made for Open loans when you click View Repayments.
To do the above, please visit Admin(top menu) → Manage Staff → Staff. There click on Edit Staff button for the relevant staff member or yourself. Then you can select the loan statuses that you would like to show in the Set Default View section.
New Table Columns
For the Repayments(top menu) → View Repayments page, we have added some new table columns which you can show.
- Loan Status
- Show the loan status - Loan Product
- Show the loan product
To select the above columns, please visit Repayments(top menu) → View Repayments and click on Show/Hide Columns(top right of table) button and move the columns to the right box.
Advanced Search - Select Multiple Values
Before, on pages such as Loans(top menu) → View All Loans and Repayments(top menu) → View Repayments, when you clicked Advanced Search on the top of the page, you could only select one option for each of the select boxes. We have now changed this to allow for multiple selections as can be seen in below image:
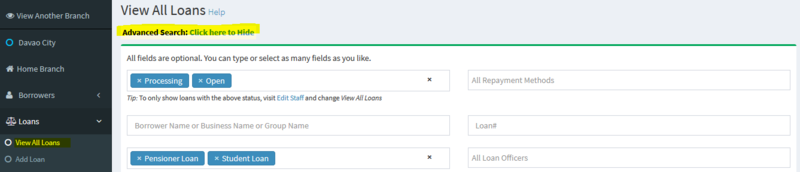
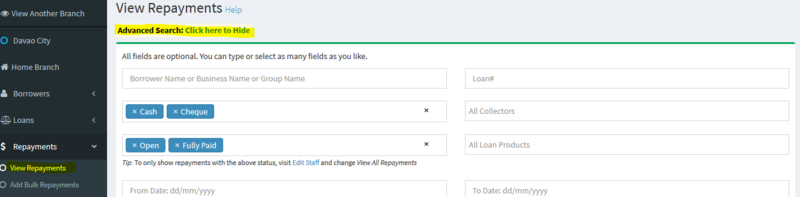
This will make it easier to filter the results for multiple categories at once. The above has been changed for the following pages:
- View All Loans
- View Repayments
- Collateral Register
- View Savings Accounts
- View Savings Transactions
- Payroll Report
- View Expenses
- View Other Income
- View Asset Management
- 2 January 2019
Branch Holidays
Previously, any changes to branch holidays would only affect new loans. Now you can apply holidays to loans already in the system. This is particularly useful if you forgot to add holidays and already have loans in the system. Also in some countries, there are often unexpected holidays announced. Hence this feature will allow you to apply those branch holidays to existing loans.
The loan schedule will skip the branch holidays and set the next date that is not a holiday. For example if you have 1st January and 2nd January as holidays and your loan schedule has 1st January in it, then the system will change that to 3rd January since 1st and 2nd are holidays.
To add/edit holidays, please visit Admin(top menu) → Branches → Branch Holidays.
- 17 December 2018
API Released
We have launched our API which will allow you to connect to Loandisk and transfer data from your website. At the moment, a limited version of the API has been released. In the coming weeks, we will be providing a more comprehensive API once the testing phase is over.
Currently, you can use the API to add, edit, get, and delete borrowers. To do this, please visit Admin(top menu) → API Settings and note down the following details.
-
Auth Code
- Click Generate Auth Code button on the API Settings page and note this down -
Public Key
- As shown on the API Settings page -
Branch Id
- As shown on the API Settings page, note down the Branch Id where you would like to transfer the data. An account can have multiple branches, hence you must specify the branch
Please read the API documentation before using the API. It contains the required steps. If you have any questions, please feel free to contact us at support@loandisk.com.
If you are using PHP on your website, you can download the Loandisk API PHP SDK.
Please note that you must have an active subscription to Loandisk at the time of using the API.
Group Collection Sheets
If you have created groups of borrowers at Borrowers(top menu) → View Borrower Groups, you can now download collection sheets for each group separately.
Please visit Collection Sheets(top menu) → Daily Collection Sheet. There you will see a Borrower Groups drop down box where you can select the group. You will only see this box if you have active borrower groups.
Group Name Table Column
Before, on pages such as Borrowers(top menu) → View Borrowers and Loans(top menu) → View All Loans, the group name would show below the borrower name. We have added separate column just for group name. You can also select this by clicking on Show/Hide button on top right of the tables.
Profit/Loss for last 6 months
You can now see the profit and loss statement for last 6 months and all time. To do this, please visit Reports(top menu) → Profit / Loss.
Improved Reports
The reports at Reports(top menu) have been modified for clients with large number of loans. Since the report generation can take a while for clients with 100,000+ loans, you can now generate them in the background and continue to use Loandisk. Also, you can see past reports generated there.
View Loan Details
We have made some changes to the View Loan Details page (Loans(top menu) → View All Loans → Pencil button) so that it loads even quicker than before. The speed has been increased by roughly 5 times.
- 25 October 2018
Loan Fees Calculation
Previously for percentage based Loan Fees, the system calculated all fees on the total loan amount which included principal and interest. Now, you can choose to calculate fees on the following:- Due Principal Amount
- Due Interest Amount
- Due Principal and Interest Amount
To do this, please visit Admin(top menu) → Loans → Loan Fees → Add Loan Fee. There in Calculate Fee percentage % of field, you can select one of the above options. Please note that this is only possible if the Fee Calculation is selected as I want Fee to be percentage % based.
Loan Fee Tax Calculations: Add Loan
In many countries, it is required by law to charge tax for every repayment in the loan schedule. For example, you might be required to charge a certain percentage of the due principal amount for each repayment. We have provided an option on the Add Loan page under Loan Fees section to select this option in the loan schedule. You will see it under Useful for Tax Collections as Charge Fee Each Repayment.....
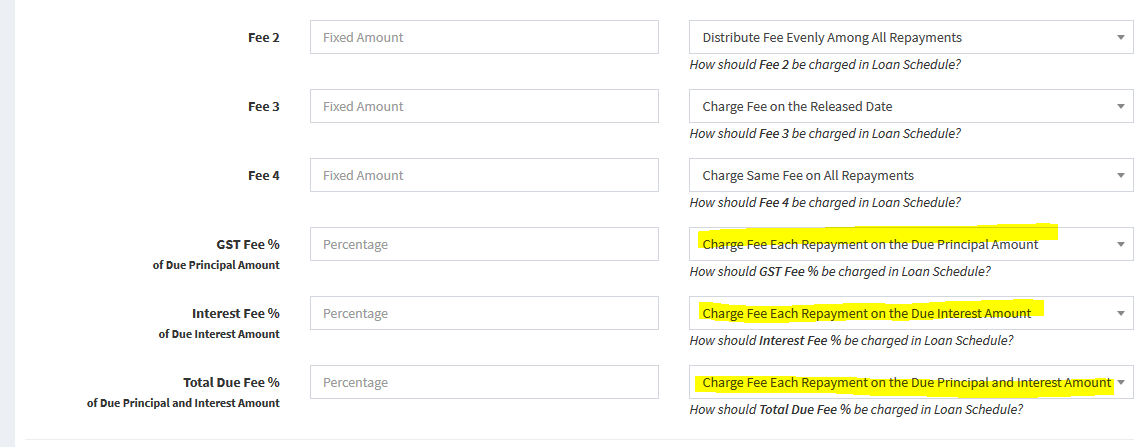
For example, let's see the following loan schedule:
Principal Interest GST Fee
X% of Due Principal AmountInterest Fee
X% of Due Interest AmountTotal Due Fee
X% of Due Principal and Interest Amount100 10 10 (10% of 100) 1 (10% of 10) 11 (10% of 110) 70 20 7 (10% of 70) 2 (10% of 20) 9 (10% of 90) 50 30 5 (10% of 50) 3 (10% of 30) 8 (10% of 80) Above, you can see how the fee is being calculated based on the dues of each repayment.
Savings Account: Place Lien
Let's assume you have multiple branches where borrowers can visit to withdraw money from their savings accounts. Suppose a borrower has a savings account with $10,000 balance and takes a loan from BranchA for $1,000. The branch manager of BranchA might want to place a restriction on the savings account to prevent the borrower from withdrawing more than $9,000 from the savings account. By using this feature, the branch manager can place a lien on the savings account for $1,000. This will prevent the borrower from withdrawing more than the $9,000 from any branch.
To do the above, please visit Savings(top menu) → View Savings Accounts → Pencil button. There click the Place Lien on Savings Account button to place the lien. In the above example, if you enter $1,000 as the lien amount, then the borrower's available balance will be $9000 ($10,000 - $1,000). This means that the borrower must maintain a minimum balance of $1000 at all times.
- 23 September 2018
Other Income for Loans
Previously the Other Income(top menu) feature didn't allow other income to be linked with loans. This made it difficult to capture income for loans that is not principal, interest, fees, or penalty. Now, you can link other income to loans and use this to record payments such as down payments, membership fees, and legal fees.
Please visit Loans(top menu) → View All Loans → Pencil button. There you will see the Other Income tab. You can click Add Other Income button to add income for the loan.
Another option is you can go straight to Other Income(top menu) → Add Other Income and select the loan in Link to Loan field.
Inter Branch Reports
In Reports(top menu), we have provided the option to select multiple branches. If you have many branches, it will save you time from having to switch between branches in order to view consolidated reports. Also, this will allow you to have 1 branch just for accounting purposes which you can give access to your accountant and bookkeeper to see all reports. Hence, they don't need access to other branches just to see reports.
Approve Savings Transactions for Staff
With this feature, you can restrict certain staff members so all savings transactions entered will be pending for approval. This will allow you to check for errors before transactions are applied to savings accounts. You can approve or delete the pending transactions.
To restrict a staff member so all transactions entered are sent for approval, please visit Admin(top menu) → Manage Staff → Staff → Add Staff or Edit. There in Restrict Add/Edit Savings Transactions for Approval, select Yes.
To approve or delete transactions entered by the above staff, please visit Savings Transactions(top menu) → Approve Transactions. There you can check the transactions, and click on Approve Transactions or Delete Transactions button.
Please note that staff members can not approve their own transactions. You may also want to remove access to the Approve Transactions page for staff that can only enter pending transactions. This can be done by visiting Admin(top menu) → Manage Staff → Staff → Staff Roles and Permissions → Set Permissions button. There, uncheck Approve Transactions and click Submit button below.
Missed Repayment Status
We have changed the way the Missed Repayment status is calculated. It should now be more accurate. For example take the following schedule:
- 10th January - Due $10. Total Pending Due $10.
- 20th January - Due $10. Total Pending Due $20.
- 30th January - Due $10. Total Pending Due $30.
Consider the following circumstances:- Today is 5th January:
- System will not mark this as Missed Repayment since the first installment date of 10th January has not been reached and the borrower still has time to pay. - Today is 19th January:
- If no payment has been received, it will be marked as Missed Repayment.
- If there is a part payment, it will go to Arrears. - Today is 22nd January:
- If there is no payment after 10th January (previous installment), it will be marked as Missed Repayment.
- If there is a part payment after 10th January, it will go to Arrears.
- If there is a payment of $10 ore less on 10th January or before, it will go to Missed Repayment. If the payment is more than $10 on 10th January or before, it will be marked as Arrears instead. This is because the total due on 22nd January is $20. Before that, total due is $10 on 10th January. Hence if you enter a payment of more than $10, it will be assumed that a part payment has been made for 20th January also. - Today is 30th January:
- System will mark this as Due Today since 30th January is also an installment date. Once we reach 31st January, then the system will consider the loan for Missed Repayment status.
View Borrowers: Total Paid and Open Loans Balance Columns
On the Borrowers(top menu) → View Borrowers page, you can now show the Total Paid and Open Loans Balance columns. If you don't see these columns, please visit Borrowers(top menu) → View Borrowers and click on Show/Hide Columns(top right of table) button and move the columns to the right box.
The Total Paid column shows the total amount paid by the borrower (not including deductable fees). The Open Loans Balance column shows the total balance of current open loans of the borrower.
Outstanding Charts on Home Page
On the Home Branch page, you will see the Total Outstanding Open Loans and Principal/Interest/Fees/Penalty Outstanding Open Loans charts.
Add Bulk Repayments, Add Bulk Transactions: Mobile Compatible
Previously the Add Bulk Repayments and Add Bulk Transactions pages were not mobile compatible. We have made some changes so the pages are easily viewable on mobiles and tablets. The table columns will stack vertically on small screens and horizontally on laptops and desktops.
Outstanding Report and Improved Reports
We have made some changes to Reports(top menu) to make them more accurate for different circumstances. Also, a new report has been added at Outstanding Report which shows the total outstanding amount on any given date.
Loan Product Name
You can now show loan product name in Collection Sheets(top menu).
Savings Transactions: Commissions
We have added one new type which you can select when adding a savings transaction. This is:
- Commissions: Debit the savings account. This is useful for adding any commissions on the savings account.
- 20 August 2018
Multiple Disbursements: Add Disbursement to Existing Loan
This feature will allow you to disburse funds multiple times in a loan. Sometimes, lending companies like to release funds to borrowers only when it is needed or based on a schedule or milestone. Previously, you would have to create a new loan each time you disburse. Now, you can add multiple disbursements on the same loan. Another way to think of this is having multiple loans in 1 loan. This is particularly useful for student loans where lending companies are disbursing cash each semester on the same loan.
You will see the Add Disbursement button in the Loan Schedule tab. Please visit Loans(top menu) → View All Loans → Pencil button. There on the View Loan Details page, please click on the Loan Schedule tab → Add Disbursement.
Staff Access to Branches
Now, you can give staff access to specific branches. Before this feature existed, staff either had access to all branches or no branches. With this feature, you can choose which branches the staff member can access.
To give staff access to branches, please visit Admin(top menu) → Manage Staff → Staff → Add Staff or Edit. There in Access to Branches, check the branches that the staff member can access.
After giving access above, the staff member can visit View Another Branch (top menu) and select the branch. The View Another Branch link will only be visible to the staff member if you have given access to more than 1 branch.
Approve Repayments for Staff
With this feature, you can restrict certain staff members so all repayments entered will be pending for approval. This will allow you to check for errors before payments are applied to loans. You can approve or delete the pending repayments.
To restrict a staff member so all payments entered are sent for approval, please visit Admin(top menu) → Manage Staff → Staff → Add Staff or Edit. There in Restrict Add/Edit Repayments for Approval, select Yes.
To approve or delete payments entered by the above staff, please visit Repayments(top menu) → Approve Repayments. There you can check the payments, and click on Approve Payments or Delete Payments button.
Please note that staff members can not approve their own payments. You may also want to remove access to the Approve Payments page for staff that can only enter pending repayments. This can be done by visiting Admin(top menu) → Manage Staff → Staff → Staff Roles and Permissions → Set Permissions button. There, uncheck Approve Repayments and click Submit button below.
Bulk Upload Savings Accounts via CSV file
To import savings accounts in bulk via a CSV file, please visit Admin(top menu) → Bulk Upload → Upload Savings Accounts from CSV file.
Savings Placeholders for SMS/Email
We have added new placeholders for SMS/Email for savings accounts. These include:
- {SavingsProduct} - This will be replaced with the Savings Product
- {SavingsAccountDesc} - This will be replaced with the description entered when adding the savings account
- {LastTransactionDesc} - This will be replaced with the description of the transaction that is being sent
New Loan Status: Not Taken Up
We have added a loan status: Not Taken Up. Suppose you have added a new loan and selected the Processing status. This means that the loan hasn't been released to the borrower. You then have 3 options:
- Open: You can edit the loan and select the Open status which means that the loan has been released to borrower.
- Denied: You have decided not to give the loan to borrower.
- Not Taken Up: The borrower has decided not to take the loan from you.
Please visit Loans(top menu) → View All Loans → Pencil button. There on the View Loan Details page, please click on the Loan Terms tab → Edit Loan. Below, you will see the Loan Status section where you can select the Not Taken Up loan status.
Borrower Statements/Schedules
You can bulk download all borrower statements, loan schedules, or loan statements for the branch that you are logged into by visiting Admin(top menu) → Borrowers → Download Statements/Schedules.
Savings Transactions: Transfer In/Transfer Out
We have added two new types which you can select when adding a savings transaction. These are:
- Transfer In: Credit the savings account.
- Transfer Out: Debit the savings account.
- 23 July 2018
Upload Files
We have changed the upload feature so now you have the option of dragging files from your computer and dropping them into the upload box. Other features include:
- Progress bar
- Upload any file type
- Upload speed increased by 5 times
- See thumbnail if upload file is an image
Custom Fields: Upload Files
You can now add a file upload box as a custom field. For exmaple, you may have documents that need to be uploaded but you want them to be properly categorized. To do this, visit Admin(top menu) → Settings → Custom Fields → Add Custom Field. There in Field Type, select File Upload.
SMS/Email: Instant Notifications
If you have setup Auto SMS or Auto Email, you now send instant notifications for the following categories:
- Loan Added In System
- Add Repayment Confirmation
- Add Savings Transaction Confirmation
- Loan Fully Paid Confirmation
For example, if you have setup Add Repayment Confirmation, when you enter a payment on Loandisk, a SMS and/or Email will be immediatley sent to the customer.
To do this for SMS, visit Admin(top menu) → SMS Settings → Auto Send SMS. For email, visit Admin(top menu) → Email Settings → Auto Send Emails. There, click Edit button for one of the above categories. You need to make sure you select Same Day in Send Email/SMS dropdown. This will cause the SMS/Email to be immediately sent to the customer. Also, please remember to click on the Activate Category button.
Loan Report
We have added a Loan Report in the Reports section which shows the due amounts, payments received, and net due for all loans. You can also do a range search. Please visit Reports(top menu) → Loan Report.
New Loan Status: Arrears
We have added a new loan status: Arrears. When a loan is added fresh into the system, it becomes Open. Now, let's assume that loan is due on 22nd July for $100 and today is 23rd July but no payment has been received. In this case, it becomes Missed Repayment. Then let's say you manage to get part payment of $10. In this case, loan status will be changed from Missed Repayment to Arrears.
You can track these loans by visiting Loans(top menu) → Loans in Arrears.
Repayments Chart
Some minor changes have been made to the Repayments Chart page. There, you can see the total collections, last 7 days, last 30 days, and all time. Please visit Repayments(top menu) → Repayments Charts
Placeholders in Email Subject field
Before, you could only put placeholders in the email message. Now you can also put placeholders in the subject field and it will be replaced by the data from the system.
Loan Comments: View All
To see all comments made, please visit Loans(top menu) → Loan Comments.
Add Loan: Override Each Repayment Amount to
When adding a loan, you can now use the Override Each Repayment Amount to field for any interest method. Before, it was only available for Flat Rate interest method. To use this, please visit Loans(top menu) → Add Loan. There in Advance Settings, you can put an amount in the Override Each Repayment Amount to field.
Loan Calculator: Select Product
In the Loan Calculator, we have added option to select loan products which will save you time from entering the fields each time. To use this, please visit Loans(top menu) → Loan Calculator.
Collateral: Serial Number not unique
We have removed the restriction of serial numbers being unique when adding a new collateral.
Transfer Collateral to another Loan
You can transfer collateral to another loan easily with this feature. For example, if the borrower takes a new loan with the same collateral, you can use this feature to quickly transfer collateral to the new loan.
To use this, please visit Collateral Register(top menu) → Pencil Button. There, click on the Loan Collateral tab → Transfer to Another Loan button.
Collection Sheets: Show Savings Balance and Borrower Create Date
You can show the Borrower Create Date and Savings Balance columns in the collection sheets. To use this, please visit Collection Sheets(top menu). There you can tick the Borrower Create Date and Savings Balance checkboxes.
Loan Schedule: Principal Due and Fixed Header
In the Loan Schedule, the Principal Due column has been added which shows the principal due until a particular collection date. Also, the top header row in the Loan Schedule tab is now fixed so if you have a long schedule, you will see the top row at all times.
To see this, please visit any loan and then click on the Loan Schedule tab.
Borrower Credit Score
In Add Borrower, you can now type the credit score of the borrower. This will then show in the borrower strip that is visible on the top when you are viewing a particular borrower. Also, you can select this column in Borrowers(top menu) → View Borrowers → Show/Hide Columns.
To use this, please visit Borrowers(top menu) → Add Borrower. There you will see the Credit Score field.
Calendar Fix
In Calendar (top menu), we have made some changes so you will only see loans that have a pending due of more than 0 until a certain date. Also, only the expiry of open loans will be shown. If a loan is fully paid, it will not be shown.